Manage form lifecycle
Hook into the form's lifecycle events to customize user input before submission, run validations, or handle errors.
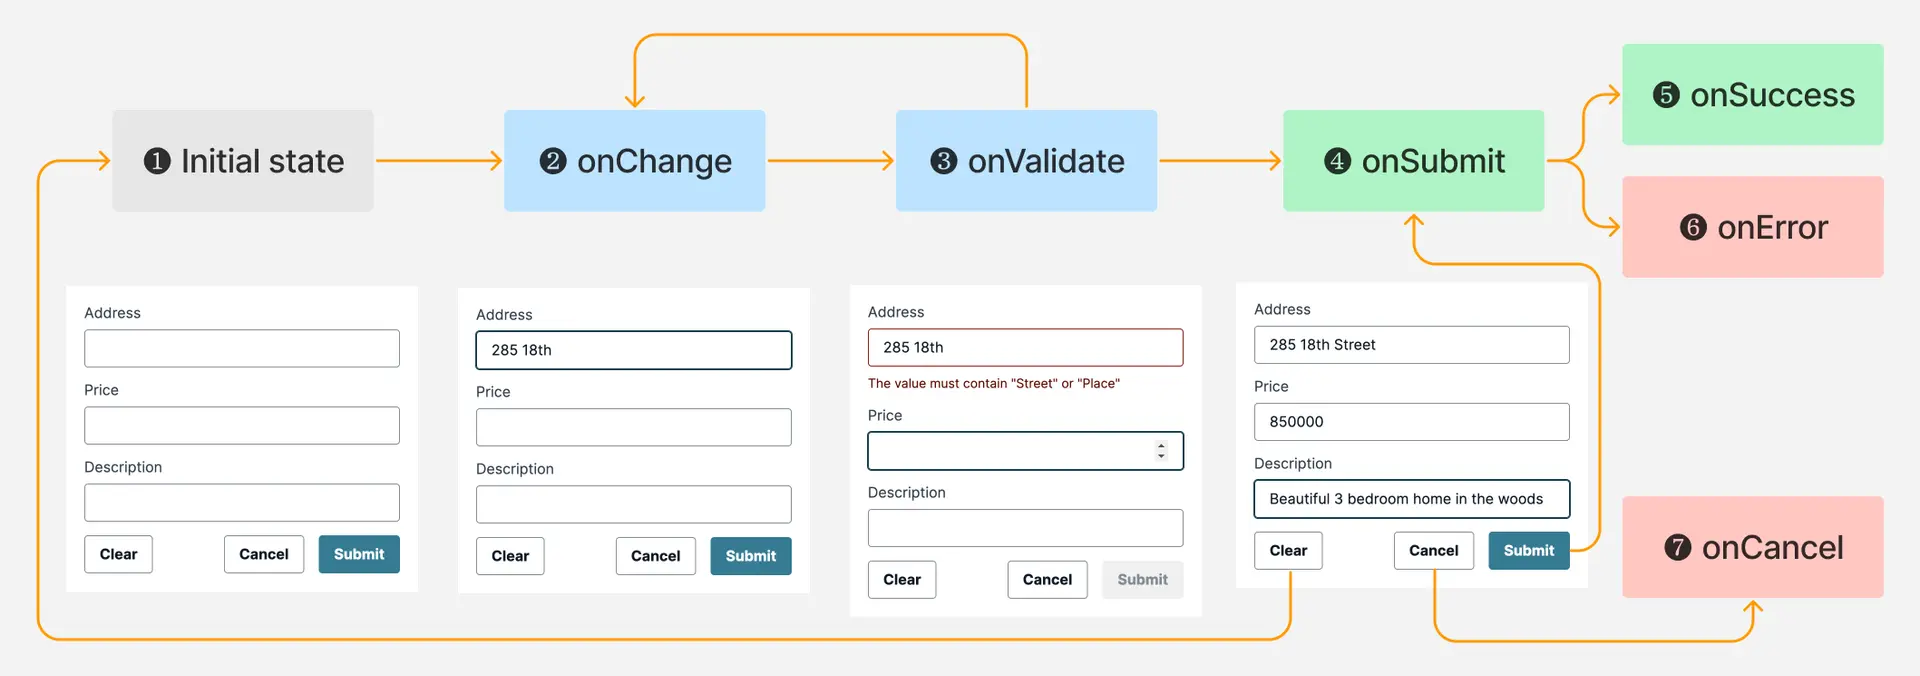
- Initial state - The inputs are either empty or pre-populated based on a default value provided by you.
Use case: If your user clicks on the Clear or Reset button, they'll be brought back to this state.
onChange- Event when form data is changed by the user.
Use case: Use this to get the form data after every user input.
onValidate- Event hook for custom validations. This event triggers afteronChange.
Use case: Use this to extend validation rules via code. onValidate also supports asynchronous validation rules, which enable you to validate the form input against external APIs.
onSubmit- Event when your user clicks the Submit button.
Use case: If your form is not connected to a data model, use set this event handler to retrieve the form data. If your form is connected to a data model, use this to customize the provided form data before they are saved to the cloud.
onSuccess- Event when saving form data to the cloud succeeds.
Use case: Use this to dismiss the form or reroute your user after a successful form submission. Only use this if your form is connected to a data model.
onError- Event when saving form data to the cloud fails.
Use case: Use this to log the error and investigate further if your validation rules need to be enhanced to catch input formatting issues. Only use this if your form is connected to a data model.
onCancel- Event when your user clicks on the Cancel button.
Use case: Use this to dismiss the form without saving the form data.
Get form data as your user inputs data - onChange
In some cases, you want to get the form data in real-time as the user is filling the form. The onChange event provides you the form data in the fields parameter.
import { useState } from 'react'import { HomeCreateForm } from './ui-components'
function App() {  const [formData, setFormData] = useState()
  return (    <HomeCreateForm onChange={fields => setFormData(fields)}/>  )}
Extend validation rules in code - onValidate
With the onValidate event, you can extend the validation rules in code. Learn more about How to add validation rules.
Handle form data submissions - onSubmit
onSubmit should be your default way to handle form submission. It is triggered every time the user clicks on the Submit action button.
You can use the onSubmit handler to customize the form data before they are saved to the cloud. The form data that's returned from the onSubmit handler will be saved to the cloud.
For example, if you want to trim all the string data before saving it:
<HomeCreateForm onSubmit={(fields) => { const updatedFields = {} Object.keys(fields).forEach(key => { if (typeof fields[key] === 'string') { updatedFields[key] = fields[key].trim() } else { updatedFields[key] = fields[key] } }) return updatedFields }}/>Handle form data successfully saving to the cloud - onSuccess
You can use the onSuccess handler to take an action after the form data has been successfully submitted. The example below hides the form after it has been successfully submitted.
import { useState } from 'react'import { HomeCreateForm } from './ui-components'
function App() {  const [showForm, setShowForm] = useState(true)
  return (    {showForm &&      <HomeCreateForm onSuccess={() => {        setShowForm(false) // Hide the form      }}/>}  )}
Handle form submission errors - onError
You might encounter additional errors during the submit process. You can log these errors and present an alert to customers by using the onError handler.
import { HomeCreateForm } from './ui-components'
function App() {  return (    <HomeCreateForm onError={(error) => {      console.log(error)    }}/>  )}
Handle user clicking on Cancel action button - onCancel
If the user clicks on the Cancel action button, you can use the onCancel event to hide the form or route the customer to another page.
import { useState } from 'react'import { HomeCreateForm } from './ui-components'
function App() {  const [showForm, setShowForm] = useState(true)
  return (    {showForm &&      <HomeCreateForm onCancel={() => {        setShowForm(false) // Hide the form      }}/>}  )}