Configure AWS for local development
This guide will help you set up Temporary credentials with IAM Identity Center and AWS Organizations, which will enable you to define Single-sign on (SSO), users, groups, permission sets, and more for your team. AWS Organizations can grow to house multiple AWS accounts. Users within the organization can traverse the AWS account(s) as their permission set allows.
Amplify leverages the standard local credentials chain provider to simplify access to AWS services. While this guide highlights IAM Identity Center, you can explore additional methods for authenticating with AWS locally.
IAM Identity Center terminology
IAM Identity Center enables users to sign in using a single user identity to access all their assigned AWS accounts, business applications, and custom applications in the AWS Cloud. This single sign-on capability reduces the complexity of managing multiple credentials and improves security by centralizing user authentication.
Users
Users refers to the location where user identities and group information are stored and managed. IAM Identity Center can integrate with external identity sources like Microsoft Active Directory or use a built-in identity store provided by AWS.
Permission Set
A collection of permissions that can be assigned to users or groups. Permission sets define what actions users are allowed to perform in your AWS accounts. They are similar to IAM policies but are used within the context of IAM Identity Center to manage access across multiple accounts.
AWS Organization
AWS Organizations and IAM Identity Center work together to streamline management across multiple AWS accounts. AWS Organizations manages account structures and policies, while IAM Identity Center integrates with it to enable single sign-on and align permissions with organizational roles. This synergy ensures secure and consistent access control, simplifying user and permission management.
Local Profiles
Credentials are typically resolved through the use of AWS profiles. Profiles can contain permanent credentials or SSO metadata, and can be set for use with Amplify by using the same techniques as the AWS CLI:
- with the
--profileflag - with the
AWS_PROFILEenvironment variable
Temporary credentials
An alternative to permanent credentials, enable you to define permissions for a session. Sessions are created when you assume an IAM role or sign in using AWS IAM Identity Center. These sessions come with an additional "session token" that is used to validate the temporary credentials and must be included on requests to AWS. As you are working locally, this will be presented as an additional environment variable.
You can use temporary security credentials to make programmatic requests for AWS resources using the AWS CLI or AWS API (through the AWS SDKs). The temporary credentials provide the same permissions as long-term security credentials, such as IAM user credentials. However, there are a few differences, which are covered in the AWS Identity and Access Management documentation.
Set up Identity Center
Follow the steps below if you have never set up AWS profiles before.
If you already have a profile, attach the AmplifyBackendDeployFullAccess managed policy to your IAM user.
1. Create user with Amplify permissions
Sign in to the AWS Console to access IAM Identity Center page and choose Enable.
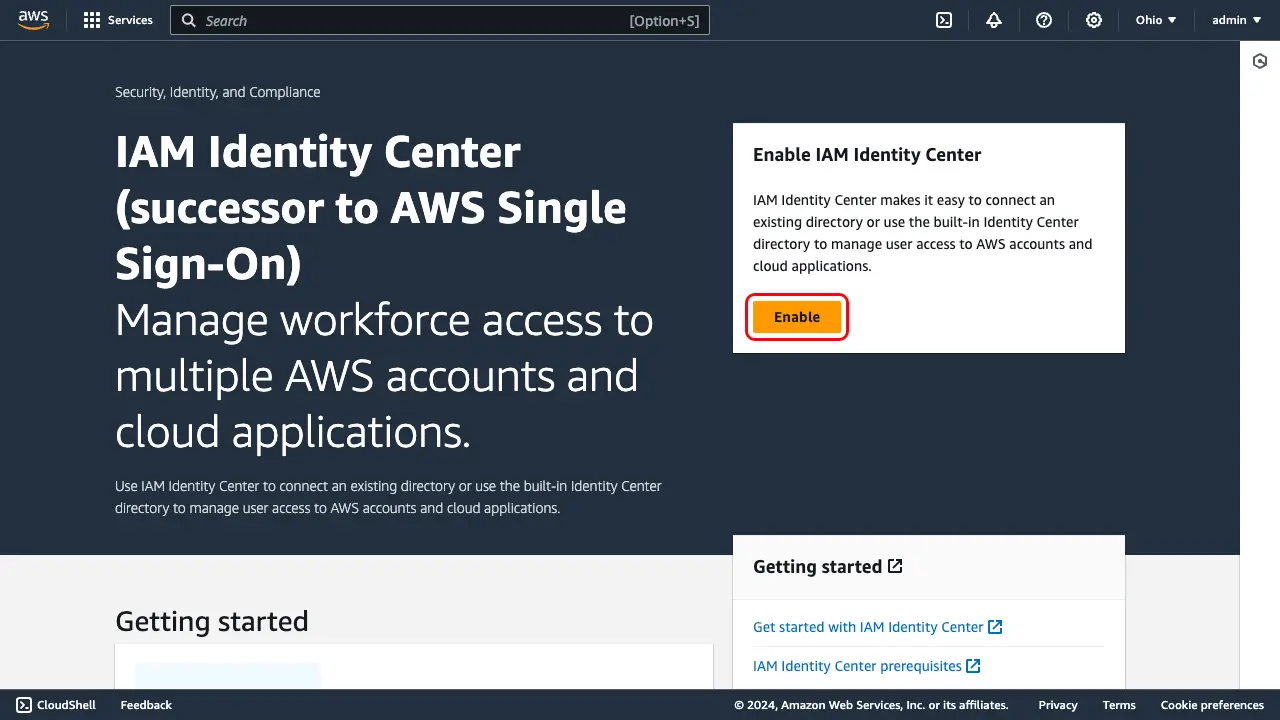
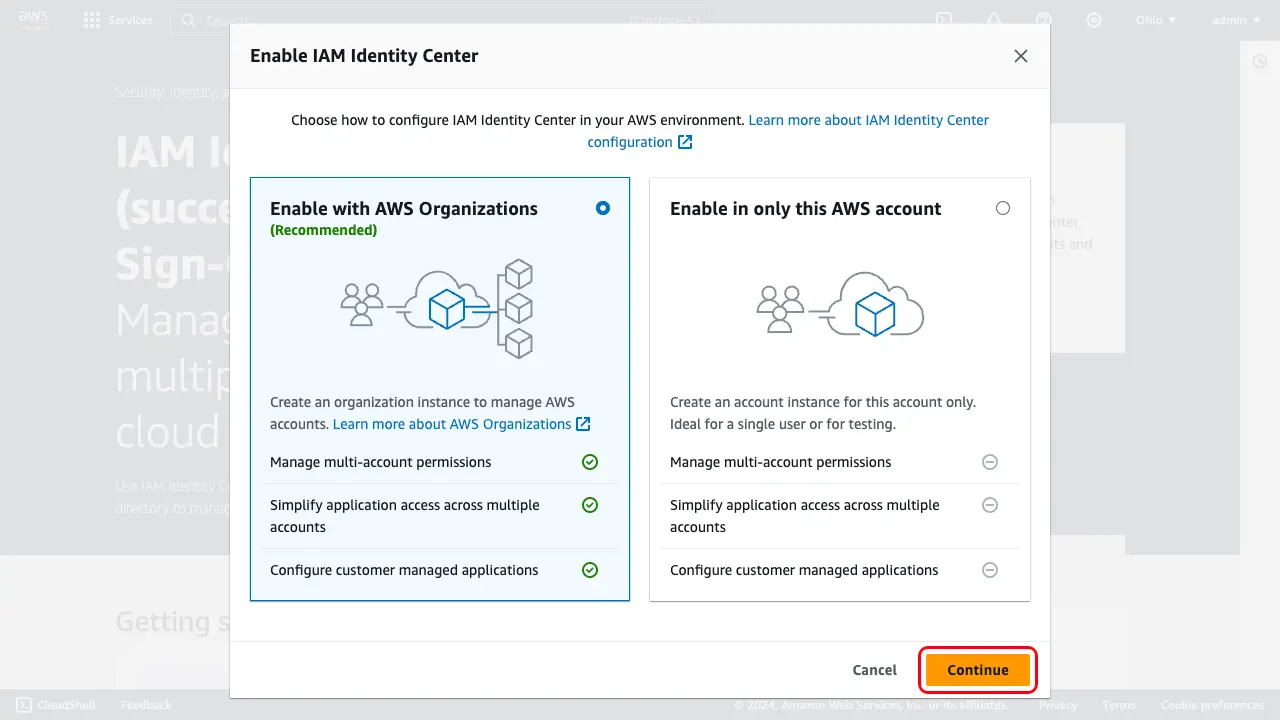
A dialog will open, prompting you to "Choose how to configure IAM Identity Center in your AWS environment." Select Enable with AWS Organizations and choose Continue.
Next, we are going to automate a number of steps that simulate the operations of setting up a user in the IAM Identity Center console. To get started open CloudShell, located in the console footer.
Paste the following command in the CloudShell terminal and enter an email address you would like to associate with this AWS account:
read -p "Enter email address: " user_email # hit enterEnter email address: <your-email-address>Now, run the following command
response=$(aws sso-admin list-instances)ssoId=$(echo $response | jq '.Instances[0].IdentityStoreId' -r)ssoArn=$(echo $response | jq '.Instances[0].InstanceArn' -r)email_json=$(jq -n --arg email "$user_email" '{"Type":"Work","Value":$email}')response=$(aws identitystore create-user --identity-store-id $ssoId --user-name amplify-admin --display-name 'Amplify Admin' --name Formatted=string,FamilyName=Admin,GivenName=Amplify --emails "$email_json")userId=$(echo $response | jq '.UserId' -r)response=$(aws sso-admin create-permission-set --name amplify-policy --instance-arn=$ssoArn --session-duration PT12H)permissionSetArn=$(echo $response | jq '.PermissionSet.PermissionSetArn' -r)aws sso-admin attach-managed-policy-to-permission-set --instance-arn $ssoArn --permission-set-arn $permissionSetArn --managed-policy-arn arn:aws:iam::aws:policy/service-role/AmplifyBackendDeployFullAccessaccountId=$(aws sts get-caller-identity | jq '.Account' -r)aws sso-admin create-account-assignment --instance-arn $ssoArn --target-id $accountId --target-type AWS_ACCOUNT --permission-set-arn $permissionSetArn --principal-type USER --principal-id $userId# Hit enterTo validate that this worked, run the following command in the CloudShell. If something failed in this process, please report an issue. Keep this information readily available for the next step.
printf "\n\nStart session url: https://$ssoId.awsapps.com/start\nRegion: $AWS_REGION\nUsername: amplify-admin\n\n"
# you should seeStart session url: https://d-XXXXXXXXXX.awsapps.com/startRegion: us-east-1Username: amplify-adminA step-by-step walkthrough in the consolePrefer a manual set up?
-
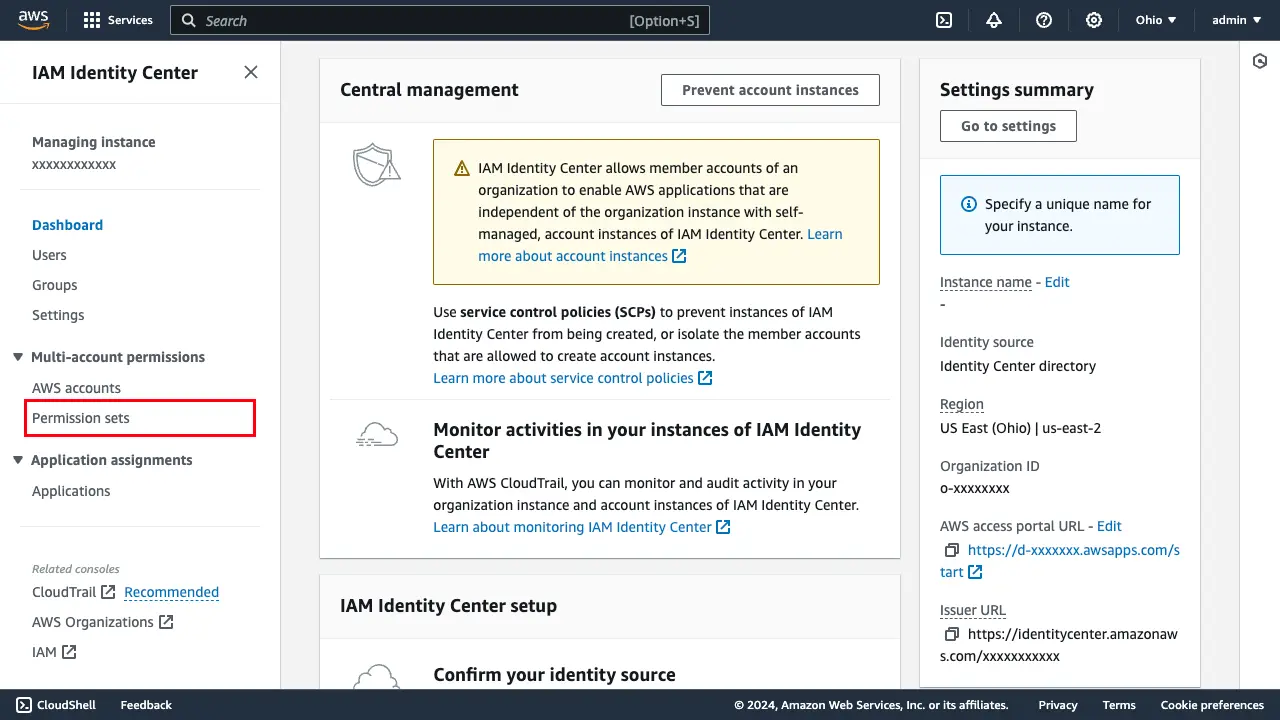
After the AWS Organization is created and IAM Identity Center is enabled, you are presented with a dashboard. In the navigation pane, select Permission sets.
-
Select Create permission set.
-
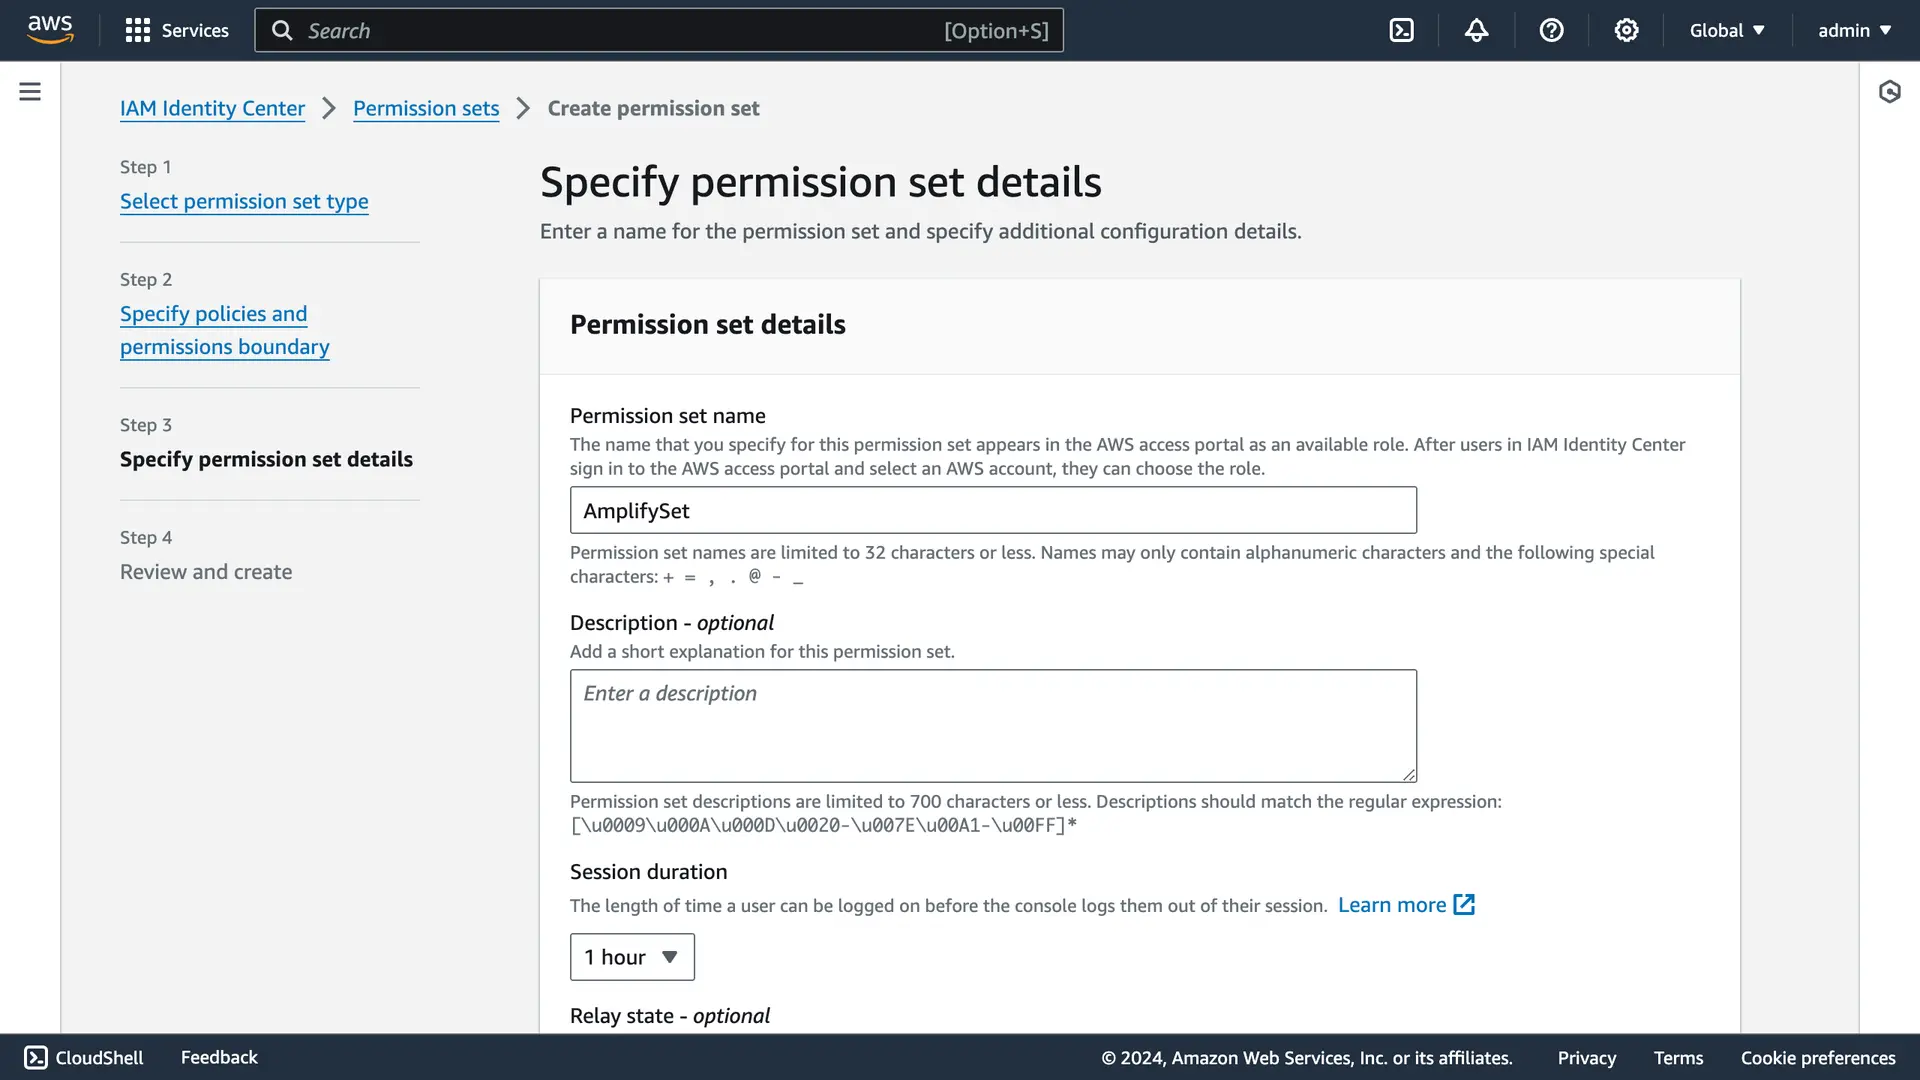
When prompted for the permission set type, choose Custom permission set. Then choose Next. Expand AWS Managed Policies (set) and search for amplify. Select AmplifyBackendDeployFullAccess and choose Next.

-
Name the permission set amplify-policy and optionally change the session duration. Choose Next.
-
Review the permission set and choose Create.
-
Once the permission set is created, you will return to the IAM Identity Center dashboard. You are now ready to create your first user. Using the navigation pane, select Users.
-
Enter the user details, then choose Next.
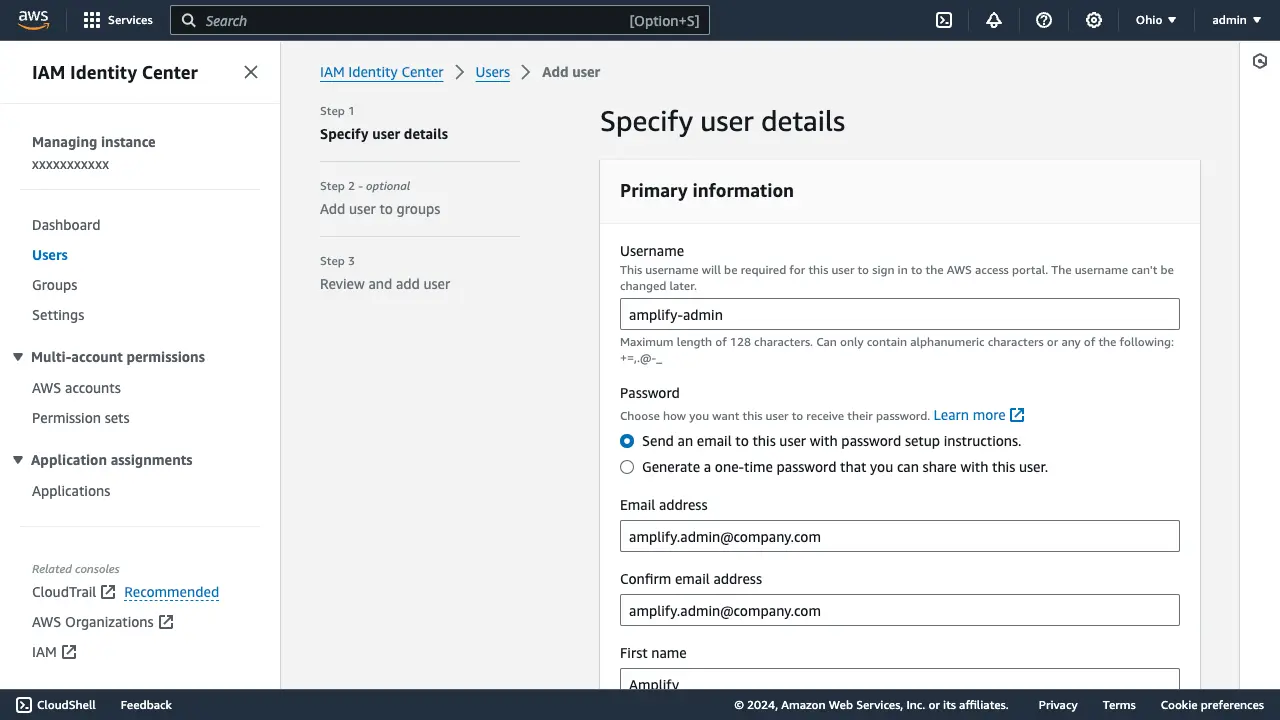
-
Optionally create and add the user to a group, and choose Next.
-
Review the user information and select Add user. The user will then need to verify their email using the email specified during user creation.
-
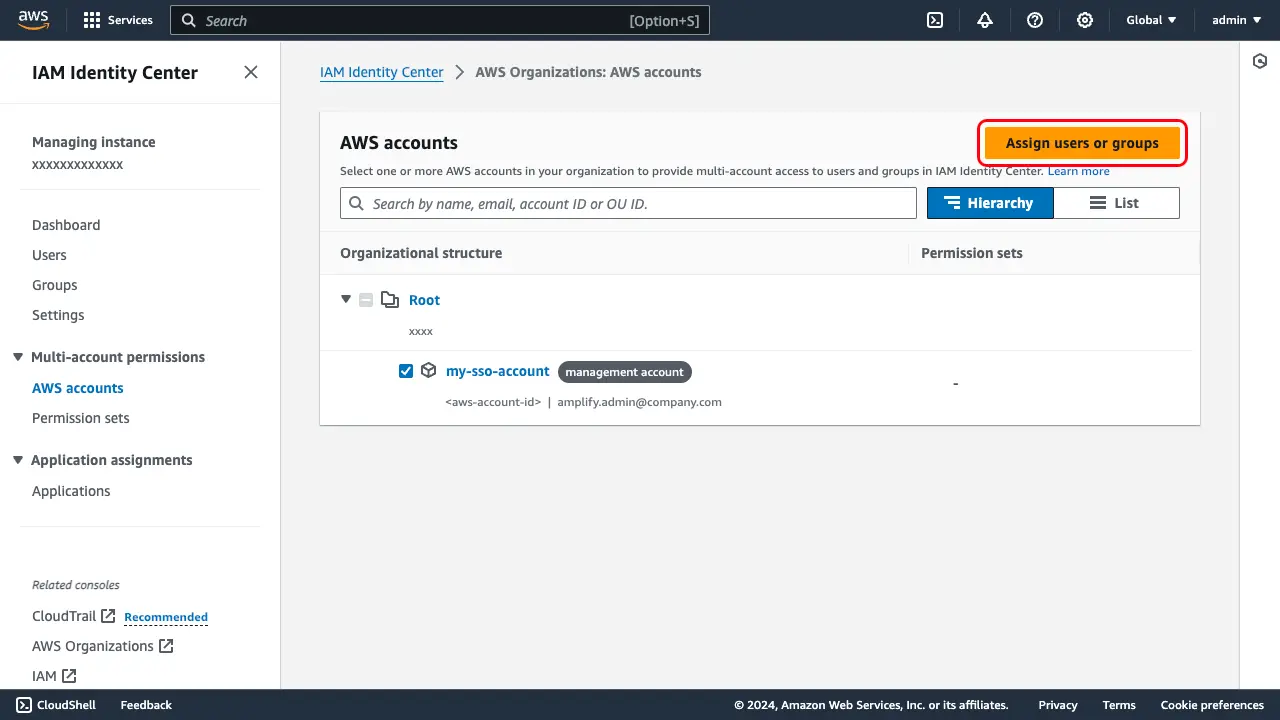
Once the new user is created, you will return to the IAM Identity Center dashboard. The next step is to grant the user access to an AWS account. For this demo, we will use the AWS account we used to create the Organization, but you can create a new AWS account under your organization for use with Amplify. Select the checkbox next to the management account and choose Assign users or groups.
-
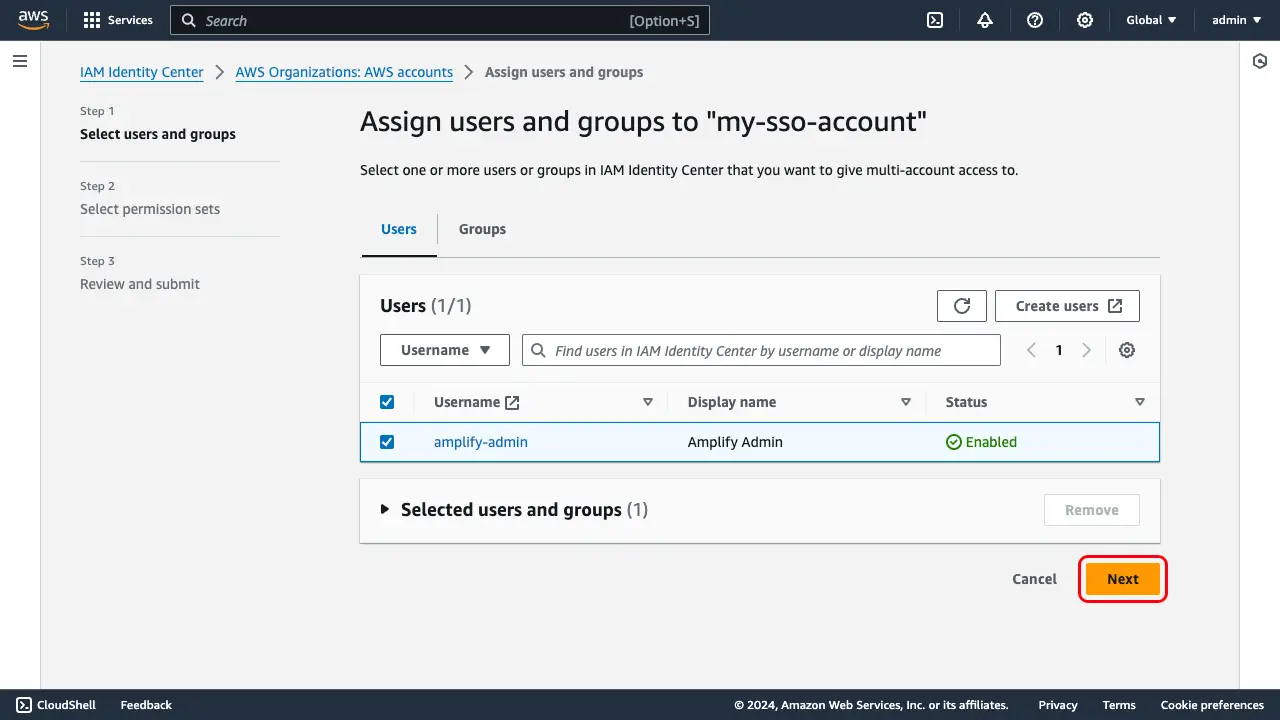
When prompted to assign a user or group, select the Users tab, select the user created in step 13, and choose Next.
-
Assign the permission set created in step 9 and choose Next.
-
Review the assignment information and choose Submit.
-
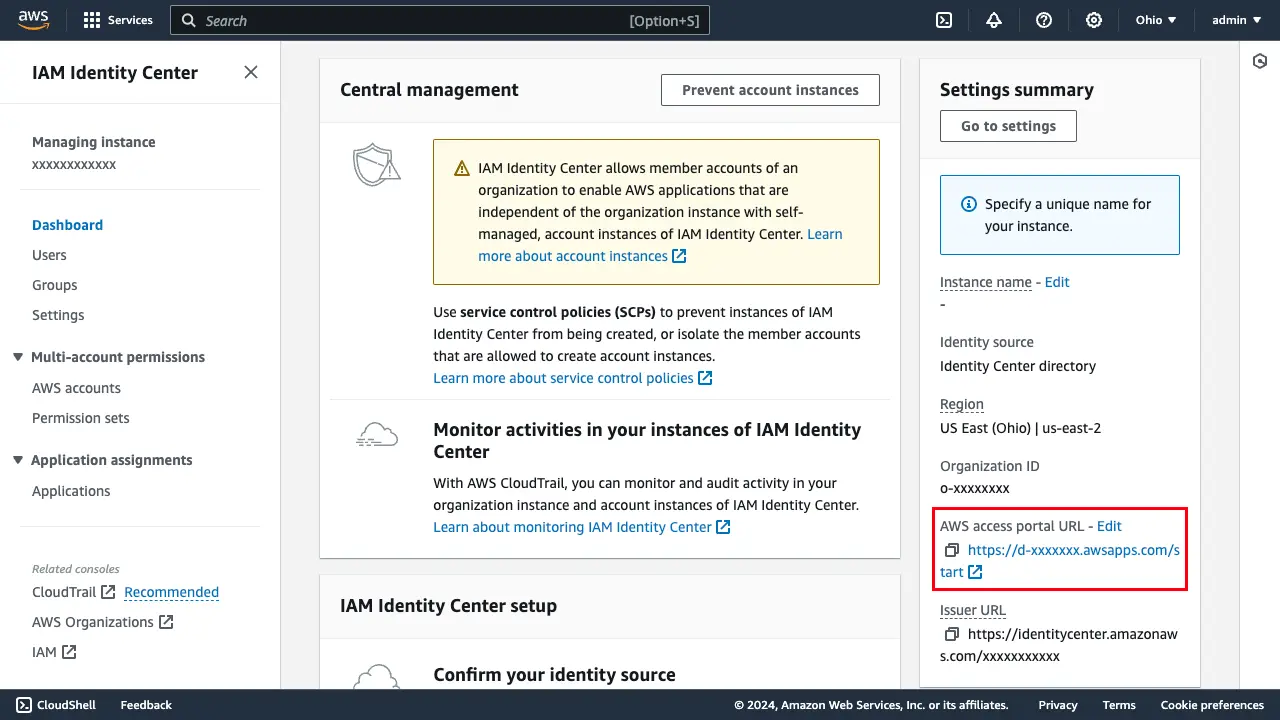
Now you are ready to sign in to the access portal. Navigate back to the IAM Identity Center dashboard. Within the Settings summary pane, copy the URL for your AWS access portal URL.
-
Navigate to the copied URL and sign in as your user, amplify-admin. After signing in, you should have access to an AWS account.
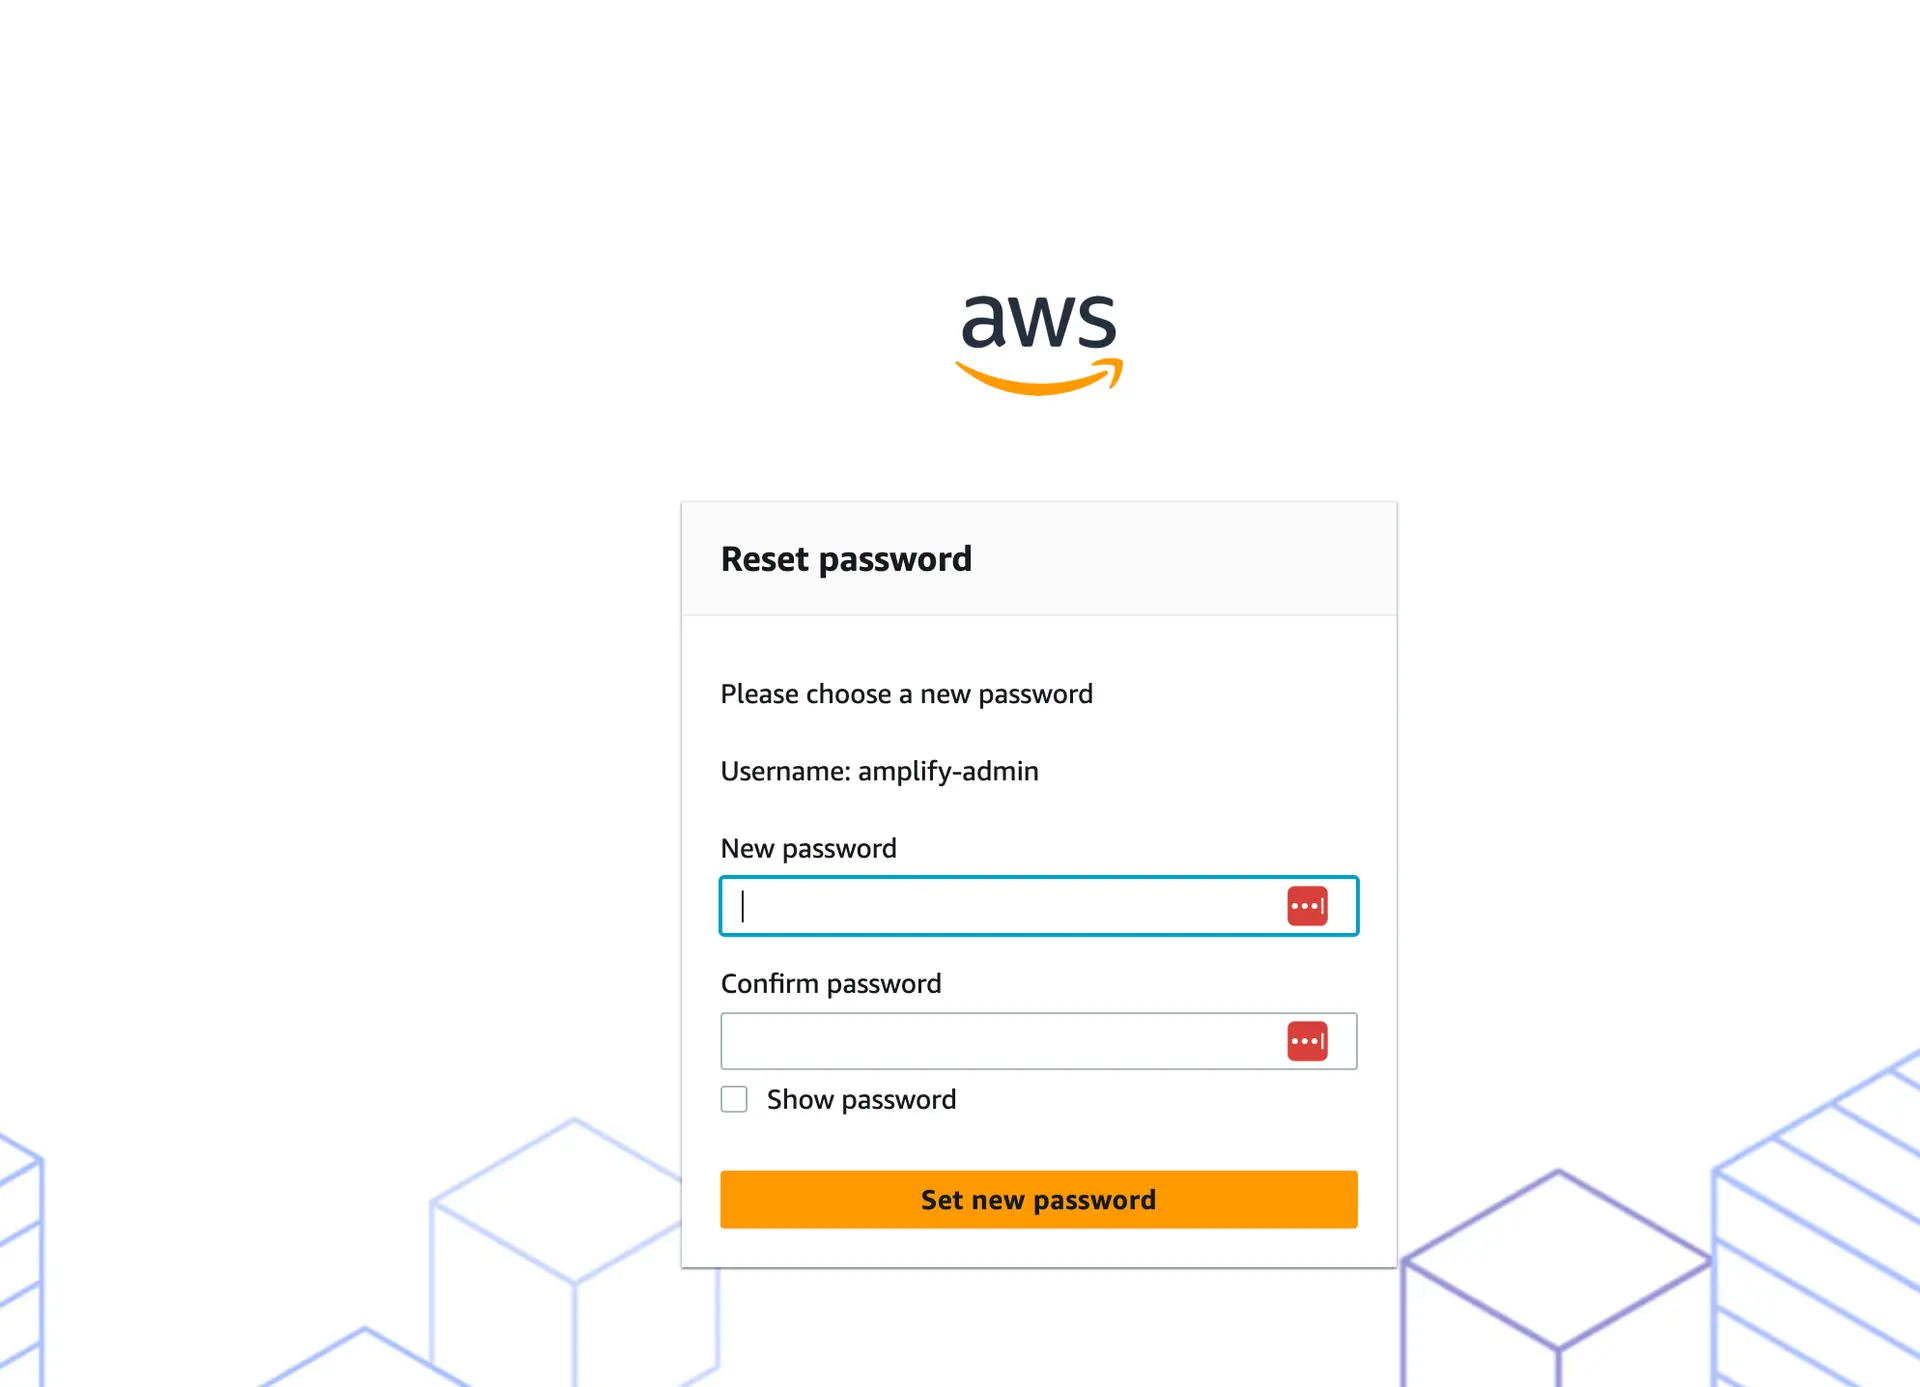
2. Create password for user
Now create a password for the user that we need for the next step. In the IdC console, navigate to Users > amplify_admin > Reset password > Send an email to the user with instructions for resetting the password.
Check your email (make sure you also check your spam folder). Click on the Reset password link and choose a password of your choice. When signing in make sure to use amplify-admin as the Username.
Finish local setup
Now, set up an AWS profile that is linked to the user you just created on your local machine. There are a few options for getting IAM Identity Center user credentials, but we will use the AWS CLI configuration wizard.
3. Install the AWS CLI
Install the AWS CLI.
In your browser, download the macOS pkg file:
In your browser, Download and run the AWS CLI MSI installer for Windows (64-bit):
curl "https://awscli.amazonaws.com/awscli-exe-linux-x86_64.zip" -o "awscliv2.zip"unzip awscliv2.zip./aws/install -i /usr/local/aws-cli -b /usr/local/bin4. Set up local AWS profile
Open your terminal, you are ready to configure an AWS profile that uses the SSO user. Use the information from CloudShell to populate the information below.
aws configure sso
| SSO session name (Recommended): amplify-admin| SSO start URL: <START SESSION URL>| SSO region: <your-region>| SSO registration scopes [sso:account:access]: <leave blank>| Attempting to automatically open the SSO authorization page in your default browser.| If the browser does not open or you wish to use a different device to authorize this request, open the following URL:|| https://device.sso.us-east-2.amazonaws.com/|| Then enter the code:|| SOME-CODE
## browser opensAfter you provide this information, the browser will automatically open asking you to sign in with the username and password you just created and configure a multi-factor device to authenticate.
Now return to the terminal and enter the following information:
The only AWS account available to you is: <your-aws-account-id>Using the account ID <your-aws-account-id>The only role available to you is: amplify-policyUsing the role name "amplify-policy"CLI default client Region [us-east-1]: <your-region>CLI default output format [None]:Make sure to set the profile name to default. Alternatively, remember the auto-generated profile name; you will need this later.
CLI profile name [amplify-policy-<your-aws-account-id>]: defaultTo use this profile, specify the profile name using --profile, as shown:
aws s3 ls --profile default
If you inspect ~/.aws/config, you should now see the SSO profile:
[profile default]sso_session = amplify-adminsso_account_id = <your-aws-account-id>sso_role_name = AdministratorAccessregion = <your-region>[sso-session amplify-admin]sso_start_url = https://xxxxxx.awsapps.com/start#sso_region = <your-region>sso_registration_scopes = sso:account:access5. Bootstrap your AWS account
Now you are ready to use this AWS profile with AWS Amplify. Open your Amplify project and start the sandbox. If you have multiple local profiles or named your profile something other than default, you can specify a profile with --profile.
npx ampx sandbox
# OR
npx ampx sandbox --profile <profile-name>Before you can start deploying resources in the cloud sandbox environment, Amplify will need to complete a one-time bootstrap setup for the account and AWS Region before it can start deploying resources.
Learn moreWhat is bootstrapping?
Bootstrapping is the process of provisioning resources for the AWS CDK before you can deploy AWS CDK apps into an AWS environment. These resources include an Amazon S3 bucket for storing files and IAM roles that grant permissions needed to perform deployments. The required resources are defined in an AWS CloudFormation stack, called the bootstrap stack, which is usually named CDKToolkit. Like any AWS CloudFormation stack, it appears in the AWS CloudFormation console once it is deployed. You can learn more about this process in the CDK documentation.
npx ampx sandbox --profile amplify-adminThe region us-east-1 has not been bootstrapped. Sign in to the AWS console as a Root user or Admin to complete the bootstrap process, then restart the sandbox.If this is not the region you are expecting to bootstrap, check for any AWS environment variables that may be set in your shell or use --profile <profile-name> to specify a profile with the correct region.During the first-time setup, npx ampx sandbox will ask you to sign in to the AWS Management Console. You must sign in as the account root user or as a user that has AdministratorAccess permissions. Once signed in, you will be redirected to the Amplify console. On the Create new app page, choose Initialize setup now. It may take a few minutes for the bootstrapping process to complete.

Success
You have successfully completed the bootstrapping process and you can now return to the terminal to create a new Amplify sandbox environment:
npx ampx sandbox --profile <value>