Use Amplify Storage with any S3 bucket
With Amplify Storage APIs, you can use your own S3 buckets instead of the Amplify-created ones.
Use storage resources with an Amplify backend
Add necessary permissions to the S3 bucket
For the specific Amazon S3 bucket that you want to use with these APIs, you need to make sure that the associated IAM role has the necessary permissions to read and write data to that bucket.
To do this, go to Amazon S3 console > Select the S3 bucket > Permissions > Edit Bucket Policy.
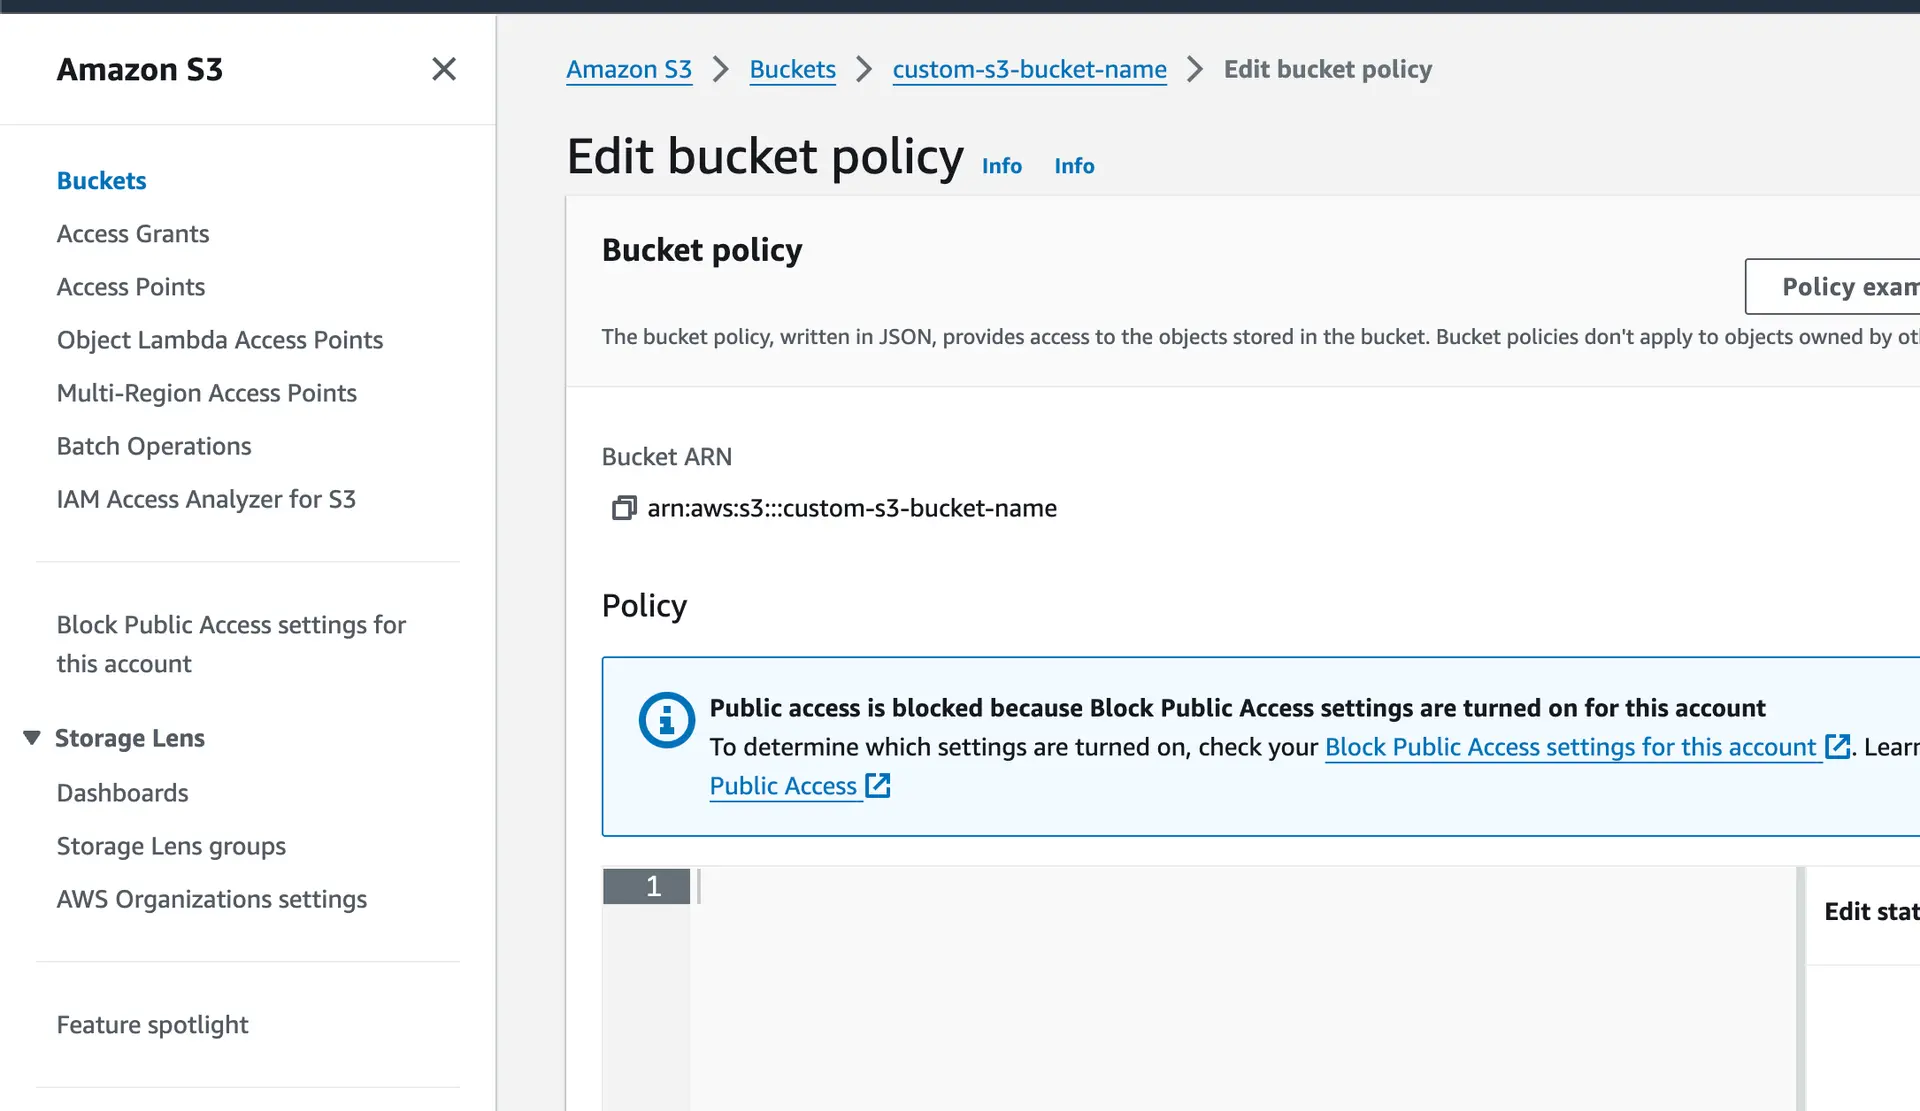
The policy will look something like this:
{ "Version": "2012-10-17", "Statement": [ { "Sid": "Statement1", "Principal": { "AWS": "arn:aws:iam::<AWS-account-ID>:role/<role-name>" }, "Effect": "Allow", "Action": [ "s3:PutObject", "s3:GetObject", "s3:DeleteObject", "s3:ListBucket" ], "Resource": [ "arn:aws:s3:::<bucket-name>", "arn:aws:s3:::<bucket-name>/*" ] } ]}Replace <AWS-account-ID> with your AWS account ID and <role-name> with the IAM role associated with your Amplify Auth setup. Replace <bucket-name> with the S3 bucket name.
You can refer to Amazon S3's Policies and Permissions documentation for more ways to customize access to the bucket.
Specify the S3 bucket in Amplify's backend config
Next, use the addOutput method from the backend definition object to define a custom S3 bucket by specifying the name and region of the bucket in your amplify/backend.ts file. You must also set up the appropriate resources and IAM policies to be attached to the backend.
Configure the S3 bucket
Below are several examples of configuring the backend to define a custom S3 bucket:
Below is an example of expanding the original backend object to grant all guest (i.e. not signed in) users read access to files under public/:
import { defineBackend } from "@aws-amplify/backend";import { Effect, Policy, PolicyStatement } from "aws-cdk-lib/aws-iam";import { Bucket } from "aws-cdk-lib/aws-s3";import { auth } from "./auth/resource";
const backend = defineBackend({ auth,});const customBucketStack = backend.createStack("custom-bucket-stack");
// Import existing bucketconst customBucket = Bucket.fromBucketAttributes(customBucketStack, "MyCustomBucket", { bucketArn: "arn:aws:s3:::<bucket-name>", region: "<region>"});
backend.addOutput({ storage: { aws_region: customBucket.env.region, bucket_name: customBucket.bucketName, // optional: `buckets` can be used when setting up more than one existing bucket buckets: [ { aws_region: customBucket.env.region, bucket_name: customBucket.bucketName, name: customBucket.bucketName, /* optional: `paths` can be used to set up access to specific bucket prefixes and configure user access types to them */ paths: { "public/*": { // "write" and "delete" can also be added depending on your use case guest: ["get", "list"], }, }, } ] },});
/* Define an inline policy to attach to Amplify's unauth role This policy defines how unauthenticated/guest users can access your existing bucket*/ const unauthPolicy = new Policy(backend.stack, "customBucketUnauthPolicy", { statements: [ new PolicyStatement({ effect: Effect.ALLOW, actions: ["s3:GetObject"], resources: [`${customBucket.bucketArn}/public/*`], }), new PolicyStatement({ effect: Effect.ALLOW, actions: ["s3:ListBucket"], resources: [ `${customBucket.bucketArn}`, `${customBucket.bucketArn}/*` ], conditions: { StringLike: { "s3:prefix": ["public/", "public/*"], }, }, }), ],});
// Add the policies to the unauthenticated user rolebackend.auth.resources.unauthenticatedUserIamRole.attachInlinePolicy( unauthPolicy,);Below is an example of expanding the original backend object to grant all authenticated (i.e. signed in) users with full access to files under public/:
import { defineBackend } from "@aws-amplify/backend";import { Effect, Policy, PolicyStatement } from "aws-cdk-lib/aws-iam";import { Bucket } from "aws-cdk-lib/aws-s3";import { auth } from "./auth/resource";
const backend = defineBackend({ auth,});
const customBucketStack = backend.createStack("custom-bucket-stack");
// Import existing bucketconst customBucket = Bucket.fromBucketAttributes(customBucketStack, "MyCustomBucket", { bucketArn: "arn:aws:s3:::<bucket-name>", region: "<region>"});
backend.addOutput({ storage: { aws_region: customBucket.env.region, bucket_name: customBucket.bucketName, buckets: [ { aws_region: customBucket.env.region, bucket_name: customBucket.bucketName, name: customBucket.bucketName, paths: { "public/*": { guest: ["get", "list"], authenticated: ["get", "list", "write", "delete"], }, }, } ] },});
// ... Unauthenticated/guest user policies and role attachments go here .../* Define an inline policy to attach to Amplify's auth role This policy defines how authenticated users can access your existing bucket*/ const authPolicy = new Policy(backend.stack, "customBucketAuthPolicy", { statements: [ new PolicyStatement({ effect: Effect.ALLOW, actions: [ "s3:GetObject", "s3:PutObject", "s3:DeleteObject" ], resources: [`${customBucket.bucketArn}/public/*`,], }), new PolicyStatement({ effect: Effect.ALLOW, actions: ["s3:ListBucket"], resources: [ `${customBucket.bucketArn}`, `${customBucket.bucketArn}/*` ], conditions: { StringLike: { "s3:prefix": ["public/*", "public/"], }, }, }), ],});
// Add the policies to the authenticated user rolebackend.auth.resources.authenticatedUserIamRole.attachInlinePolicy(authPolicy);Below is an example of expanding the original backend object with user group permissions. Here, any authenticated users can read from admin/ and public/ and authenticated users belonging to the "admin" user group can only manage admin/:
import { defineBackend } from "@aws-amplify/backend";import { Effect, Policy, PolicyStatement } from "aws-cdk-lib/aws-iam";import { Bucket } from "aws-cdk-lib/aws-s3";import { auth } from "./auth/resource";
const backend = defineBackend({ auth,});
const customBucketStack = backend.createStack("custom-bucket-stack");
// Import existing bucketconst customBucket = Bucket.fromBucketAttributes(customBucketStack, "MyCustomBucket", { bucketArn: "arn:aws:s3:::<bucket-name>", region: "<region>"});
backend.addOutput({ storage: { aws_region: customBucket.env.region, bucket_name: customBucket.bucketName, buckets: [ { aws_region: customBucket.env.region, bucket_name: customBucket.bucketName, name: customBucket.bucketName, /* @ts-expect-error: Amplify backend type issue https://github.com/aws-amplify/amplify-backend/issues/2569 */ paths: { "public/*": { authenticated: ["get", "list", "write", "delete"], }, "admin/*": { authenticated: ["get", "list"], groupsadmin: ["get", "list", "write", "delete"], }, }, } ] },});
// ... Authenticated user policy and role attachment goes here .../* Define an inline policy to attach to "admin" user group role This policy defines how authenticated users with "admin" user group role can access your existing bucket*/ const adminPolicy = new Policy(backend.stack, "customBucketAdminPolicy", { statements: [ new PolicyStatement({ effect: Effect.ALLOW, actions: [ "s3:GetObject", "s3:PutObject", "s3:DeleteObject" ], resources: [ `${customBucket.bucketArn}/admin/*`], }), new PolicyStatement({ effect: Effect.ALLOW, actions: ["s3:ListBucket"], resources: [ `${customBucket.bucketArn}` `${customBucket.bucketArn}/*` ], conditions: { StringLike: { "s3:prefix": ["admin/*", "admin/"], }, }, }), ],});
// Add the policies to the "admin" user group rolebackend.auth.resources.groups["admin"].role.attachInlinePolicy(adminPolicy);Amplify allows scoping file access to individual users via the user's identity ID. To specify the user's identity ID, you can use the token ${cognito-identity.amazonaws.com:sub}.
Below is an example of expanding the original backend object to define read access for guests to the public/ folder, as well as defining a protected/ folder where anyone can view uploaded files, but only the file owner can modify/delete them:
import { defineBackend } from "@aws-amplify/backend";import { Effect, Policy, PolicyStatement } from "aws-cdk-lib/aws-iam";import { Bucket } from "aws-cdk-lib/aws-s3";import { auth } from "./auth/resource";
const backend = defineBackend({ auth,});
const customBucketStack = backend.createStack("custom-bucket-stack");
// Import existing bucketconst customBucket = Bucket.fromBucketAttributes(customBucketStack, "MyCustomBucket", { bucketArn: "arn:aws:s3:::<bucket-name>", region: "<region>"});
backend.addOutput({ storage: { aws_region: customBucket.env.region, bucket_name: customBucket.bucketName, buckets: [ { aws_region: customBucket.env.region, bucket_name: customBucket.bucketName, name: customBucket.bucketName, /* @ts-expect-error: Amplify backend type issue https://github.com/aws-amplify/amplify-backend/issues/2569 */ paths: { "public/*": { guest: ["get", "list"], authenticated: ["get", "list", "write", "delete"], }, // allow all users to view all folders/files within `protected/` "protected/*": { guest: ["get", "list"], authenticated: ["get", "list"], }, // allow owners to read, write and delete their own files in assigned subfolder "protected/${cognito-identity.amazonaws.com:sub}/*": { entityidentity: ["get", "list", "write", "delete"] } }, } ] },});/* Define an inline policy to attach to Amplify's unauth role This policy defines how unauthenticated users/guests can access your existing bucket*/ const unauthPolicy = new Policy(backend.stack, "customBucketUnauthPolicy", { statements: [ new PolicyStatement({ effect: Effect.ALLOW, actions: ["s3:GetObject"], resources: [ `${customBucket.bucketArn}/public/*` `${customBucket.bucketArn}/protected/*` ], }), new PolicyStatement({ effect: Effect.ALLOW, actions: ["s3:ListBucket"], resources: [ `${customBucket.bucketArn}` `${customBucket.bucketArn}/*` ], conditions: { StringLike: { "s3:prefix": [ "public/", "public/*", "protected/", "protected/*" ], }, }, }), ],});
/* Define an inline policy to attach to Amplify's auth role This policy defines how authenticated users can access your existing bucket and customizes owner access to their individual folder*/const authPolicy = new Policy(backend.stack, "customBucketAuthPolicy", { statements: [ new PolicyStatement({ effect: Effect.ALLOW, actions: ["s3:GetObject"], resources: [ `${customBucket.bucketArn}/public/*` `${customBucket.bucketArn}/protected/*` ], }), new PolicyStatement({ effect: Effect.ALLOW, actions: ["s3:ListBucket"], resources: [ `${customBucket.bucketArn}` `${customBucket.bucketArn}/*` ], conditions: { StringLike: { "s3:prefix": [ "public/", "public/*", "protected/", "protected/*" ], }, }, }), new PolicyStatement({ effect: Effect.ALLOW, actions: ["s3:PutObject"], resources: [ `${customBucket.bucketArn}/public/*` `${customBucket.bucketArn}/protected/${cognito-identity.amazonaws.com:sub}/*` ], }), new PolicyStatement({ effect: Effect.ALLOW, actions: ["s3:DeleteObject"], resources: [ `${customBucket.bucketArn}/protected/${cognito-identity.amazonaws.com:sub}/*` ], }), ],});
// Add the policies to the unauthenticated user rolebackend.auth.resources.unauthenticatedUserIamRole.attachInlinePolicy( unauthPolicy,);
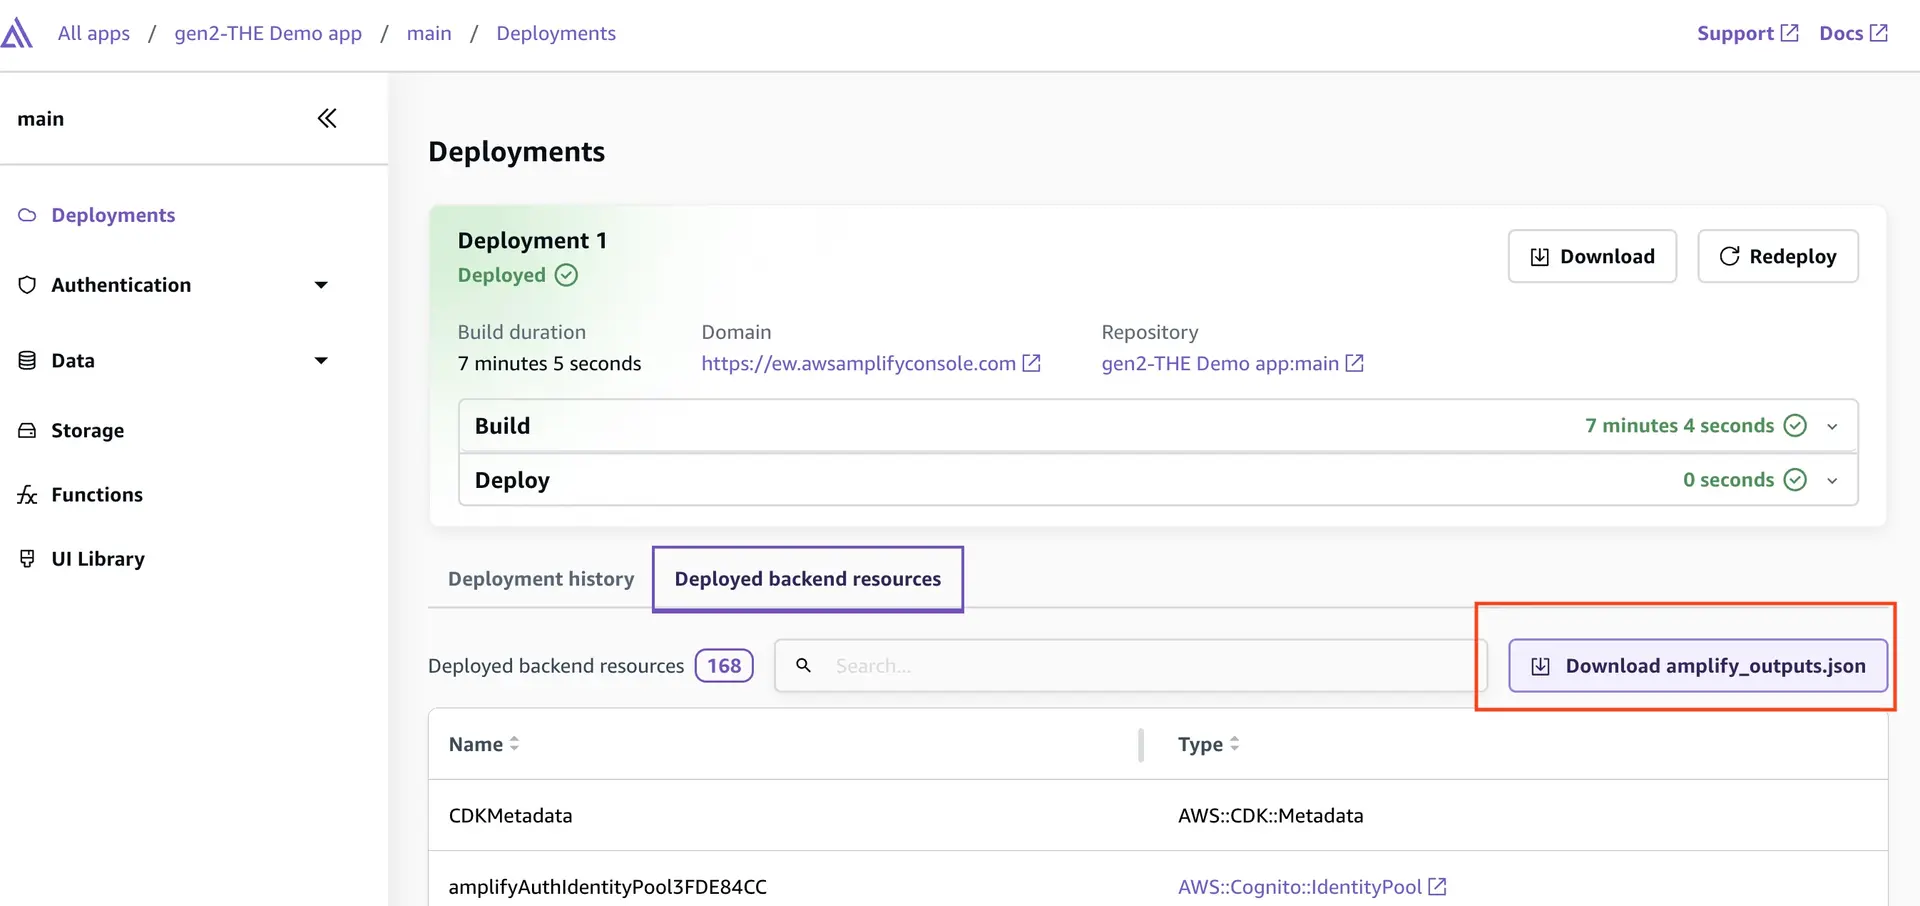
// Add the policies to the authenticated user rolebackend.auth.resources.authenticatedUserIamRole.attachInlinePolicy(authPolicy);Import latest amplify_outputs.json file
To ensure the local amplify_outputs.json file is up-to-date, you can run the npx ampx generate outputs command or download the latest amplify_outputs.json from the Amplify console as shown below.
Now that you've configured the necessary permissions, you can start using the storage APIs with your chosen S3 bucket.
Use storage resources without an Amplify backend
While using the Amplify backend is the easiest way to get started, existing storage resources can also be integrated with Amplify Storage.
In addition to manually configuring your storage options, you will also need to ensure Amplify Auth is properly configured in your project and associated IAM roles have the necessary permissions to interact with your existing bucket. Read more about using existing auth resources without an Amplify backend.
Using Amplify.configure
Existing storage resource setup can be accomplished by passing the resource metadata to Amplify.configure. This will configure the Amplify Storage client library to interact with the additional resources. It's recommended to add the Amplify configuration step as early as possible in the application lifecycle, ideally at the root entry point.
import { Amplify } from "aws-amplify";
Amplify.configure({  Auth: {    // add your auth configuration  },  Storage: {    S3: {      bucket: "<your-default-bucket-name>",      region: "<your-default-bucket-region>",      // default bucket metadata should be duplicated below with any additional buckets      buckets: {        "<your-default-bucket-friendly-name>": {          bucketName: "<your-default-bucket-name>",          region: "<your-default-bucket-region>",          paths: {            "public/*": {              guest: ["get", "list"],              authenticated: ["get", "list", "write", "delete"],              groupsadmin: ["get", "list", "write", "delete"]            },            "protected/*": {              guest: ["get", "list"],              authenticated: ["get", "list"],              groupsadmin: ["get", "list", "write", "delete"]            }            "protected/${cognito-identity.amazonaws.com:sub}/*": {              entityidentity: ["get", "list", "write", "delete"]            },            "admin/*": {              authenticated: ["get", "list"],              groupsadmin: ["get", "list", "write", "delete"],            },          }        },        "<your-additional-bucket-friendly-name>": {          bucketName: "<your-additional-bucket-name>",          region: "<your-additional-bucket-region>",          paths: {            // ...          }        }      }    }  }});
Using amplify_outputs.json
Alternatively, existing storage resources can be used by creating or modifying the amplify_outputs.json file directly.
{ "auth": { // add your auth configuration }, "storage": { "aws_region": "<your-default-bucket-region>", "bucket_name": "<your-default-bucket-name>", // default bucket metadata should be duplicated below with any additional buckets "buckets": [ { "name": "<your-default-bucket-friendly-name>", "bucket_name": "<your-default-bucket-name>", "aws_region": "<your-default-bucket-region>", "paths": { "public/*": { "guest": [ "get", "list" ], "authenticated": [ "get", "list", "write", "delete" ], "groupsadmin": [ "get", "list", "write", "delete" ] }, "protected/*": { "guest": [ "get", "list" ], "authenticated": [ "get", "list" ], "groupsadmin": [ "get", "list", "write", "delete" ] }, "protected/${cognito-identity.amazonaws.com:sub}/*": { "entityidentity": [ "get", "list", "write", "delete" ] }, "admin/*": { "authenticated": [ "get", "list" ], "groupsadmin": [ "get", "list", "write", "delete" ] } } }, { "name": "<your-additional-bucket-friendly-name>", "bucket_name": "<your-additional-bucket-name>", "aws_region": "<your-additional-bucket-region>", "paths": { // add more paths for the bucket } } ] }}