Concepts
AWS Amplify Gen 2 uses a TypeScript-based, code-first developer experience (DX) for defining backends. The Gen 2 DX offers a unified Amplify developer experience with hosting, backend, and UI-building capabilities and a code-first approach. Amplify empowers frontend developers to deploy cloud infrastructure by simply expressing their app’s data model, business logic, authentication, and authorization rules completely in TypeScript. Amplify automatically configures the correct cloud resources and removes the requirement to stitch together underlying AWS services.
Capabilities
You can use Amplify for end-to-end fullstack development.
Build fullstack apps with TypeScript
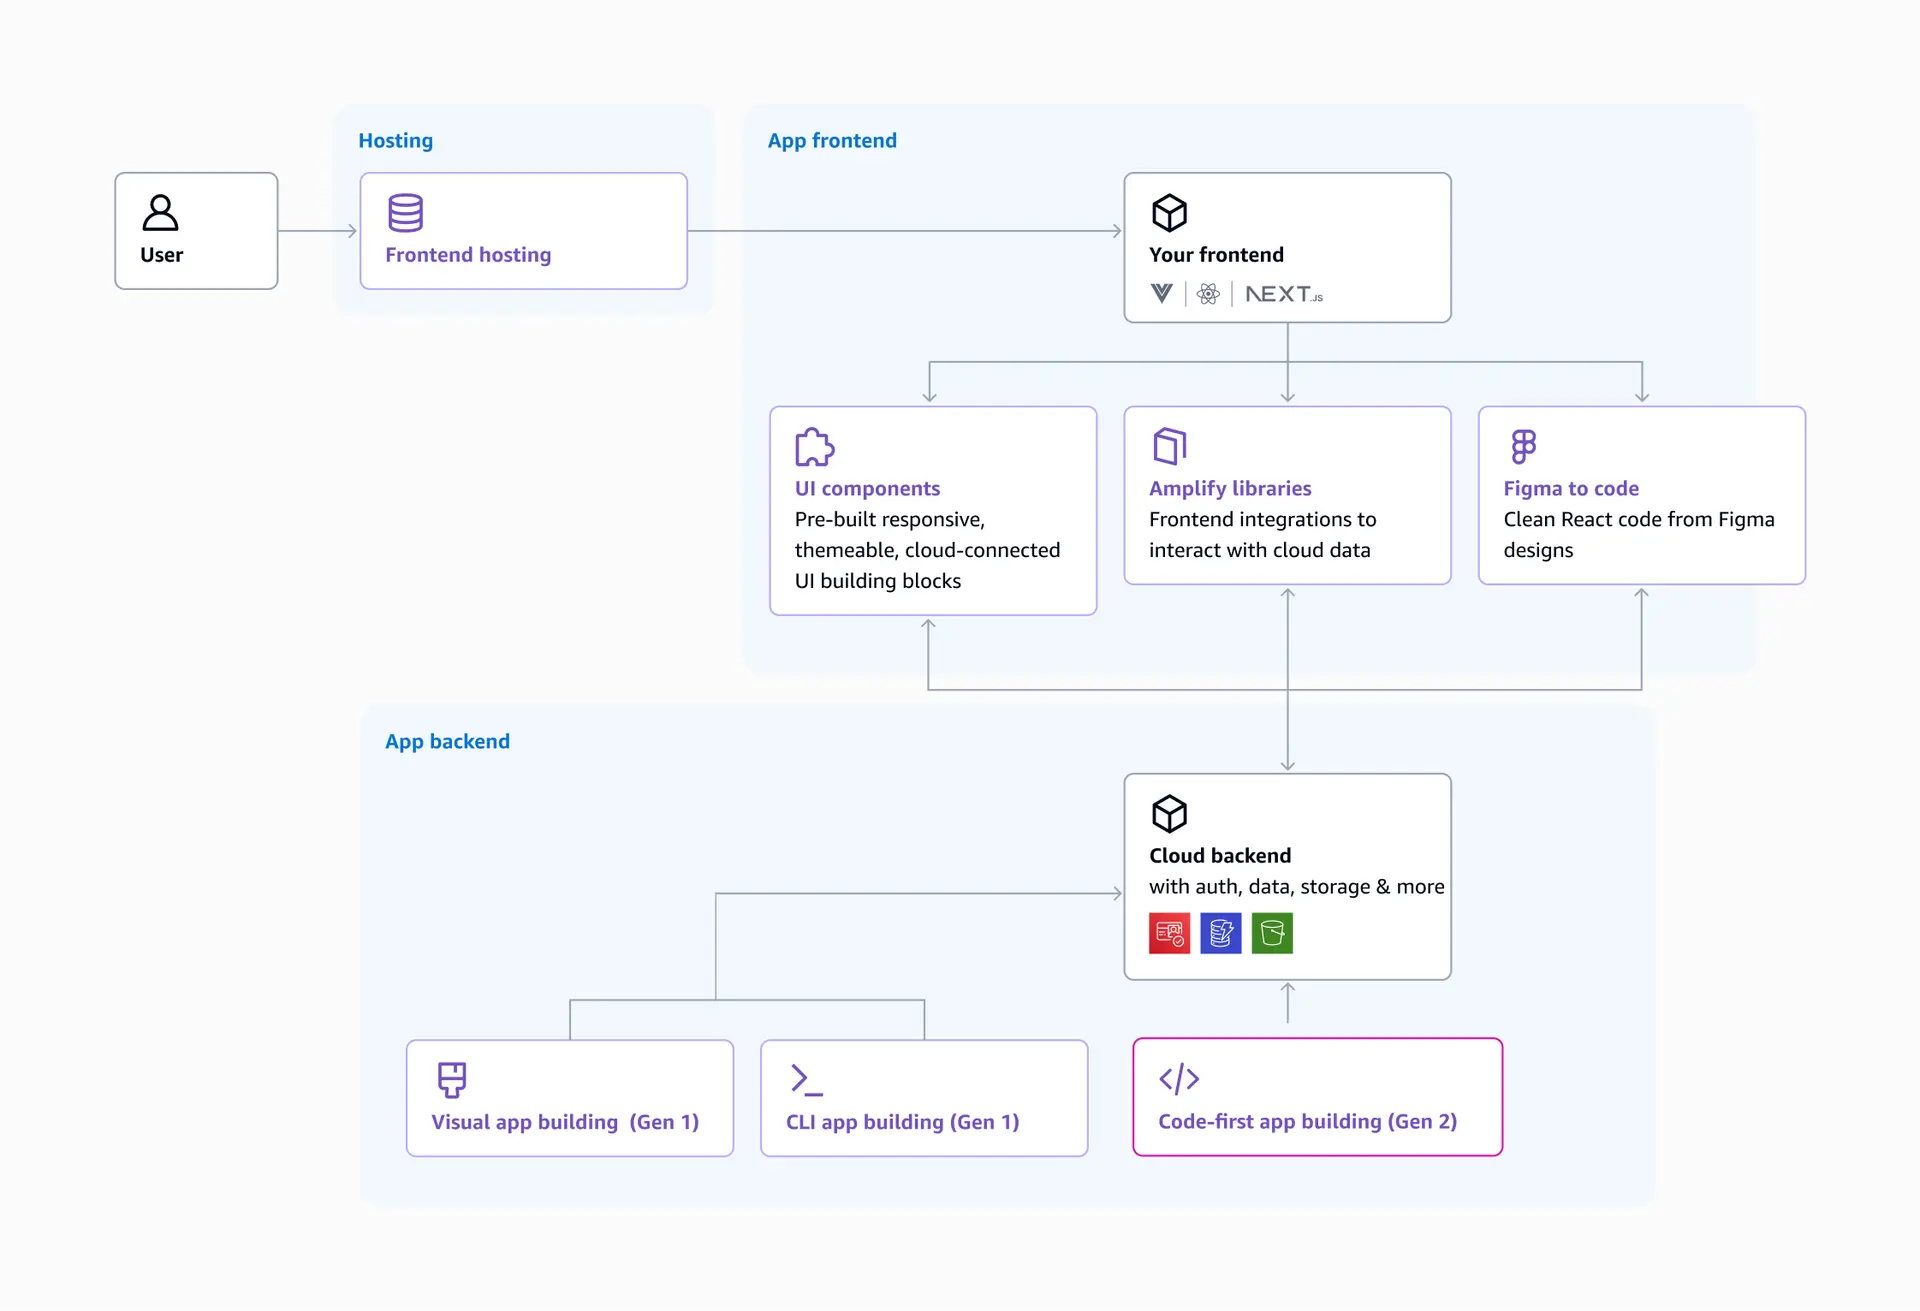
With the Gen 2 DX, you can provision backend infrastructure by authoring TypeScript. In the following diagram, the box at the bottom (outlined in pink), highlights the main difference in how you provision infrastructure compared to Gen 1. In Gen 1, you would use Studio's console or the CLI to provision infrastructure; in Gen 2, you author TypeScript code in files following a file-based convention (such as amplify/auth/resource.ts or amplify/auth/data.ts). With TypeScript types and classes for resources, you gain strict typing and IntelliSense in Visual Studio Code to prevent errors. A breaking change in the backend code immediately reflects as a type error in the co-located frontend code. The file-based convention follows the "convention over configuration" paradigm—you know exactly where to look for resource definitions when you group them by type in separate files.
Faster local development
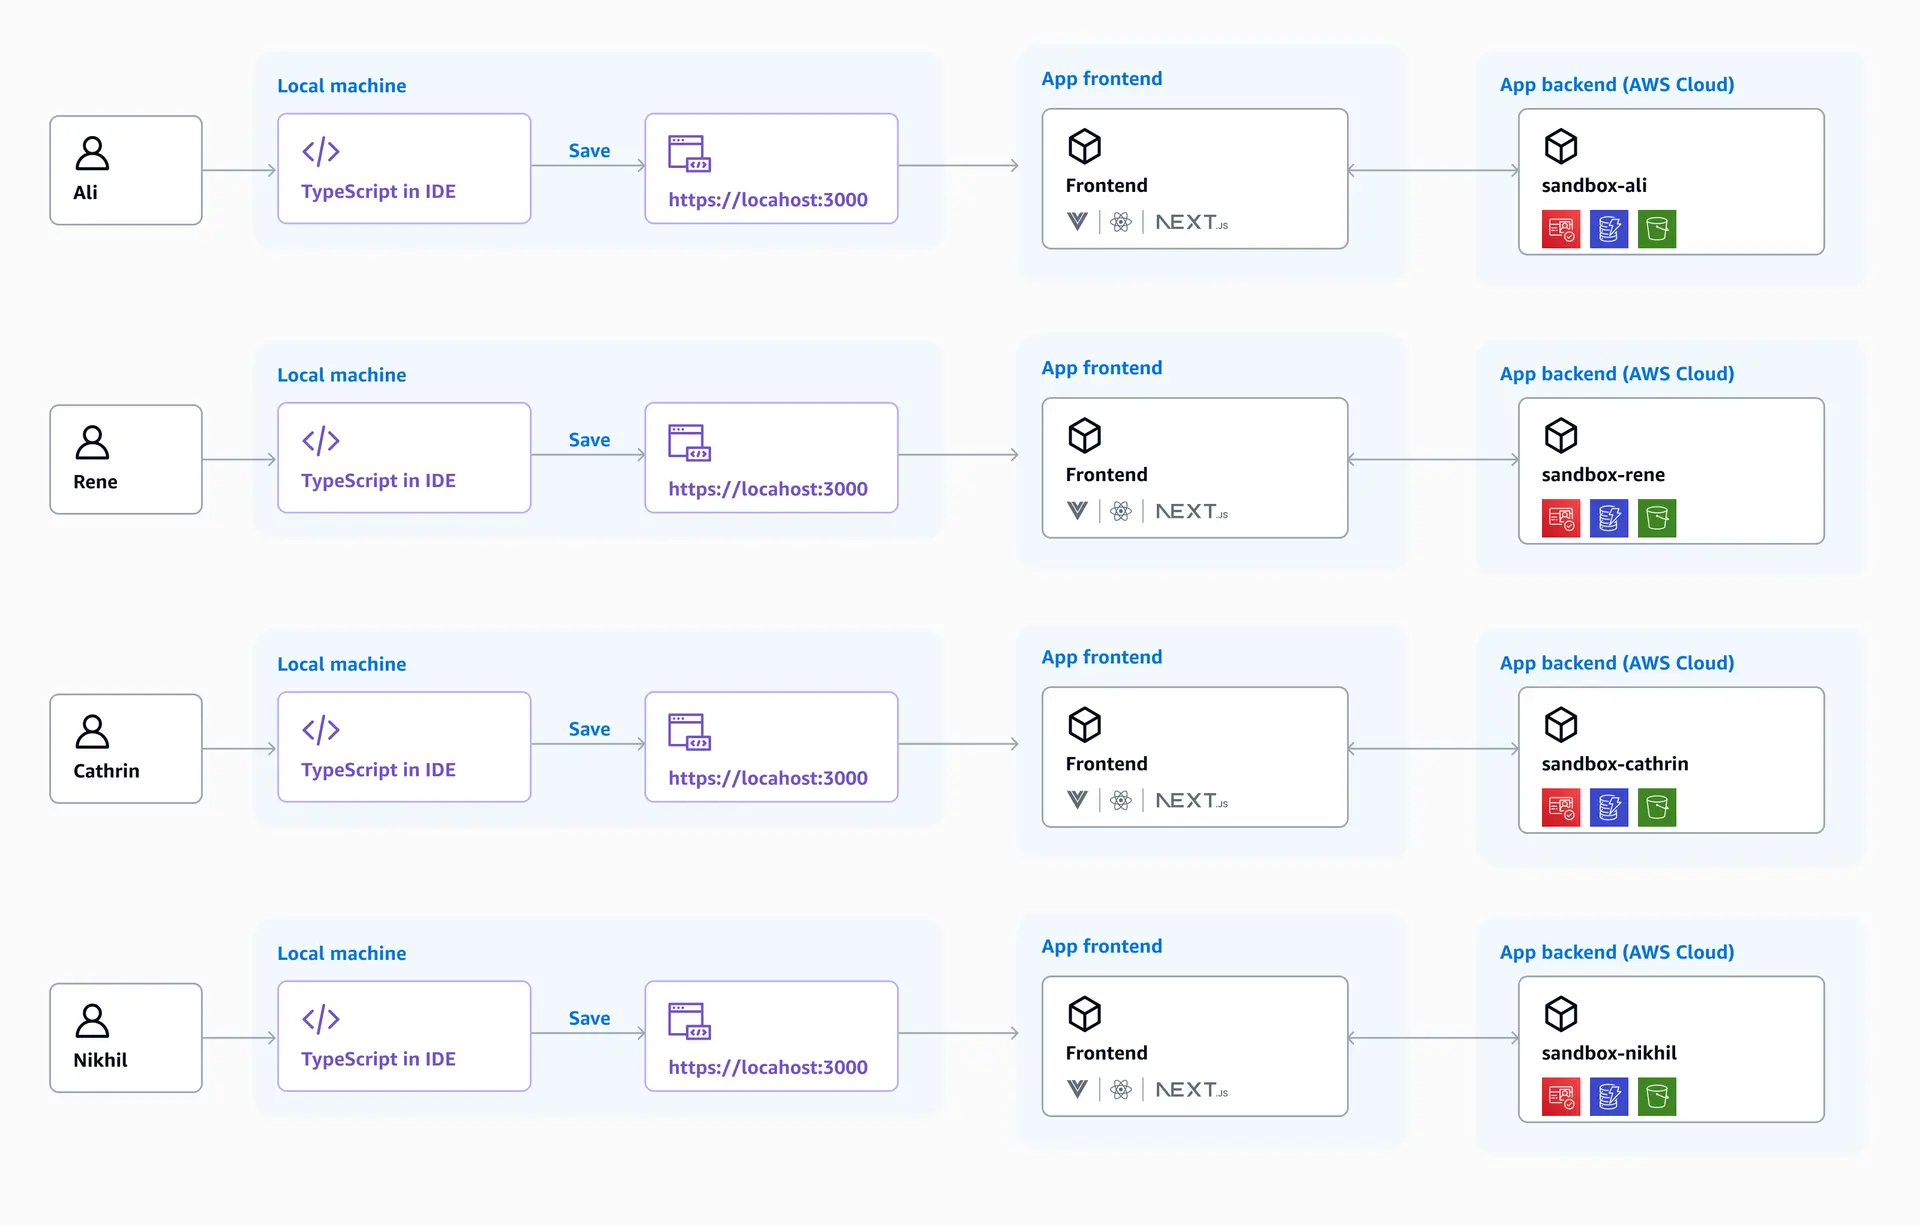
Per-developer cloud sandbox environments are optimized for faster iterations. Each developer on a team gets an isolated cloud development environment against which they can test their changes. These cloud sandbox environments are meant for local development only, but they deploy high-fidelity AWS backends while you build. Depending on the workflow, iterative updates are now deployed up to 8X faster than Gen 1 deployments. In the diagram below, four developers are able to work on fullstack features independently without disrupting each other's environments.
Fullstack Git-based environments
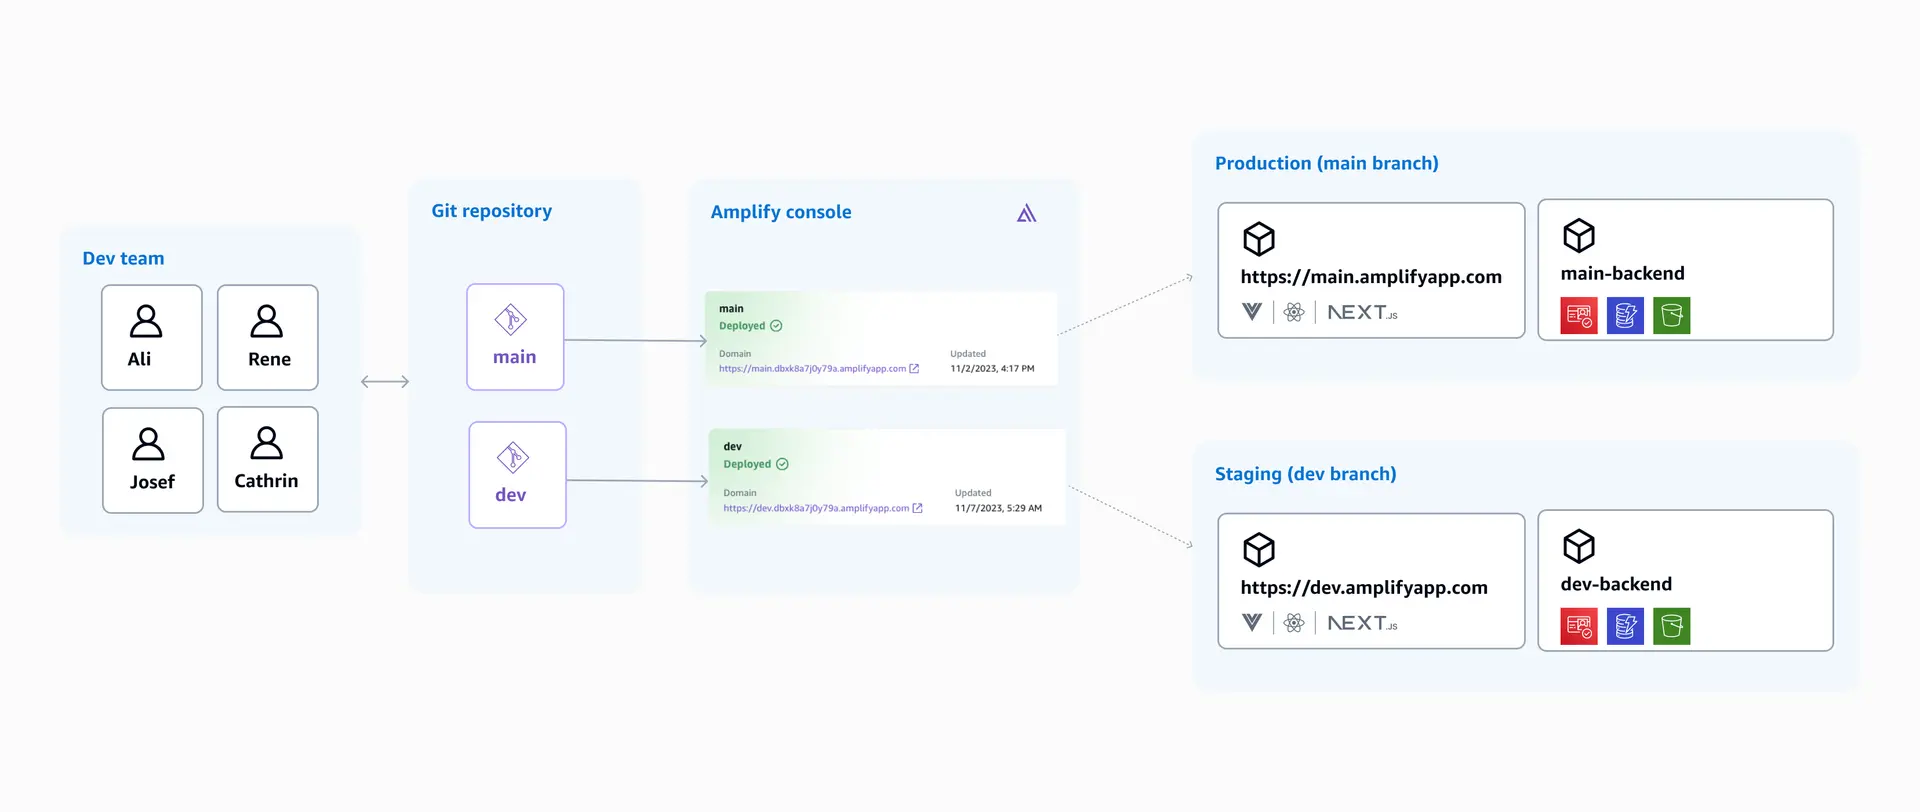
All shared environments (such as production, staging, gamma) map 1:1 to Git branches in your repository. New features can be tested in ephemeral environments with pull request previews (or feature branches) before they are merged into production. Unlike the Gen 1 experience, which requires users to configure a number of steps in the CLI or Console to set up a fullstack environment, the Gen 2 experience is zero-config. Because of our code-first approach, the Git repository is always the source of truth for the state of the fullstack app—all backend resources are defined as code for reproducibility and portability across branches. This, along with central management of environment variables and secrets, simplifies the promotion workflow from lower to upper environments.
Unified management console
All branches can be managed in the new Amplify console. The Amplify Gen 2 console provides a single place for you to manage your builds, hosting settings (such as custom domains), deployed resources (such as data browser or user management), and environment variables and secrets. Even though you can access deployed resources directly in other AWS service consoles, the Amplify console will offer a first-party experience for the categories almost every app needs—data, auth, storage, and functions. For example, with Data, Amplify offers an API playground and a data manager (coming soon) with relationship building, seed data generation, and file upload capabilities.
Build an app
Data
The @aws-amplify/backend library offers a TypeScript-first Data library for setting up fully typed real-time APIs (powered by AWS AppSync GraphQL APIs) and NoSQL databases (powered by Amazon DynamoDB tables). After you generate an Amplify backend, you will have an amplify/data/resource.ts file, which will contain your app's data schema. The defineData function turns the schema into a fully functioning data backend with all the boilerplate handled automatically.
A data model for a chat app may look something like this, for example:
const schema = a.schema({ Chat: a.model({ name: a.string(), message: a.hasMany('Message', 'chatId'), }), Message: a.model({ text: a.string(), chat: a.belongsTo('Chat', 'chatId'), chatId: a.id() }),}).authorization((allow) => allow.owner());On your app's frontend, you can use the generateClient function, which provides a typed client instance, making it easy to integrate CRUD (create, read, update, delete) operations for your models in your application code.
// generate your data client using the Schema from your backendconst client = generateClient<Schema>();
// list all messagesconst { data } = await client.models.Message.list();
// create a new messageconst { errors, data: newMessage } = await client.models.Message.create({  text: 'My message text'});
Auth
Auth works similarly to data. You can configure the authentication settings you want for your app in amplify/auth/resource.ts. If you want to change the verification email's subject line, you can change out the default generated code with the following:
export const auth = defineAuth({ loginWith: { email: { verificationEmailSubject: 'Welcome 👋 Verify your email!' } }});You can customize your authentication flow with customized sign-in and registration flows, multi-factor authentication (MFA), and third-party social providers. Amplify deploys an Amazon Cognito instance in your AWS account when you add auth to your app.
Then, you could use the Amplify Authenticator component or the client libraries to add user flows.
import { withAuthenticator } from '@aws-amplify/ui-react';
function App({ signOut, user }) {  return (    <>      <h1>Hello {user.username}</h1>      <button onClick={signOut}>Sign out</button>    </>  );}
export default withAuthenticator(App);
UI building
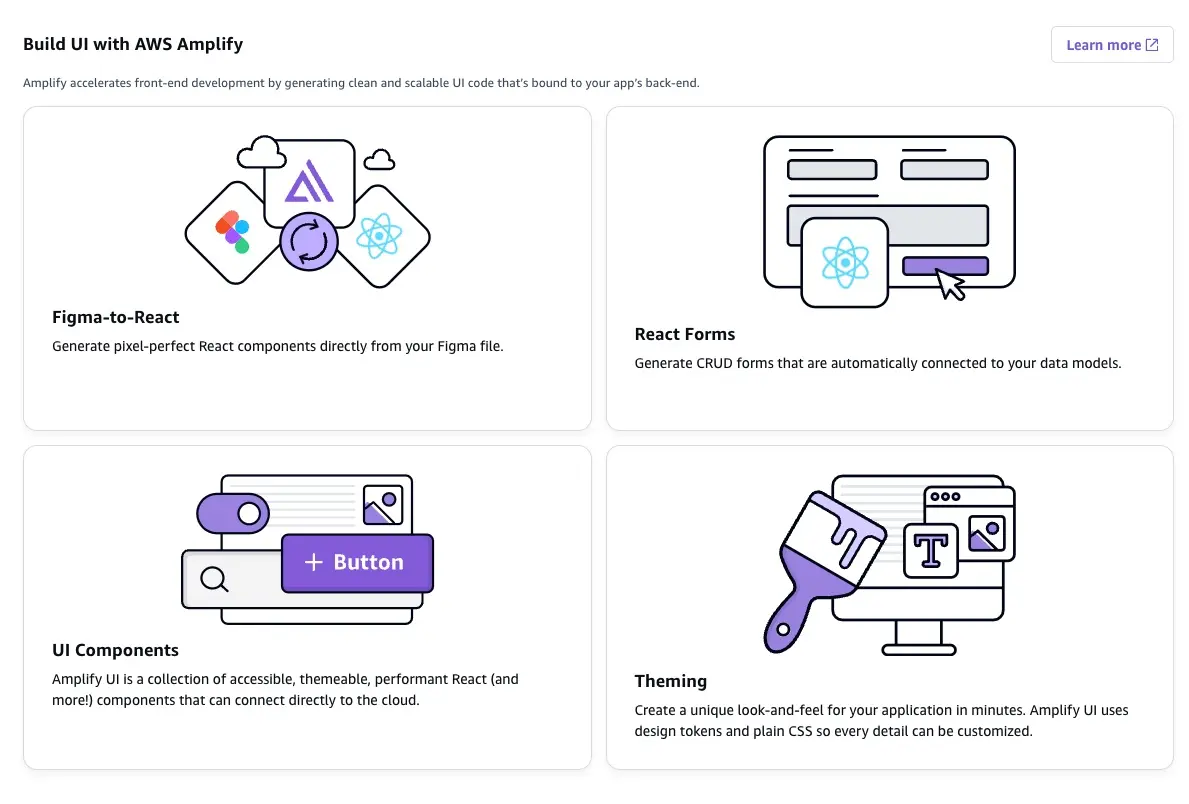
Amplify makes it easy to quickly build web app user interfaces using the UI component library, Figma-to-code generation, and CRUD form-generation capabilities. Learn more.
Connecting to AWS beyond Amplify
Add any AWS resource
Gen 2 is layered on top of AWS Cloud Development Kit (CDK)—the Data and Auth capabilities in @aws-amplify/backend wrap L3 AWS CDK constructs. As a result, extending the resources generated by Amplify does not require any special configuration. The following example adds Amazon Location Services by adding a file: amplify/custom/maps/resource.ts.
import { CfnOutput, Stack, StackProps } from 'aws-cdk-lib';import * as locations from 'aws-cdk-lib/aws-location';import { Construct } from 'constructs';
export class LocationMapStack extends Stack {  constructor(scope: Construct, id: string, props?: StackProps) {    super(scope, id, props);
    // Create the map resource    const map = new locations.CfnMap(this, 'LocationMap', {      configuration: {        style: 'VectorEsriStreets' // map style      },      description: 'My Location Map',      mapName: 'MyMap'    });
    new CfnOutput(this, 'mapArn', {      value: map.attrArn,      exportName: 'mapArn'    });  }}
This is then included in the amplify/backend.ts file so it gets deployed as part of your Amplify app.
import { Backend } from '@aws-amplify/backend';import { auth } from './auth/resource';import { data } from './data/resource';import { LocationMapStack } from './locationMapStack/resource';
const backend = new Backend({  auth,  data});
new LocationMapStack(  backend.getStack('LocationMapStack'),  'myLocationResource',  {});
Connect to existing resources
Amplify is designed to work with your existing AWS resources and configurations. For example, you can use Amplify's pre-built authentication UI components with an existing Amazon Cognito user pool you created and configured separately. Or you can display images and files from an existing Amazon S3 bucket in your app's user interface by integrating with Amplify Storage.
Amplify's libraries provide an interface to leverage your existing AWS services so that you can adopt Amplify's capabilities incrementally into your current workflows, without disrupting your existing backend infrastructure.
Next steps
Now that you have a conceptual understanding of AWS Amplify's capabilities, complete the quickstart tutorial to put it into action in an app.