Add social provider sign-in
You can enable your users to sign-in and authenticate with your app using their existing accounts with social providers like Apple, Amazon, Facebook, and Google. Once you configure your backend resources, you can then configure your app to sign in users for that provider. This process will securely exchange credentials and gather user information. This information can then be used to create a new user in your app or link the social account to an existing user. Incorporating social provider sign-in provides your users with a streamlined registration, more sign-in options, and an integrated experience across their existing accounts and your app.
In this guide we will review how you can add sign-in with social providers by first setting up your developer account with the provider. After this step, you can then configure your Auth category and integrate social sign-in with your app.
Before you begin, you will need:
- An Amplify project
- The Amplify libraries installed and configured
Learn moreReview how OAuth authentication works
The preferred way to incorporate social provider sign-in is via an OAuth redirect which lets users sign in using their social media account and creates a corresponding user in the Cognito User Pool.
OAuth 2.0 is the common Authorization framework used by web and mobile applications for accessing user information ("scopes") in a limited manner. Common analogies you will hear in OAuth is that of boarding a plane or staying in a hotel - showing your identification is the authentication piece (signing into an app) and using the boarding pass/hotel key is what you are authorized to access.
OAuth support in Amplify uses Cognito User Pools and supports federation with social providers, which will automatically create a corresponding user in the User Pool after they sign in. With this design you do not need to include an SDK for the social provider in your app. After you set up your developer account with these social providers you can configure the Auth category by running amplify add auth and selecting the social provider option. You can then use signInWithRedirect() in your app to either show a pre-built "Hosted UI" or pass in a provider name (e.g. signInWithRedirect({provider:'Facebook'})) to interface directly and build your own UI. 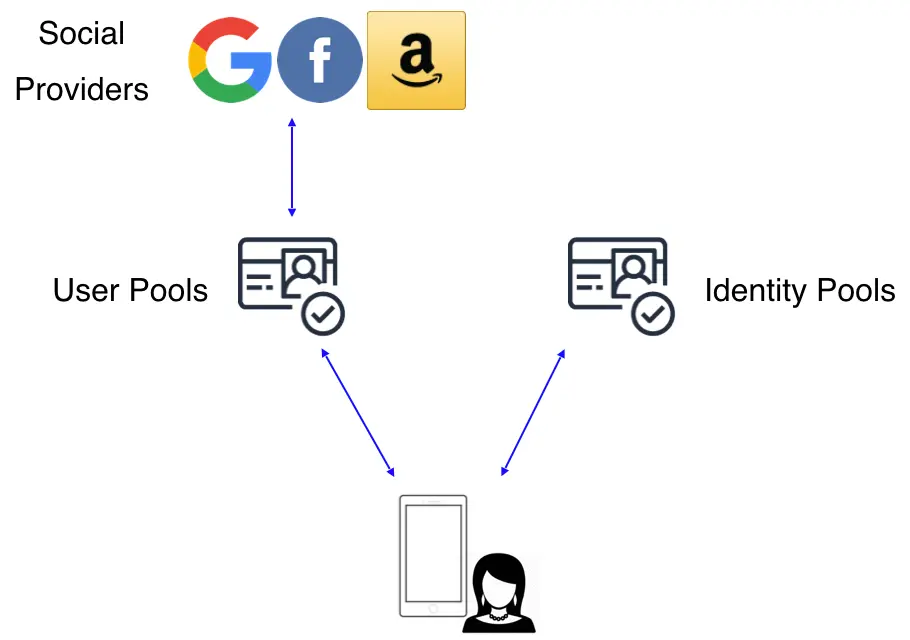
Set up your social auth provider
Before you configure social sign-in with Amplify Auth you will need to set up your developer account with each provider you are using.
-
Create a developer account with Facebook.
-
Sign in with your Facebook credentials.
-
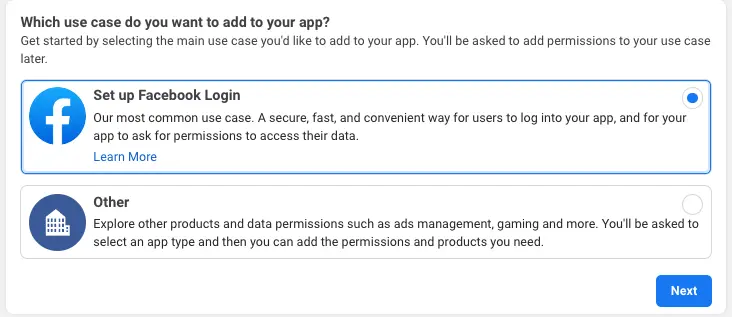
Choose My Apps from the top navigation bar, and on the page that loads choose Create App.
-
For your use case, choose Set up Facebook Login.
-
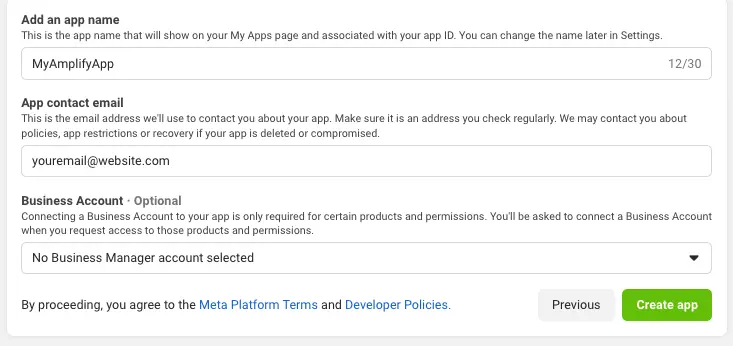
For platform, choose Website and select No, I'm not building a game.
-
Give your Facebook app a name and choose Create app.
-
On the left navigation bar, choose Settings and then Basic.
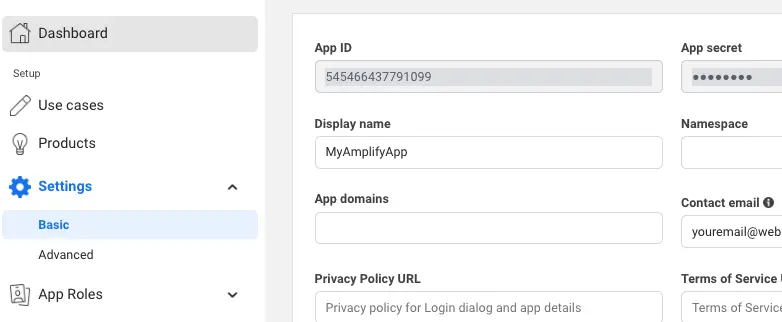
-
Note the App ID and the App Secret. You will use them in the next section in the CLI flow.
-
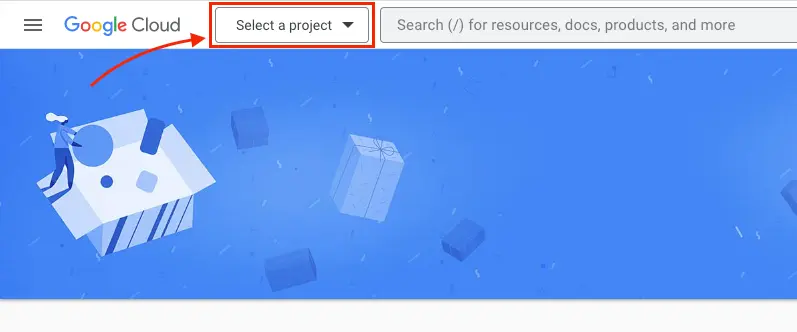
Go to Google developer console.
-
Click Select a project.
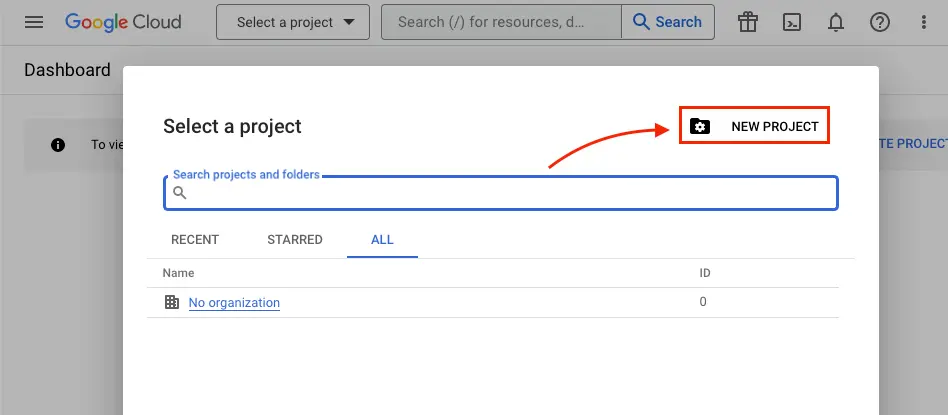
-
Click NEW PROJECT.
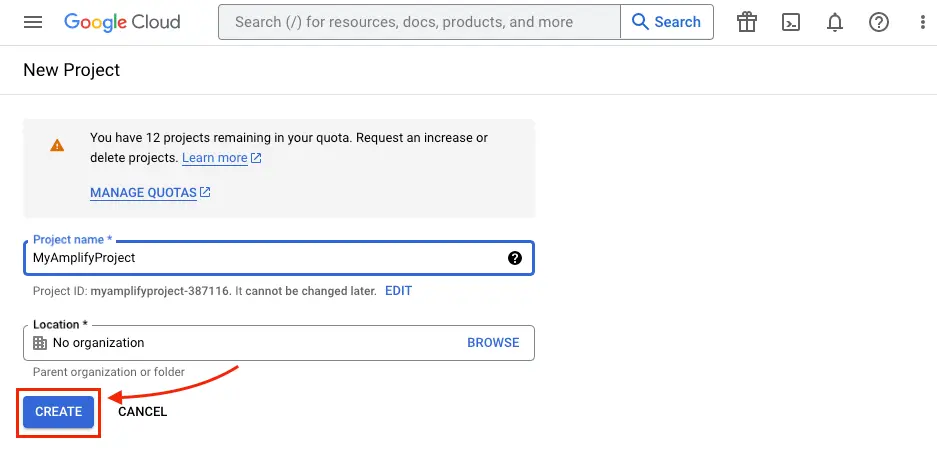
-
Type in project name and click CREATE.
-
Once the project is created, from the left navigation menu, select APIs & Services, then select Credentials.
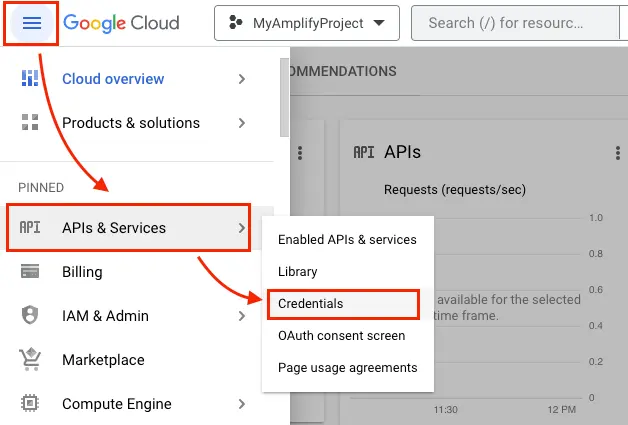
-
Click CONFIGURE CONSENT SCREEN.

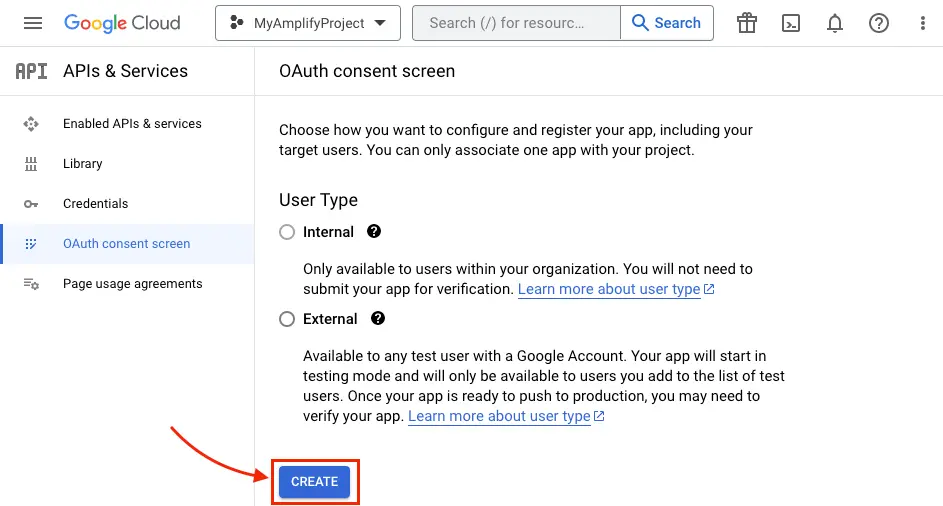
-
Click CREATE.
-
Type in App Information and Developer contact information which are required fields and click SAVE AND CONTINUE three times (OAuth consent screen -> Scopes -> Test Users) to finish setting up the consent screen.
-
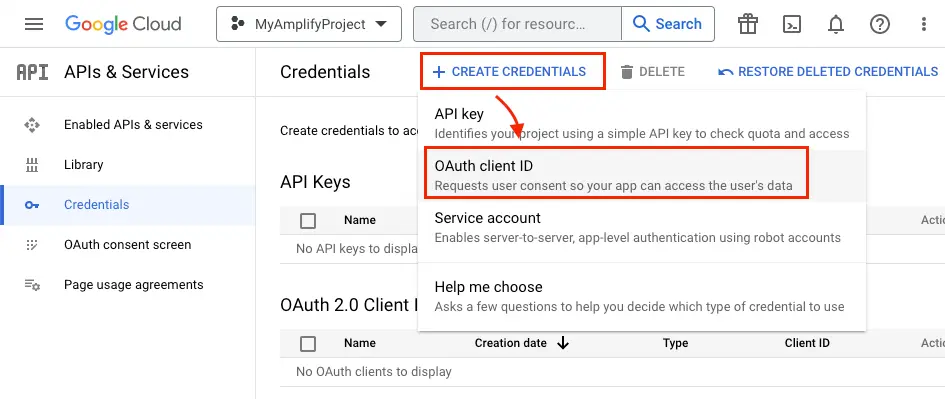
Back under the Credentials tab, Create your OAuth2.0 credentials by choosing OAuth client ID from the Create credentials drop-down list.
 .
. -
Choose Web application as Application type and name your OAuth Client.
-
Click Create.
-
Take note of Your client ID and Your Client Secret. You will need them for the next section in the CLI flow.
-
Choose OK.
-
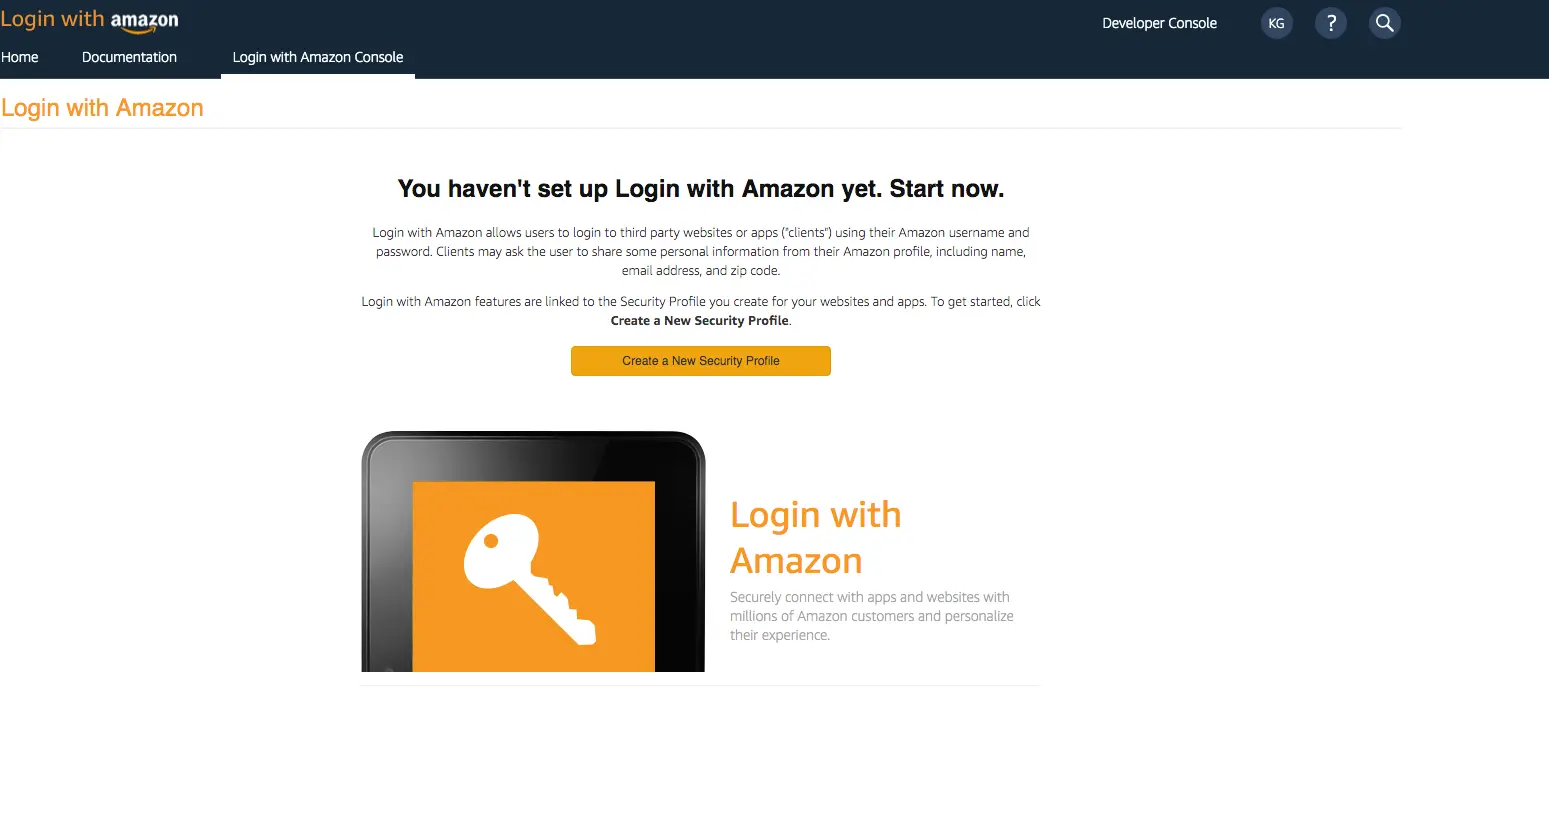
Create a developer account with Amazon.
-
Sign in with your Amazon credentials.
-
You need to create an Amazon security profile to receive the Amazon Client ID and Client Secret. Choose Create a Security Profile.
-
Type in a Security Profile Name, a Security Profile Description, and a Consent Privacy Notice URL.
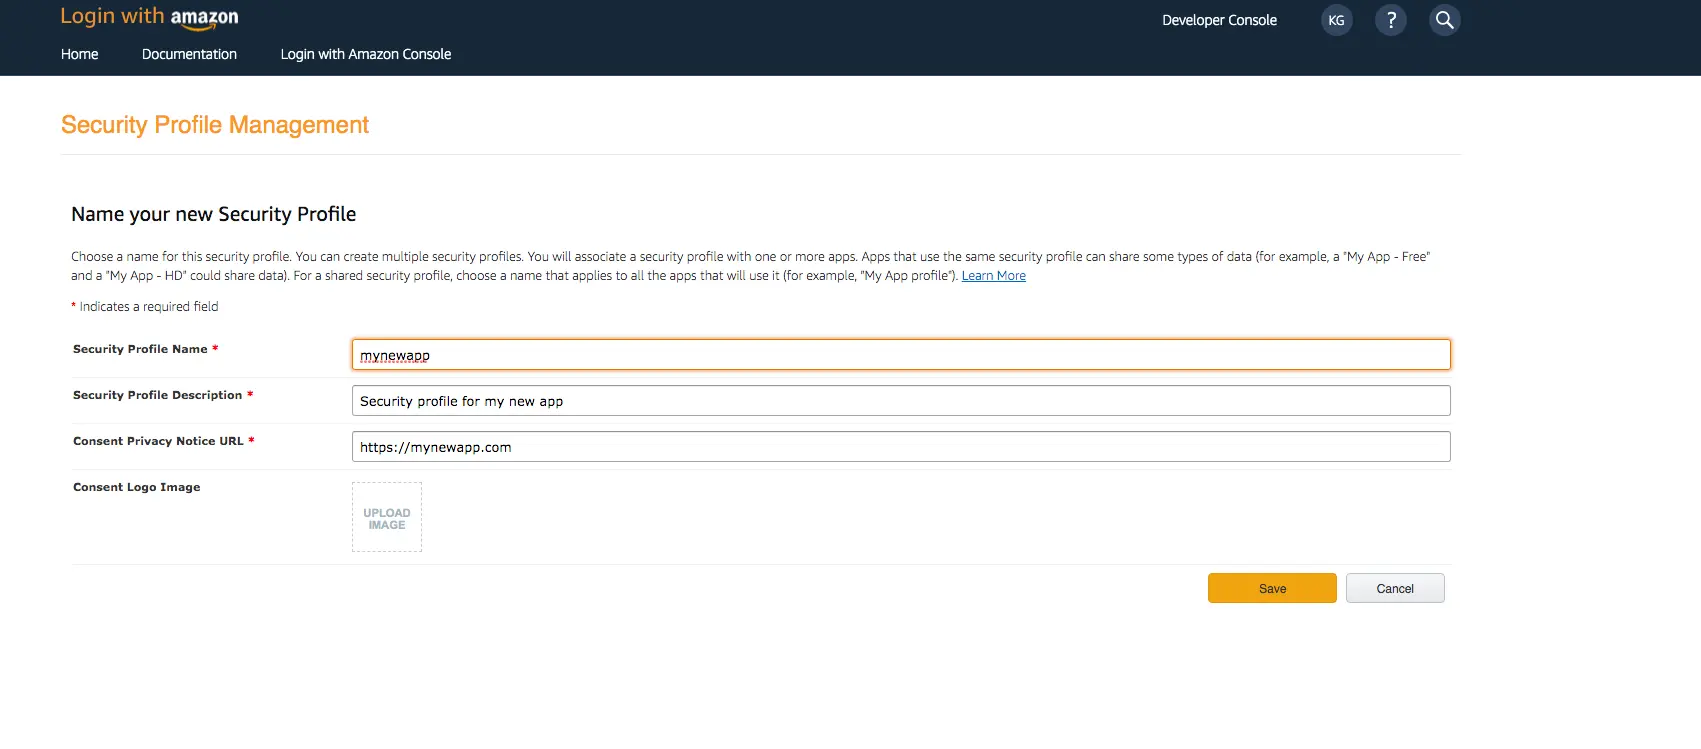
-
Choose Save.
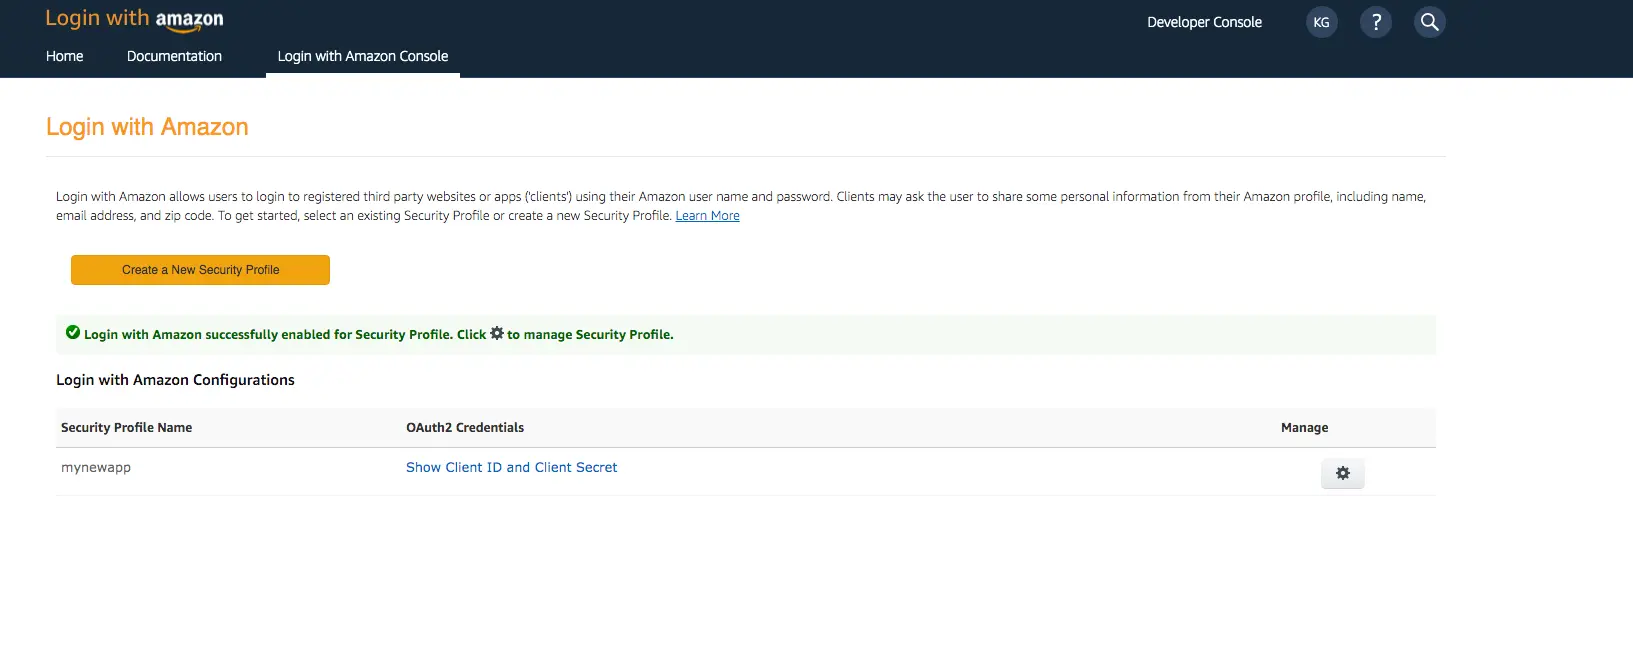
-
Choose Show Client ID and Client Secret to show the client ID and secret. You will need them for the next section in the CLI flow.
-
Sign In with your Apple developer credentials.
-
On the main developer portal page, select Certificates, IDs, & Profiles.
-
On the left navigation bar, select Identifier.
-
On the Identifiers page, select the plus icon (+).
-
On the Register a New Identifier page, select App IDs.
-
On the Register an App ID page, under App ID Prefix, take note of the Team ID value.
-
Provide a description in the Description text box and provide the
bundleIDof the iOS app.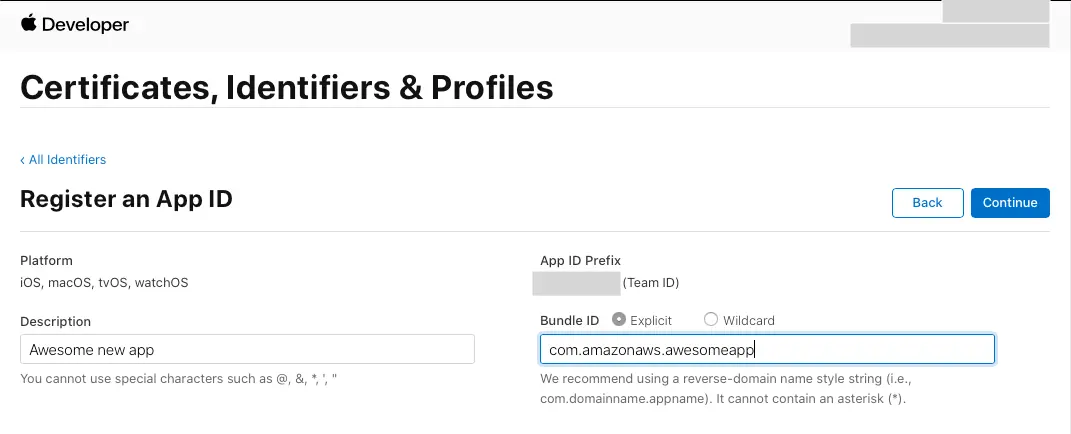
-
Under Capabilities, select Sign in with Apple.
-
Select Continue, review the configuration, and then select Register.
-
On the Identifiers page, on the right, select App IDs, and then select Services ID.
-
Select the plus icon (+) and, on the Register a New Identifier page, select Services IDs.
-
Provide a description in the Description text box and provide an identifier for the Service ID.
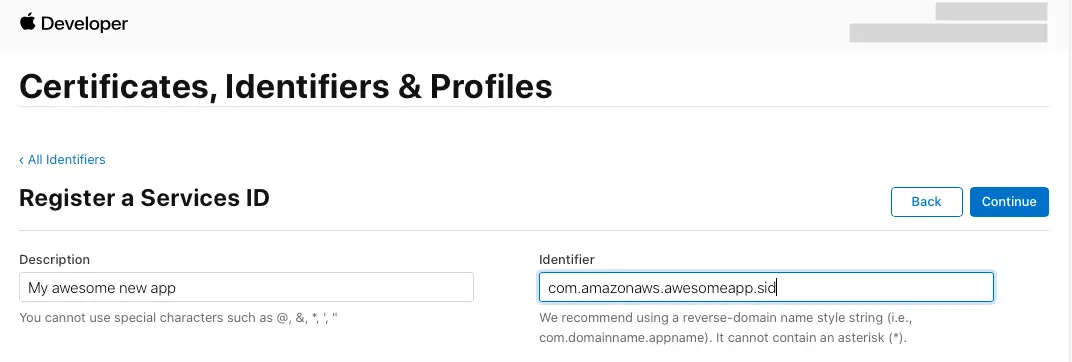
-
Select Continue and register the Service ID.
Your developer accounts with the social providers are now set up and you can return to your Amplify project for next steps.
Configure the Auth category
Once you have the social providers configured you can update your Auth configuration through the Amplify CLI.
To begin with the CLI, run the following in your project’s root folder:
amplify add auth ## "amplify update auth" if already configuredChoose the following options:
? Do you want to use the default authentication and security configuration? `Default configuration with Social Provider (Federation)`? How do you want users to be able to sign in? `Username`? Do you want to configure advanced settings? `No, I am done.`? What domain name prefix you want us to create for you? `(default)`? Enter your redirect signin URI: `http://localhost:3000/`? Do you want to add another redirect signin URI `No`? Enter your redirect signout URI: `http://localhost:3000/`? Do you want to add another redirect signout URI `No`? Select the social providers you want to configure for your user pool: `<choose your provider and follow the prompts to input the proper tokens>`Next, run amplify push to publish your changes. Once finished, it will display an auto generated URL for your web UI. You can retrieve your user pool domain URL at anytime by running amplify status using the CLI.
You need to now inform your social provider of this URL:
-
Sign In to your Facebook developer account with your Facebook credentials.
-
Choose My Apps from the top navigation bar, and on the Apps page, choose your app you created before.
-
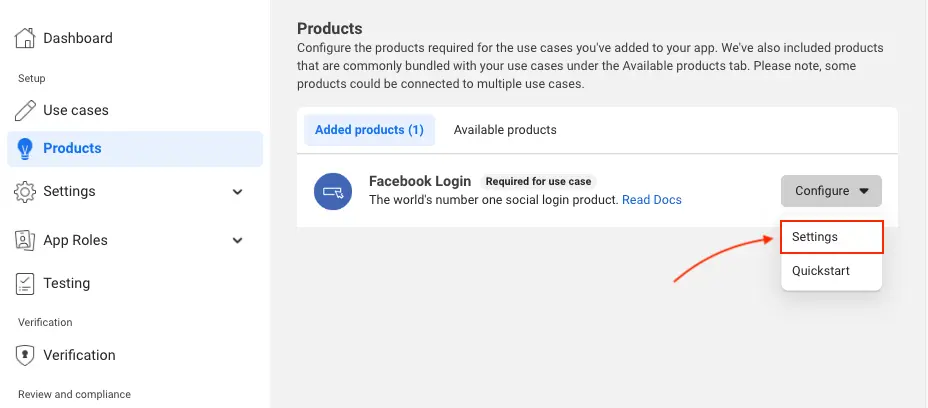
On the left navigation bar, choose Products. Add Facebook Login if it isn't already added.
-
If already added, choose Settings under the Configure dropdown.
-
Under Valid OAuth Redirect URIs type your user pool domain with the
/oauth2/idpresponseendpoint.https://<your-user-pool-domain>/oauth2/idpresponse

- Save your changes.
-
Go to the Google developer console.
-
On the left navigation bar, look for APIs and Services under Pinned or under More Products if not pinned.
-
Within the APIs and Services sub menu, choose Credentials.
-
Select the client you created in the first step and click the Edit button.
-
Type your user pool domain into the Authorized Javascript origins form.
-
Type your user pool domain with the
/oauth2/idpresponseendpoint into Authorized Redirect URIs.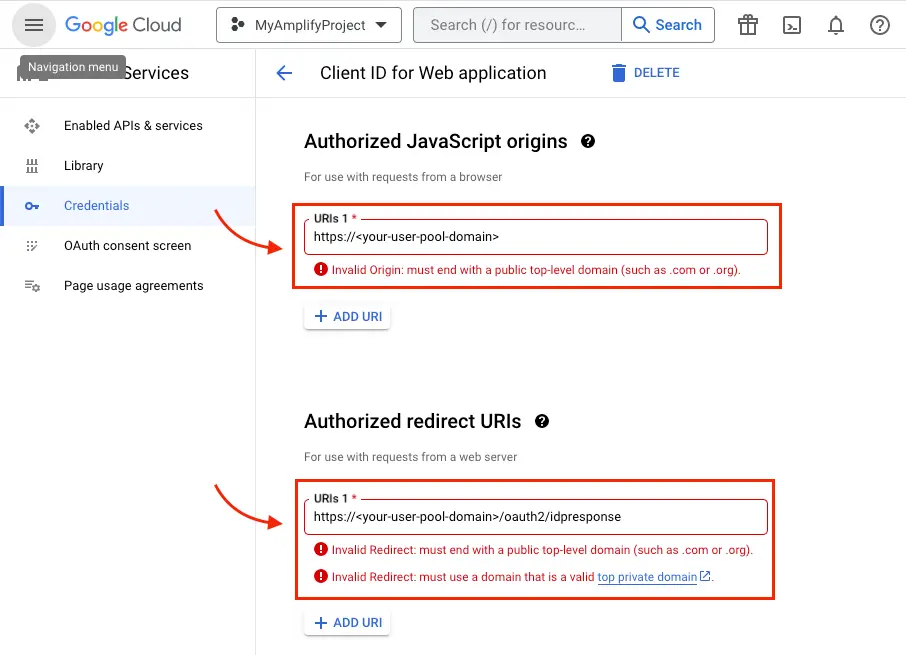
Note: If you saw an error message
Invalid Redirect: domain must be added to the authorized domains list before submitting.when adding the endpoint, please go to the Authorized Domains List and add the domain. -
Click Save.
-
Sign in with your Amazon credentials.
-
Hover over the gear and choose Web Settings associated with the security profile you created in the previous step, and then choose Edit.
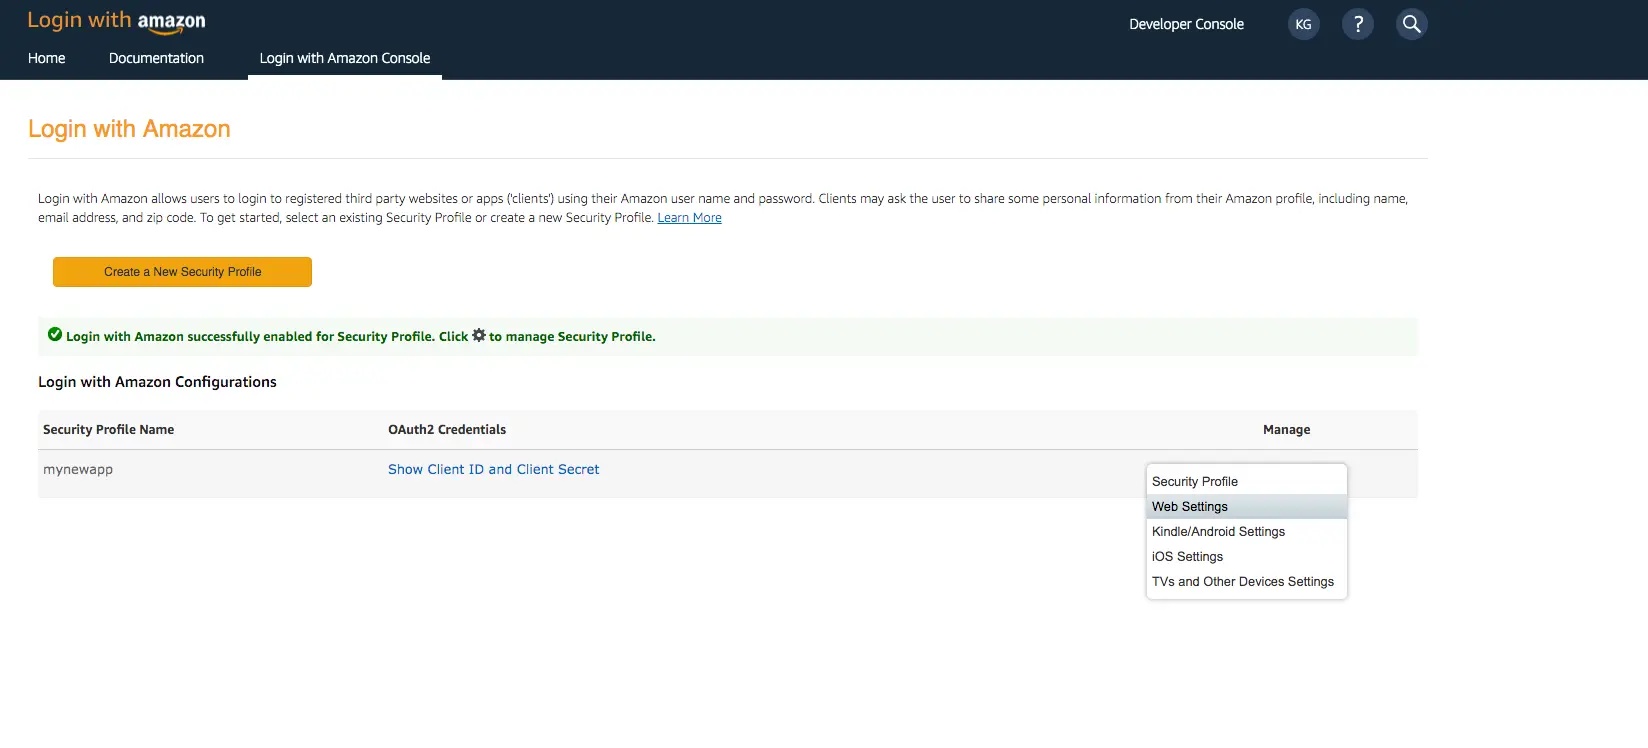
-
Type your user pool domain into Allowed Origins and type your user pool domain with the
/oauth2/idpresponseendpoint into Allowed Return URLs.
-
Choose Save.
-
Sign In with your Apple developer credentials.
-
On the main developer portal page, select Certificates, IDs, & Profiles.
-
On the left navigation bar, select Identifiers and then select Service IDs from the drop down list on the right.
-
Select the Service ID created when you set up your auth provider as outlined in the section above.
-
Enable Sign In with Apple and select Configure.
-
Under Primary App ID select the App ID that was created before.
-
Type your user pool domain into Domains and Subdomains.
-
Type your user pool domain with the
/oauth2/idpresponseendpoint into Return URLs.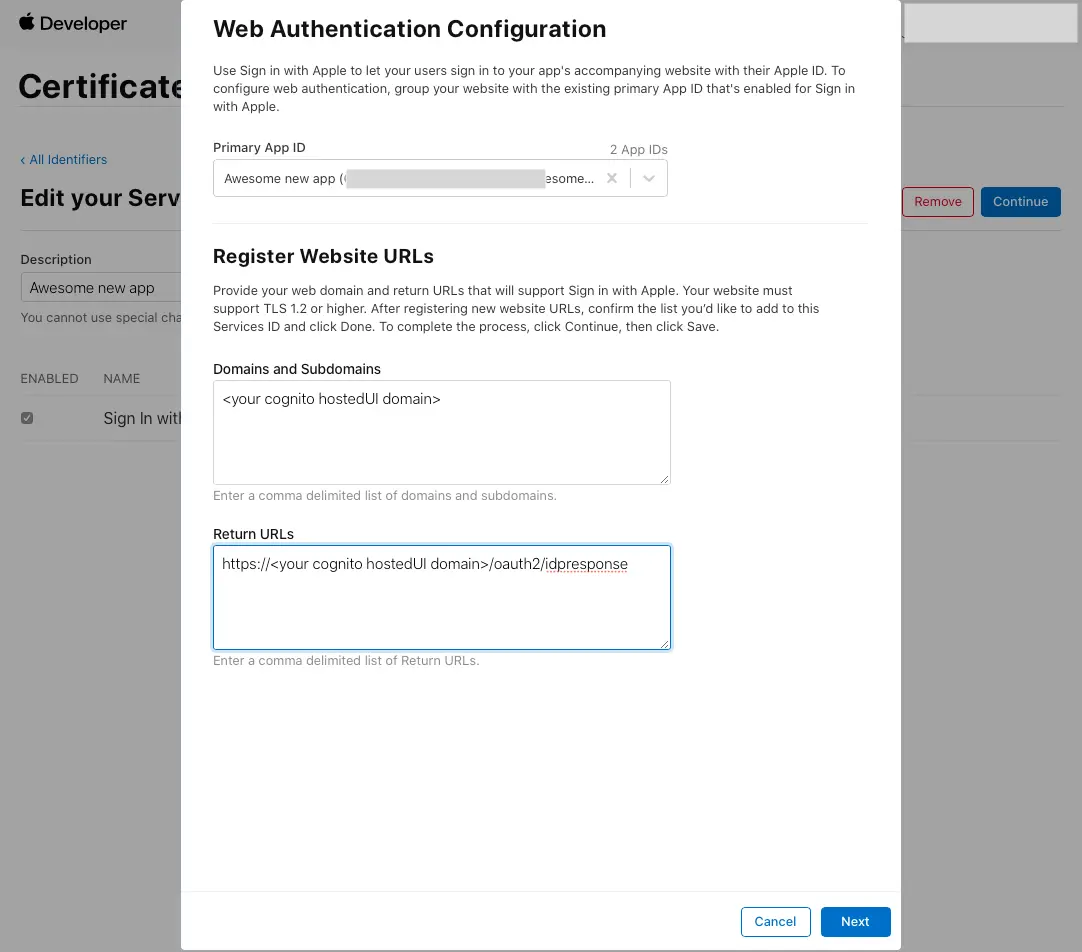
-
Click Next, review the information, then select Done.
-
On Edit your Services ID Configuration click Continue, review the information, then select Save.
-
On the main Certificates, Identifiers & Profiles, select Keys.
-
On the Keys page, select the plus icon (+).
-
Provide a name for the key under Key Name.
-
Enable Sign in with Apple and select Configure.
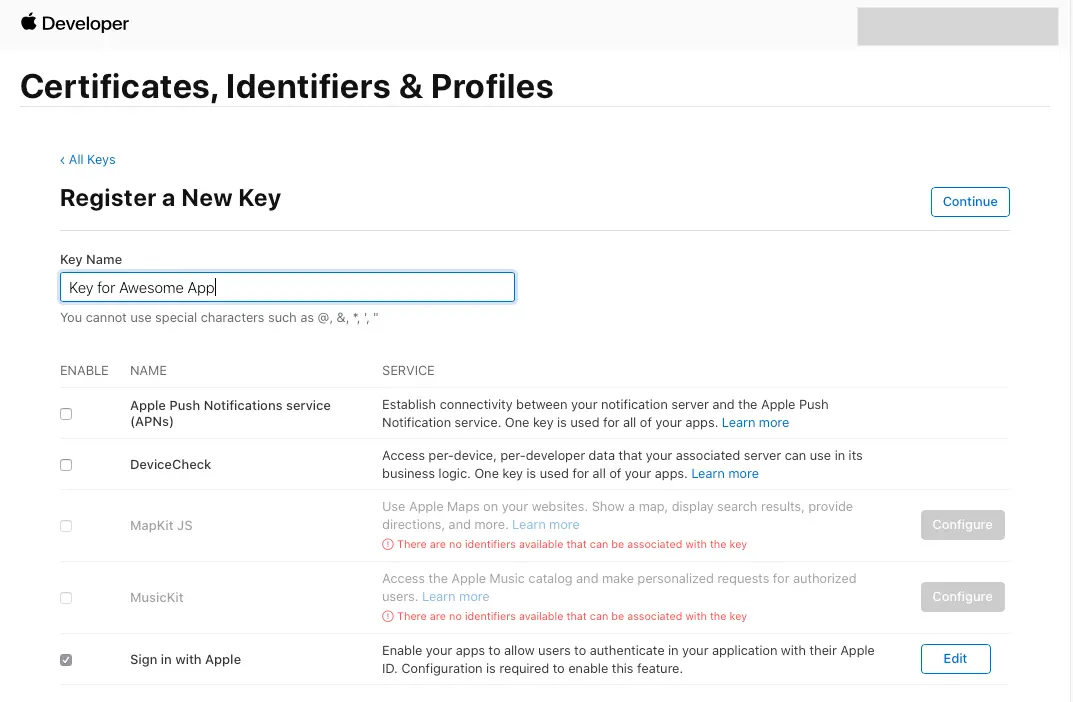
-
Under Primary App ID select the App ID that was created before.
-
Click on Save.
-
On Register a New Key click Continue, review the information, then select Register.
-
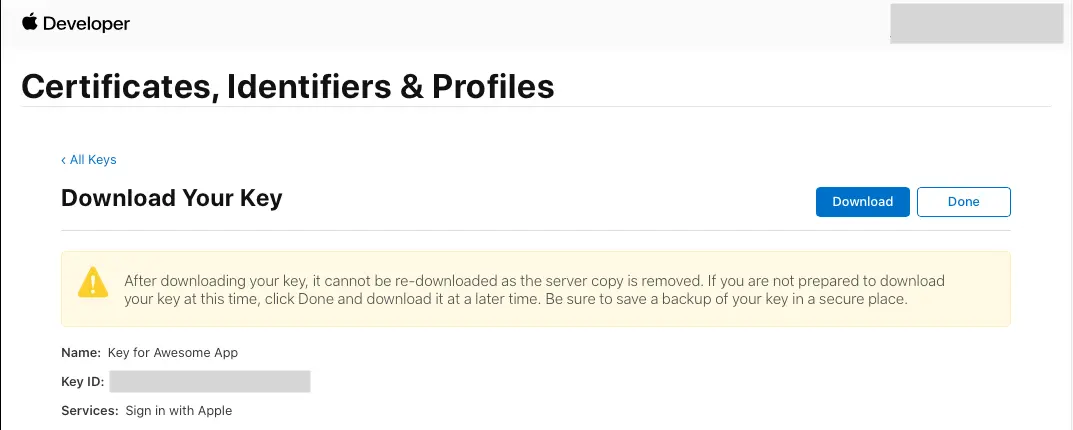
You will be redirected to a new page. Take note of the Key ID and download the .p8 file containing the private key.
You have configured your Auth category and updated your URL with the social providers. You can now set up the frontend for your app.
Set up your frontend
After configuring the OAuth endpoints (with Cognito Hosted UI), you can integrate your app by invoking the signInWithRedirect function which will redirect the user to the Cognito Hosted UI and provide options to sign in via username and password as well as any of the Social providers you have configured. Also, note that passing Amazon, Apple, Facebook or Google on the provider argument (e.g signInWithRedirect({ provider: 'Amazon' })) will bypass the Hosted UI and federate immediately with the social provider as shown in the below example.
Add custom state
A custom state is not required, but if you are looking to add one, you are able to do so by passing a string value (e.g. signInWithRedirect({ customState: 'xyz' })) and listening for the custom state via Hub. You can also use the Hub eventing system to catch errors using signInWithRedirect() to listen for the signInWithRedirect_failure event.
import { Hub } from "aws-amplify/utils";import { signInWithRedirect, getCurrentUser, AuthUser } from "aws-amplify/auth";
Hub.listen("auth", ({ payload }) => {  switch (payload.event) {    case "signInWithRedirect":      const user = await getCurrentUser();      console.log(user.username);      break;    case "signInWithRedirect_failure":      // handle sign in failure      break;    case "customOAuthState":      const state = payload.data; // this will be customState provided on signInWithRedirect function      console.log(state);      break;  }});
function handleSignInClick(customState: string) { signInWithRedirect({ provider: "Google", customState });}import { Hub } from "aws-amplify/utils";import { signInWithRedirect, getCurrentUser } from "aws-amplify/auth";
Hub.listen("auth", ({ payload }) => { switch (payload.event) { case "signInWithRedirect": const user = await getCurrentUser(); console.log(user.username); break; case "signInWithRedirect_failure": // handle sign in failure break; case "customOAuthState": const state = payload.data; // this will be customState provided on signInWithRedirect function console.log(state); break; }});
function handleSignInClick(customState) { signInWithRedirect({ provider: "Google", customState });}Redirect URLs
Sign in & Sign out redirect URL(s) are used to redirect end users after the sign in or sign out operation has occurred. You may want to specify multiple URLs for various use-cases such as having different URLs for development (http://localhost:3000/) production (https://www.example.com/) or redirect users to an intermediate URL before returning them to the app.
ExampleFull Example using multiple redirect URLs
import React, { useEffect, useState } from "react";import { Amplify } from "aws-amplify";import { Hub } from "aws-amplify/utils";import { signInWithRedirect, signOut, getCurrentUser } from "aws-amplify/auth";import { AuthUser } from "aws-amplify/auth";
Amplify.configure({  Auth: {    Cognito: {      loginWith: {        oauth: {          redirectSignIn: [            "http://localhost:3000/",            "https://www.example.com/",          ],          redirectSignOut: [            "http://localhost:3000/",            "https://www.example.com/",          ],          ...oauthConfig        },      },     ...userPoolConfig    },  },});
function App() {  const [user, setUser] = useState<AuthUser | null>(null);  const [error, setError] = useState<unknown>(null);  const [customState, setCustomState] = useState<string | null>(null);
  useEffect(() => {    const unsubscribe = Hub.listen("auth", ({ payload }) => {      switch (payload.event) {        case "signInWithRedirect":          getUser();          break;        case "signInWithRedirect_failure":          setError("An error has occurred during the Oauth flow.");          break;        case "customOAuthState":          setCustomState(payload.data);          break;      }    });
    getUser();
    return unsubscribe;  }, []);
  const getUser = async (): Promise<void> => {    try {      const currentUser = await getCurrentUser();      setUser(currentUser);    } catch (error) {      console.error(error);      console.log("Not signed in");    }  };
return ( <div className="App"> <button onClick={() => signInWithRedirect()}>Open Hosted UI</button> <button onClick={() => signOut()}>Sign Out</button> <div>{user?.username}</div> </div> );}import React, { useEffect, useState } from 'react';import { Amplify } from 'aws-amplify';import { Hub } from 'aws-amplify/utils';import { signInWithRedirect, signOut, getCurrentUser } from 'aws-amplify/auth';
Amplify.configure({ Auth: { Cognito: { loginWith: { oauth: { redirectSignIn: [ 'http://localhost:3000/', 'https://www.example.com/' ], redirectSignOut: [ 'http://localhost:3000/', 'https://www.example.com/' ], ...oauthConfig } }, ...userPoolConfig } }});
function App() { const [user, setUser] = useState(null); const [error, setError] = useState(null); const [customState, setCustomState] = useState(null);
useEffect(() => { const unsubscribe = Hub.listen('auth', ({ payload }) => { switch (payload.event) { case 'signInWithRedirect': getUser(); break; case 'signInWithRedirect_failure': setError('An error has occurred during the Oauth flow.'); break; case 'customOAuthState': setCustomState(payload.data); break; } });
getUser();
return unsubscribe; }, []);
const getUser = async () => { try { const currentUser = await getCurrentUser(); setUser(currentUser); } catch (error) { console.error(error); console.log('Not signed in'); } };
return ( <div className="App"> <button onClick={() => signInWithRedirect()}>Open Hosted UI</button> <button onClick={() => signInWithRedirect({ provider: 'Facebook' })}> Open Facebook </button> <button onClick={() => signInWithRedirect({ provider: 'Google' })}> Open Google </button> <button onClick={() => signInWithRedirect({ provider: 'Amazon' })}> Open Amazon </button> <button onClick={() => signInWithRedirect({ provider: 'Apple' })}> Open Apple </button> <button onClick={() => signOut()}>Sign Out</button> <div>{user?.username}</div> </div> );}Specifying a redirect URL on sign out
If you have multiple redirect URLs configured, you may choose to override the default behavior of selecting a redirect URL and provide the one of your choosing when calling signOut. The provided redirect URL should match at least one of the configured redirect URLs. If no redirect URL is provided to signOut, one will be selected based on the current app domain.
import { Amplify } from 'aws-amplify';import { signOut } from 'aws-amplify/auth';
// Assuming the following URLS were provided manually or via the Amplify configuration file,// redirectSignOut: 'http://localhost:3000/,https://www.example.com/'
signOut({  global: false,  oauth: {    redirectUrl: 'https://www.example.com/'  }});
(Required for Multi-Page Applications) Complete Social Sign In after Redirect
If you are developing a multi-page application, and the redirected page is not the same page that initiated the sign in, you will need to add the following code to the redirected page to ensure the sign in gets completed:
import 'aws-amplify/auth/enable-oauth-listener';Custom Providers
When using custom providers that are not provided by default in Cognito, you can pass an object to the provider parameter with the name of your custom provider.
import { signInWithRedirect } from 'aws-amplify/auth';
const provider = {  custom: 'MyCustomOIDCProvider'}
function handleSignInClick() {    signInWithRedirect({ provider })}
Deploy your backend environment with auth parameters for social sign-in
When you create or update your authentication configuration, Amplify will setup the configuration locally, but it does not automatically deploy the changes to your backend environment. You will need to run amplify push to deploy the changes to your backed environment.
You can deploy your app to the Amplify Console with continuous deployment of the frontend and backend, please follow these instructions.
Conclusion
Congratulations! You finished the Add social provider sign-in guide. In this guide, you learned how to set up your social auth provider, configure the Amplify Auth category for social sign-in, and set up the frontend. Your users can now sign into your app using their social provider accounts.
Next steps
Now that you have social provider sign-in you may also want to learn additional ways to customize these workflows. We recommend you learn more about: