Data management
The Amplify Studio Data management view provides a tabular view of the backend data for an application. You can use this feature to test your models and to provide both technical and non-technical team members with the ability to create and update an application's data in real-time instead of building admin views.
The Data modeling documentation guides you through several examples for creating data models and setting the relationships between them. The following data management procedures, reference the Book and Author tables that were created in the data modeling example in order to demonstrate how to perform operations on your data.
To create data
- Launch Studio for an app.
- On the Manage menu, choose Content.
- On the Content page, select the table to update from the Select table menu. For this example, select the Author table.
- Choose Create author.
- In the Add Author window, specify your custom values for the fields in the table. For this example, enter Martha for the firstName field and enter Riviera for the lastName field.
- Choose Submit.
To seed data
- Launch Studio for an app.
- On the Manage menu, choose Content.
- On the Content page, select the table to update from the Select table menu. For this example, select the Author table.
- On the Actions menu, choose Auto-generate data.
- In the Auto-generate data window, specify how many rows of data you want to generate and constraints for the generated data.
- Choose Generate data. Seed data is auto-generated using Faker.
To edit data
- Launch Studio for an app.
- On the Manage menu, choose Content.
- On the Content page, select the table to update from the Select table menu. For this example, select the Author table that you used in the previous procedure.
- From the list of records, select any field in the record you want to update.
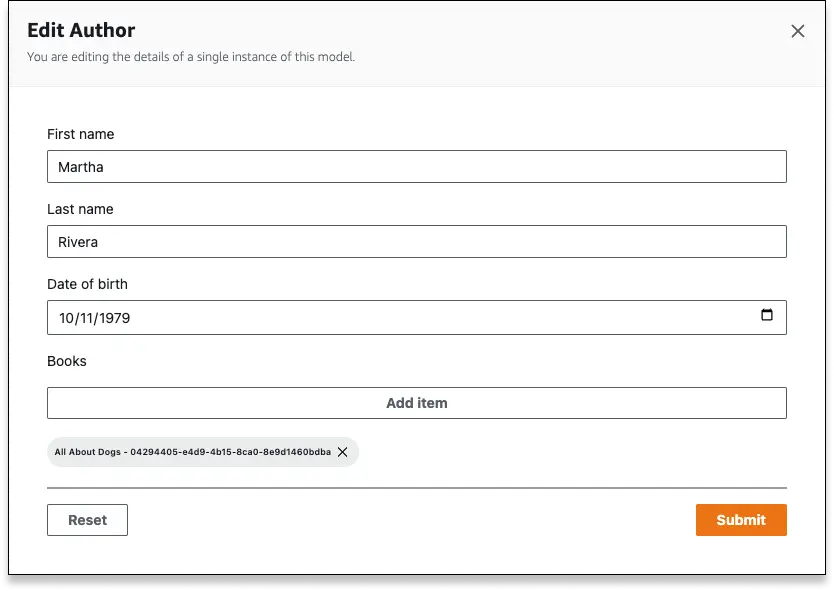
- In the Edit Author window, make any changes to your record, and then choose Submit.
To create and link data
When you create a new instance in a table, you can also link it to an instance in another table based on the relationships between the data models.
- Launch Studio for an app.
- On the Manage menu, choose Content.
- On the Content page, select the table to update from the Select table menu. For this example, select the Book table, to add a new instance of a book.
- Choose Create book. For title, enter All About Dogs.
- Let's link this book to the Martha Rivera author instance that you edited in the previous procedure. Choose Link to an existing Author, then choose the ID for Martha Rivera from the list of Author instances. Note that you have the option to link to an an author because a relationship was defined between the Book and Author tables during the data modeling process.
- View the details for the All About Dogs instance in the Book table, and Martha Rivera is linked as an author.
Alternatively, you can save save All About Dogs before linking to an Author, and instead create the link from an Author record by opening the Martha Rivera record, and selecting All About Dogs from the related Books.
To delete data
- Launch Studio for an app.
- On the Manage menu, choose Content.
- On the Content page, select the table to update from the Select table menu. For this example, select the Author table that you used in the previous procedure.
- From the list of records in the table, select the checkbox to the left of the record(s) you want to delete. For this example, select Martha Rivera.
- On the Actions menu, then choose Delete.
- In the Delete item confirmation window, choose Delete.
To download data
- Launch Studio for an app.
- On the Manage menu, choose Content.
- On the Actions menu you have two options for downloading data.
- Choose Download selected items (.csv) to download only the selected rows of data.
- Choose Download all items (.csv) to download all rows of data on the currently selected model.
- Once you have selected a download option, your data should immediately start downloading as a CSV.
Limitations
Conflict Resolution and DataStore
Studio's Data Manager supports Amplify GraphQL APIs with and without DataStore. However, GraphQL APIs without DataStore have several minor limitations:
- Data cannot be sorted by column
- The search bar is disabled
To use these features, you can add DataStore to your app by adjusting your Conflict Resolution settings.
If your GraphQL API is using Conflict Resolution and DataStore
Multi-tab limitation
If your GraphQL API is using DataStore, Studio's Data Manager requires use of IndexedDB (a local database in your web browser) in order to function. Because of this, Data Manager may not load as expected if opened in multiple tabs or windows in your browser.
This limitation does not apply to GraphQL APIs with Conflict Resolution disabled.
Null required fields
When using the data manager, you may encounter the following error message:
Field {{fieldName}} cannot be set to null since it's a required field.This message occurs when there are records in the selected data model that have null values for required fields. Usually, this occurs because a field was changed to be required after records were created. To resolve this issue, null records need to be updated.
To update records in Studio...
- From the Data tab, change the required field to optional, and select Save and deploy to redeploy your data model
- In the Content tab, update all records so that there are no null values for this field, or delete records with null values
- In the Data tab, change the field back to required, and select Save and deploy again
To update records in DynamoDB...
- Visit the DynamoDB console
- Select the Tables heading in the left-hand nav bar, and select your app's table
- Select the "Explore table items" button in the upper right-hand corner
- Update all records so that there are no null values for this field, or delete records with null values
Bi-directionally required fields
A bi-directionally required field is a Relationship field between two data models where both models require a non-null value for the field. Currently, the Data Manager does not support creating or editing records for models with bi-directionally required fields. To manage data in these models, take one of two paths:
- Change the field to optional for one or both of the related models, OR
- Create and manage records using GraphiQL, which supports simultaneous record management
Change of type in fields
When using the data manager, you may encounter the following error message:
Field {{fieldName}} has a type mismatch. Expected {{typeName}}, but got {{typeName}}This message occurs when there are records in the selected data model that have a mismatch in the expected type of a field. Usually, this occurs because a field was updated with a new type after records were created. To resolve this issue, records need to be updated.
To update records in Studio...
- In the Content tab, update all records so that they match the type of this field
To update records in DynamoDB...
- Visit the DynamoDB console
- Select the Tables heading in the left-hand nav bar, and select your app's table
- Select the "Explore table items" button in the upper right-hand corner
- Update all records so that they match the type of this field
IAM required as auth provider
In order to use Data Manager, your app must have IAM set as the default or an additional auth provider. If IAM is not added as an auth provider, you may receive the following error message:
For Studio-supported GraphQL schemas...
- Navigate to the Data tab
- Click "Save and Deploy" and Studio will automatically add IAM as an additional auth provider
For unsupported GraphQL schemas...
- In your app root directory, run
amplify update api - Select
GraphQL - Select
Authorization Modes - Change your default auth type OR add an additional auth type
Change your default auth type:
- Select IAM as your default authorization type
- Run
amplify push
Add an additional auth type:
- Select your current default authorization type and accept all defaults to leave it unchanged
- Select
Configure additional auth types - Select IAM
- Run
amplify push