Serverless containers
Serverless containers provide the ability for you to deploy APIs and host websites using AWS Fargate. Customers with existing applications or those who require a lower level of control can bring Docker containers and deploy them into an Amplify project fully integrating with other resources.
Amplify libraries can be used with the Auth category giving mobile and web applications secure connectivity and access controls to your Serverless containers. Additionally, existing GraphQL and REST services such as AWS AppSync and Amazon API Gateway can be used in the same project along with Fargate-backed APIs giving flexibility to mix and match for cost optimization and operational needs.
Note that serverless containers do incur additional costs and operational overhead, as such we recommend using AWS AppSync with the GraphQL Transform as a starting point when building mobile and web apps with Amplify.
Billing warning: When you deploy serverless containers with Amplify, it incurs additional costs when resources are not in use for services such as VPC, Fargate, ECR, Cloud Map, CodePipeline, and CodeBuild. For more information refer to VPC pricing, Fargate pricing, ECR Pricing, CodePipeline pricing, CodeBuild pricing, and Cloud Map pricing.
Getting Started
Serverless containers are not enabled in your Amplify CLI project by default. To get started you will need to run amplify configure project in order to see the options for deploying to Fargate. To get started initialize your project and enable container-based deployments:
$ amplify init
$ amplify configure project > Do you want to enable container-based deployments? Yes
Next add a NoSQL Database table named posts with column called id of type number (N). Make this the partition key.
amplify add storage> NoSQL Database # Name table “posts”
> What would you like to name this column: id
? Please choose the data type: string> number binary
? Please choose partition key for the table: (Use arrow keys)> idYou can select no for all other questions. After this add an API using the REST (or GraphQL) default ExpressJS template and grant it access to this DynamoDB table.
amplify add api> REST> API Gateway + AWS Fargate (Container-based)> ExpressJS - REST template? Do you want to access other resources in this project from your api? Y # select yes> storage # select posts table # select post table and all permissions ◉ create ◉ read ◉ update ◉ delete> Do you want to restrict API access (Y/n) # Will use Amazon Cognito if Yes is selectedNote the environment variables printed to the screen. If you choose a different database table name so that your variables are different from STORAGE_POSTS_NAME then update the TableName variable at the top of amplify/backend/api/<apiname>/src/DynamoDBActions.js appropriately.
Finally run amplify push to deploy the backend:
amplify pushOnce this completes your container will be built via an automated pipeline and deployed to Fargate Tasks on an ECS Cluster fronted by an Amazon API Gateway HTTP API using a direct Cloud Map integration to your VPC. If you selected Yes to protect your API with Authentication, an Amazon Cognito User Pool will be created with an Authorizer integration for that API.
Deploy a single container
The single Dockerfile scenario allows you to take an application running in a single Container which has been built with a Dockerfile and deploy it to AWS Fargate with the Amplify CLI.
A simple Dockerfile example is below, which would start a NodeJS application (index.js) in a built image by copying all the source files and installing dependencies. This example also shows how could can specify environment variables and use the EXPOSE statement for defining your container's communication port.
FROM public.ecr.aws/bitnami/node:14.15.1-debian-10-r8
ENV PORT=8080EXPOSE 8080
WORKDIR /usr/src/app
COPY package*.json ./RUN npm installCOPY . .
CMD [ "node", "index.js" ]
You will need an EXPOSE statement in your Dockerfile to specify a port to communicate with the container. If you do not provide one Amplify will suggest to use port 80.
Local development and testing
It is recommended to test your application locally first before deploying with amplify push, otherwise your Fargate Task may fail to start if there are application issues such as missing dependencies. With a Single Dockerfile you can do this by navigating to amplify/backend/api/<name>/src and running docker build -t to build and tag your image followed by docker run to launch your container similar to the below example:
$ cd ./amplify/backend/api/<name>/src$ docker build -t node-app:1.0 .$ docker run -p 8080:8080 -d node-app:1.0$ curl -i localhost:8080 ## Alternatively open in a web browserYou can also run your application using standard tooling such as running node index.js or python server.py in Node or Python. Once you are satisfied with the Dockerfile and your application code, run amplify push and the amplify/backend/api/<name>/src directory will be bundled for the build pipeline to run and deploy your image to Fargate. At the end of the deployment the endpoint URL will be printed and client configuration files will be updated.
Deploy multiple containers
If you wish to deploy multiple containers into Fargate to define your API, Amplify will parse a Docker Compose file (docker-compose.yml) in your amplify/backend/api/<name>/src directory to define the backend service. If you are unfamiliar with using a Docker Compose review the Docker Compose getting started guide or or add an API with an Amplify-provided template.
A Compose file includes the logical container names, build & images settings, launch commands, ports, and more. An example Docker Compose file is below:
version: '3.8'services: express: build: context: ./express dockerfile: Dockerfile ports: - '8080:8080' networks: - public - private python: build: context: ./python dockerfile: Dockerfile networks: - public - private ports: - '5000:5000'networks: public: private:This docker-compose.yml file would be placed in your amplify/backend/api/<name>/src when using the "bring your own container" flow. It defines two containers called express and python which each have a Dockerfile in two sub directories along with the application source files
./amplify/backend/api/<name>/src docker-compose.yml /express Dockerfile package.json index.js /python Dockerfile requirements.txt server.pyLocal development and testing
As with the single container workflow, it is recommended to test your application locally first before deploying with amplify push, otherwise your Fargate Task may fail to start if there are application issues such as missing dependencies. Navigate to amplify/backend/api/<name>/src and run docker-compose up which will build your images and start them locally.
$ cd ./amplify/backend/api/<name>/src$ docker-compose up$ curl -i localhost:8080 ## Alternatively open in a web browserIf your application source changes for any of the images, you can rebuild them by running docker-compose build before running docker-compose up during your test and development cycle.
Container networking
Multiple containers are deployed as a single unit in Fargate (e.g. same Task Definition). This opinionated deployment allows ease of networking between containers on the local loopback interface and avoids extra configuration, costs, operations, and debugging.
When container is deployed to Fargate
The loopback interface has an IP of 127.0.0.1 and a hostname of localhost which you can use in one container's application code to communicate with another.
Using the docker-compose.yml example from earlier, you might have the following code in your NodeJS application. It references the port of the Redis container and a host using the loopback adapter with localhost:
const options = {  port: 5000,  host: 'localhost',  // Loopback interface communication  method: 'GET',  path: '/images'};
http.get(options, data => {...})
When testing locally using docker-compose up
When performing local development and testing with docker-compose up you will use the logical container name defined in your docker-compose.yaml file.
const options = {  port: 5000,  host: 'python',   // Name of other container in docker-compose  method: 'GET',  path: '/images'};
http.get(options, data => {...})
Supported Configurations
Amplify will configure your Fargate infrastructure (ECS Service and Task Definition) automatically while allowing you to override specific settings with a Docker Compose file. Older versions of Compose files are supported however not all configuration values will be honored, therefore it is recommended you update to 3.8. Additionally if a value has been deprecated in one version of Compose, Amplify will prefer the newest version (3.8).
- build
- name
- ports
- command
- entrypoint
- env_file
- image
- healthcheck
- working_dir
- user
- secrets
- replicas
By default Amplify will use a single Availability Zone however if you choose the High Availability option it will spread Fargate Tasks across 3 Availability Zones. The replicas value should be used to increase the number of Fargate tasks running in your Cluster depending on your traffic requirements, however note that more running tasks will accrue more costs.
When you have multiple container entries specifying a port Amplify will prompt you upon running amplify push to select an Entrypoint Container. Since all containers are deployed as a "unit" and fronted by an API Gateway HTTP endpoint for client applications to access, Amplify needs to know which container in the Cluster's Service to route requests. The answer to the Entrypoint question will use the first specified ports entry to perform this routing.
It is recommended that you define container settings early in the development process if possible. While these settings can be updated later, it will cause an in-place replacement of the Fargate service configuration and could lead to your endpoint being unavailable for a few moments while the process completes. For best results minimize configuration changes in your Docker Compose settings and make more frequents updates to your application code in order to take advantage of rolling updates in the build and deploy pipeline.
Environment variables and secrets
You can use environment variables in your application code that are specified in your Docker Compose file, but do not specify the hostname when deploying in amplify push. For example the DATABASE_HOST variable below might be specified locally when using docker-compose up with the environment setting:
environment: - DATABASE_DB=amplify - DATABASE_USER=root - DATABASE_PASSWORD=/run/secrets/db-password - DATABASE_HOST=db #comment out before pushingThen your application code can switch between local and cloud deployment automatically and communicate with the db container:
module.exports = { database: { host: process.env.DATABASE_HOST || 'localhost', port: process.env.DATABASE_PORT || 3306, database: process.env.DATABASE_DB, user: process.env.DATABASE_USER, password: process.env.DATABASE_PASSWORD }, port: process.env.PORT || 8080};secrets allow you to pass sensitive data to your containers from AWS Secrets Manager. Amplify will do this for you when you populate the secrets configuration at the root level of your docker-compose.yml. It must be a file name that starts with .secret- and cannot be in the src directory of amplify/backend/api/<name>, but can be anywhere outside of it including a relative path. It is recommended to place your secrets in a amplify/backend/api/<name>/secrets directory. Every .secret- file has only one string value and will referenced by the name you provide in the docker-compose.yml entry.
When you perform an amplify push you will be prompted to store the secrets in the cloud or bypass (which may be the case in team workflows when one person controls secrets). The name of the secret will be available in your application code similar to if you specified other variables via the environment configuration:
version: '3.8'services: backend: build: args: - NODE_ENV=development context: backend environment: - DATABASE_NAME=mydb secrets: - DB_PASSWORDsecrets: DB_PASSWORD: file: ../secrets/.secret-passNodeJS example
const database = process.env.DATABASE_NAME;const password = process.env.DB_PASSWORD;Python example
import os
database = os.environ['DATABASE_NAME']password = os.environ['DB_PASSWORD']
Bring Your Own Container Specification For Your REST API
When creating an API using containers, you have the option to bring in your own Dockerfile(s) and docker-compose.yml. When selecting the Docker image for your REST API, choose Custom and then select when to deploy code and configuration changes to your container.
? What image would you like to use Custom (bring your own Dockerfile or docker-compose.yml)? When do you want to build & deploy the Fargate task> On every "amplify push" (Fully managed container source) On every Github commit (Independently managed container source) Advanced: Self-managed (Learn more: docs.amplify.aws/react/tools/cli/usage/containers)The CLI will provide you with the next steps to bring your existing Docker specification and source files into your project by populating the src directory.
✅ Next steps:- Place your Dockerfile, docker-compose.yml and any related container source files in "amplify/backend/api/{API_NAME}/src"- Amplify CLI infers many configuration settings from the "docker-compose.yaml" file. Learn more: docs.amplify.aws/react/tools/cli/usage/containers- To access AWS resources outside of this Amplify project, edit the amplify/local/test/amplify/backend/api/{API_NAME}/custom-policies.json- Run "amplify push" to build and deploy your imageClient Configuration
Serverless containers are fronted by a secure endpoint by which you can interact with them from a mobile or web application. Amplify CLI will attempt to update the project aws-exports.js or amplifyconfiguration.json file with the endpoint, however for GraphQL API types this is not possible and you will need to manually specify it in an Amplify.configure() call within your application code. The endpoint will be printed out to the screen after running an amplify push for you to make these changes, take note of it and follow one of the guides below appropriately.
- JavaScript GraphQL configuration
- JavaScript REST configuration
- Android GraphQL configuration
- Android REST configuration
- iOS GraphQL configuration
- iOS REST configuration
Note that if you have enabled Authorization checks on your endpoints during amplify add api your clients will need to Authenticate against the Cognito User Pool configured and pass tokens. Please see the appropriate platform guide for adding Sign-Up and Sign-In calls to your application.
Access existing AWS resource from container
You can grant your Fargate Task access to additional AWS resources and services. After running amplify add api, the CLI generates a custom-policies.json under the folder amplify/backend/api/<api-name>/custom-policies.json. The file is where you can specify the resources and actions that grant the Fargate task additional AWS resources and services access.
Custom Policy File Structure
[ { "Action": ["s3:CreateBucket"], "Resource": ["arn:aws:s3:::*"] }]Action: Specify the actions that are required to be granted to your AWS resource. Wild characters ‘*’ is accepted.
Resource: Specify resources that the AWS resource needs access. The resource accepts multiple ARNs for a service and wild card character ‘*’ is accepted.
Note: Specifying resource or action as ‘*’ is not recommended as best practice. This gives the Amplify api resource Administrative privileges which should be avoided.
If your Amplify resource requires access to multiple AWS services and resources, create another block to grant access to these additional services and resources.
[ { "Action": ["s3:CreateBucket"], "Resource": ["arn:aws:s3:::*"] }, { "Action": ["iam:GetPolicy"], "Resource": ["arn:aws:iam:::policy/*"] }]Optionally, the Effect field can be specified to use ‘Allow’ or ‘Deny’. If not specified, the field defaults to ‘Allow’.
{ "Action": ["s3:CreateBucket"], "Resource": ["arn:aws:s3:::*"], "Effect": "Allow"}On running amplify push command, the IAM policies specified in the custom-policies.json file will be appended to the existing IAM policy list tied to the Fargate Task's execution role.
Multi-Environment Workflow
To specify AWS ARN resources across environments, an optional ‘${env}’ parameter can be used within the resource string. The ‘${env}’ parameter in the AWS ARN resource will get populated with the current Amplify environment name at deployment.
"Resource": ["arn:aws:s3:::$\{env}my-bucket"]Hosting
When using containers in the amplify add hosting workflow the setup will be largely the same, including the ability to define your backend with a single Dockerfile or Docker Compose file yaml. However the ECS cluster will be fronted by an Application Load Balancer (ALB) and CloudFront distribution, and you will be required to provide a domain name which you own. This can either be a domain which you have purchased on a 3rd party registrar or with Route53. The domain will be used with Amazon Certificate Manager to configure SSL between ALB and Cognito User Pools to perform authorization to your website hosted on Fargate containers.
Hosting with Fargate in Amplify is only available in US-East-1 at this time
If you are using a non-Route53 registrar, you will need two additional steps:
- Approve the certificate request. This will come via email to your registered address. If you do not see it you may need to resend the email.
- Add a CNAME (A Record) on your to your DNS for the CloudFront distribution and Application Load Balancer. These will be printed out to the screen after
amplify pushsucceeds.
For Route53 registered domains these steps are not needed and Amplify will register everything automatically. You can learn more about registering a domain name in the Route53 documentation.
You can additionally restrict access to your hosted site using Amazon Cognito User Pools. The ALB will authorize requests by using the OAuth endpoint of the Cognito Hosted UI with an SSL-enabled HTTP listener. To do this run amplify add auth first and select Default configuration with Social Provider (Federation) to enable the Hosted UI (you don't need to select any of the 3rd party social providers if it's not needed in your application). After this select Yes when prompted Do you want to automatically protect your web app using Amazon Cognito Hosted UI in the amplify add hosting flow. Alternatively, you can first add hosting and later add auth to your project by running amplify configure hosting after this is completed.
Build Pipeline
Amplify creates APIs as an ECS Service to ensure that your application is monitored and tasks are in a healthy and active state, automatically recovering if an instance fails. When you make changes to your source code, the build and deployment pipeline will take your source code and Dockerfile/Docker Compose configuration as inputs. One or more containers will be built in AWS CodeBuild using your source code and pushed to ECR with a build hash as a tag, allowing you to roll back deployments if something unexpected happens in your application code. After the build is complete, the pipeline will perform a rolling deployment to launch Fargate Tasks automatically. Only when all new versions of the image are in a healthy & running state will the old tasks be stopped. Finally the build artifacts in S3 (in the fully managed scenario) and ECR images are set with a lifecycle policy retention of 7 days for cost optimization.
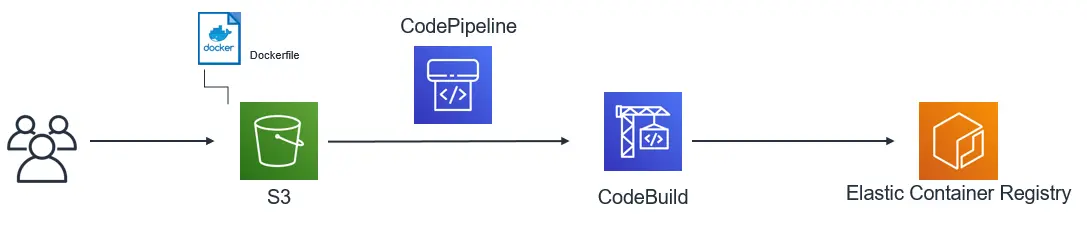
Fully Managed
The fully managed workflow does not require you to have a source control repository or even Docker installed on your local workstation in order to build and deploy a container to Fargate. Amplify will package the contents of amplify/backend/api/<name>/src and place it onto an S3 deployment bucket. This will trigger a Code Pipeline process which builds your container(s), stores the results in ECR, and deploys them to Fargate.
For single containers only one ECR entry and deployment will take place. When using a Dockerfile, a build and push to ECR will take place for each container that has a corresponding build entry. For containers that only have an image entry no ECR push will take place and this image will be launched directly into the Fargate Task. As you make changes to your source code in amplify/backend/api/<name>/src, Amplify will detect any changes when you run amplify push, package the new files together and place them on S3. This will start another run of the build and deploy pipeline automatically updating your Fargate Service.
GitHub Source
If you are using GitHub as your source repository for an Amplify project, you can use this to invoke the pipeline instead of having Amplify package and upload source to S3. In this use case you will need to provide a GitHub personal access token which will be stored in Secrets Manager as well as the full URL to your repository folder (or the branch). For instance if you push an Amplify project to GitHub called MyFargateProject you would use https://github.com/username/MyFargateProject/tree/main/amplify/backend/api/APINAME/src. repo and admin:repo_hook scopes will be needed. Please see the Code Pipeline documentation for more details.
Code Pipeline will use this for accessing the GitHub repo of your choosing and invoke the build and deploy to your Fargate Service, just as with the Fully Managed flow. Your repository must have the same structure as you would have had locally in amplify/backend/api/APINAME/src, that is to say:
- Single container needs to have a Dockerfile and all other required files (package.json, etc.)
- Multiple containers needs to have a
docker-compose.ymland related file structure
Code Pipeline will create a webhook on the GitHub repository which will trigger an invocation of the build and deployment pipeline to Fargate.
Self-managed builds
You can always interact directly with the resources in your account to build containers locally and deploy them to ECR. This is an advanced option that we do not recommend for customers getting started. As you will need to run manual docker commands for building, tagging, and pushing your images to ECR. You will also need to restart the tasks manually on your ECS Service. Please see the ECR documentation for more information.
Troubleshooting
Note that a container deployment could fail or be problematic in a few different ways ranging from a build issue to bugs in your application code not seen until production. There are different checkpoints along the way to help prevent application issues as well as methods to revert changes which are outlined below. To access the AWS Console with details of your container status, logging, or build pipeline at any time run amplify console api and select your deployed API.
Build failure
When your code is submitted to the pipeline either via amplify push or check-in to GitHub, it will be packaged and submitted to a CodeBuild job. If this build phase fails your the rest of the pipeline stops and your code will not even attempt to launch on Fargate until the build errors have been resolved. The job will perform the following:
- Login to ECR
- Create a commit hash
- Build each container (e.g.
docker build) - Tag each container (e.g.
docker tag) - Push each container to ECR (
docker pushwith commit hash) - Write the build artifact (
imagedefinitions.json) to S3
If you see a failure in the Code Pipeline console at this step, you can view the details of the build (even clicking "Tail Logs" while the pipeline is running) to see what error occurred. It's possible you have a misconfiguration in your Dockerfile or even a network failure pulling an image from a 3rd party repository. To help avoid this issue you can always run docker build or docker-compose up locally before submitting a build and validating the application runs.
Note that on your first deployment a queueing process will take a bit longer to setup your project networking stack and run initial builds in Code Pipeline. During this time if your build fails for any reason (even external image throttling or Dockerfile config) the process will roll back. If you wish to debug this during initial rollout the Amplify CLI will print out the URL of the pipeline when amplify push starts to process the stack for you to view the build phase actively.
Container launch failure
If your build pipeline completes and rolling deployment to your ECS cluster begins, but you notice that the process is not completing, it may be due to an application issue or container configuration problem in the Dockerfile. For example if you had a NodeJS or Python application that crashed upon startup (such as a file/module not found) the task may shut down. Since ECS is trying to keep the service alive it will retry starting the task several times to see if the problem will self correct. If you know what the problem is and want to stop this retry process early so that you can try another push, simply open the Cluster and click on the Service in the ECS console. Update the service and set the desired count for running tasks to 0 (zero) and update the cluster. Then fix the problem and perform another amplify push to try a deployment again.
Common issues are the application level crashes mentioned above, as well as incorrect Dockerfile/Docker-Compose commands such as those specified in entrypoint, command, or RUN. It's also possible that a specified healthcheck is continually failing. To troubleshoot this further you can click on the Cluster then Service in the ECS console followed by Tasks to see the Stopped containers. If you expand them there may be a top level error message giving information such as permissions or resource issues. Amplify also sets up logging by default and on this screen you will also find "Log Configuration" to view the logs in CloudWatch when you expand each container entry.
Application code bug
Finally you may have an issue in your application code. This would be seen either in the CloudWatch logs outlined above or through functional testing. You can log to CloudWatch via standard language logging (e.g. console.log() in NodeJS). The simple and most straight forward way to make a fix is roll forward deployments, such as fixing the code and performing another amplify push. Sometimes this is not possible and you need to revert a change to an older image. Amplify automatically creates a commit hash for each successful build before storing the record in ECR, with the most recent build having an additional latest tag applied. Older revisions are kept in ECR for 7 days before being cleaned up in order to avoid extra storage costs. If you need to revert to an older version you can note the commit hash and re-tag it along with the latest tag, then stop the tasks in your Cluster Service. ECS will automatically pull your newly tagged revision from ECR and deploy that version.