Troubleshooting
This troubleshooting guide provides guidance to developers to detect and correct common errors encountered during development, deployment, and migration of applications built using the Amplify CLI.
Essential reading
For all Amplify CLI projects
To debug deployment issues, it's helpful to understand the file structure of your Amplify-generated project and the artifacts generated by the Amplify CLI.
-
Amplify CloudFormation artifacts: The Amplify CLI provisions AWS resources using CloudFormation templates and the input parameters provided by the user during the CLI walkthrough. Starting with Amplify CLI version 7 and above, some categories (Storage, Auth, API) allow developers to override the Amplify-generated AWS resource configurations with the Amplify CLI Overrides feature.
-
Amplify CLI walkthrough input parameters artifacts: All inputs provided by the user during a CLI walkthrough are stored in JSON files in the
/amplify/backendfolder. For example,cli-inputs.jsonoramplify-meta.json. These files let you inspect the configurations, both developer-provided and Amplify-generated, to root cause potential problems. Refer to Amplify backend files documentation to determine if a file is safe to edit manually.
Domains that Amplify CLI requests when running init, publish, and push.
If you run Amplify CLI via proxy, make sure to add the following domains to the allowlist.
- amazonaws.com
- amplifyapp.com
- aws-amplify.github.io
For Amplify CLI projects with GraphQL API
To debug deployment issues in projects with GraphQL API, it's helpful to understand the various artifacts generated by Amplify in a GraphQL project.
- GraphQL schema VTL generation: The Amplify CLI GraphQL workflow uses the AWS AppSync service to provision the GraphQL API. The
amplify api gql-compilecommand transpiles the GraphQL schema provided by the developer and generates all the artifacts required to deploy the API in AWS.- Directives like @model, @function, @auth, and @searchable in the GraphQL schema are used to generate CloudFormation and provision AWS resources.
- The GraphQL resolvers for Query, Mutation or Subscription are converted into VTL (Velocity Template Language) files. AWS AppSync uses VTL to translate GraphQL requests from clients into a request to your data source.
- GraphQL schema client-side code generation: The Amplify CLI GraphQL workflow allows developers to generate client-side code for web and mobile clients using the
amplify codegencommand. Read the Amplify code generation documentation prior to debugging any client-side code generation issues.
Troubleshooting "amplify push" failures
The amplify push command performs the following steps:
- It generates CloudFormation for deployment of resources to AWS.
- If the application contains a GraphQL API, the CLI runs
amplify api gql-compileinternally to compile the schema and generate VTL (Velocity Templates) for mapping resolvers and CloudFormation templates to allocate AWS resources. - It builds, packages, and uploads the deployment artifacts into the application's deployment bucket.
- It uses the AWS CloudFormation SDK to deploy the CloudFormation stack into your AWS account.
- On a successful deployment of the resources to AWS, the Amplify CLI renames the deployment package in the deployment bucket to
#current-cloud-backend.zip. This file is the source of truth for your deployment. - If your local project is deleted or corrupted, you can always go back to your last successful deployment using
amplify pull.
** This table shows the important files and folders in the Amplify deployment bucket **
| Name | Type | Purpose |
|---|---|---|
| #current-cloud-backend.zip | zip file | Source of truth for the Amplify project. |
| amplify-appsync-files/ | folder | GraphQL API deployment artifacts (VTL resolvers, CloudFormation) |
| amplify-cfn-templates/ | folder | CloudFormation templates generated by Amplify for each resource category |
| amplify-meta.json | file | Used by CLI core and the plugins to log internal information and to communicate with each other |
| backend-config.json | file | Configuration about how your project's backend connects to AWS resources |
| hooks/ | folder | User provided Amplify hooks scripts |
| root-cloudformation-stack.json | file | The parent CloudFormation template for your application's nested stack |
** The following sections contain examples of different types of "amplify push" failures and suggested resolutions **
Push failures from unmanaged changes to cloud resources - Drift
A change to Amplify-generated resource from outside of Amplify, such as using the AWS console, is called an "unmanaged change". The Amplify CLI cannot track such changes made outside of the Amplify-generated CloudFormation stack. This difference between the expected configuration of the resource in the Cloudformation versus the actual configuration of the service is called a “CloudFormation drift”. Currently there is no automated way to reverse a CloudFormation drift. Each resource must be inspected through the AWS console for drift in its CloudFormation stack and the drift has to be resolved manually.
Upon deployment, the Amplify-generated CloudFormation templates provision an AppSync GraphQL API and multiple DynamoDB tables with their GSIs.
Scenario 1: "amplify push" fails after manually updating DynamoDB tables and GSIs from the console.
Assume you have an application with a GraphQL schema deployed to the cloud. Amplify creates DynamoDB tables for all @model types and GSIs for all @index fields in the GraphQL schema. "Drift" is introduced if you delete any of the GSIs using the DynamoDB console, instead of using the Amplify CLI. With drift, future changes to the GraphQL schema may fail to deploy. As an example, if you change the names of some @model types and @index fields in your GraphQL schema and perform the amplify push --allow-destructive-graphql-schema-updates command, Amplify will first remove all DynamoDB tables corresponding to the original model names. However if any of these tables' GSIs were already deleted manually from the console, then the deployment will fail. This is because Amplify’s CloudFormation stack is attempting to update the state of a resource (the GSI) which doesn’t exist.
Suggested Resolution: To fix deployment failures due to drift in DynamoDB tables, manually rollback the state of the drifted resource to match its state in CloudFormation. Then retry amplify push.
- You can view the drift in the DynamoDB CloudFormation Stack per instructions in the AWS drift detection documentation
- Revert every drift manually through the AWS console. In this particular scenario, re-create the GSIs and manually undo any renaming changes.
- Perform an
amplify push.
Scenario 2: "amplify push" fails after unmanaged updates to non-database resources in the cloud.
Assume you have an application with a GraphQL schema deployed to the cloud using Amplify CLI. You then have performed one or more of the following types of changes
- Updated your GraphQL schema using the AppSync console, or
- Deleted user pools created by Amplify from the Cognito console, or
- Updated the code in Lambda functions which were originally deployed through Amplify. These types of unmanaged changes will introduce a drift for the affected resources. Therefore subsequent updates to these resources using Amplify will most likely fail deployment.
Suggested Resolution: These types of drifts must be addressed on a case-by-case basis. In some cases, such as a Lambda code change, forcing a redeployment of the function by making a minor change to the code will likely work. In other cases, like deleting a user pool or updates to GraphQL schema from the AppSync console, follow the steps below:
- Force a new CloudFormation stack deployment - Run
amplify push --forceto force push the application's resources. - Forcible deployment of CloudFormation stack from the Console - Fetch the CloudFormation stack from the "amplify-cfn-templates" folder in the application’s deployment bucket and selectively update the stack through the CloudFormation console as described in (AWS CloudFormation - updating stacks documentation)[https://docs.aws.amazon.com/AWSCloudFormation/latest/UserGuide/using-cfn-updating-stacks-direct.html].
- Apply drift changes into code - If methods above failed, the other option is to inspect the manual changes and to update them in the CLI input files. For example, you could update the GraphQL schema to reflect the same changes as performed manually in the cloud and then perform
amplify push.
Push failures in a multi-account multi-environment project (CI/CD errors)
In a multi-account project with CI/CD, you find that the application has deployed successfully in one account but has failed deployment in another account. The following are some common causes:
- Some resource being referenced in the Amplify-generated CloudFormation is missing from the failing account.
- The failing account is missing permissions to access a particular resource used in the CloudFormation.
- The application code relies on “secrets” that are not correctly created or copied in the failing environment.
Scenario 1: "amplify push" fails in one account/environment
Assume you created a project in a “dev” account and you extend your deployment environment to a full CI/CD pipeline with dev, beta, and prod environments. Your project likely follows a pattern specified in the Amplify CLI team environments guide. On completion of all steps, you observe that the Amplify Hosting console displays the “build” step of one of your environments, such as "beta", as failed and shows other environments as successfully deployed.
Suggested Resolution: Using Amplify CLI deploy the application in the failing account. In the above case, the dev environment has successfully deployed but the beta environment has failed. First, get the App ID from your dev environment. You can find your App ID under the "Edit backend" section of your application's dev environment in the Amplify console. Perform the following steps to fetch the app from the dev environment and deploy it into the beta environment.
amplify pull --appId <YOUR_APP_ID> --envName devamplify env checkout betaamplify push
If amplify push fails, check the CloudFormation event logs for the failing resource to get detailed information to fix the issues in the failing environment. In the AWS CloudFormation console, search for your application's stack name. For instance, if your application was named "lil" and deployed in your "dev" environment, Amplify would have generated a CloudFormation stack named amplify-lil-dev-{random chars}. In the CloudFormation console, click on the application's stack name and then click on the "Resources" tab. The "Resources" tab displays the deployment status of all the resources in the stack. It will also show the deployment error reason. Refer to the CloudFormation troubleshooting document to gain insight into the error messages.
Note: To debug any issues related to secrets not being correctly copied across environments, refer to Multi-environment flows section in the Access secret values documentation.

Push failures from resources exceeding AWS service quotas
AWS maintains service quotas for various AWS services. If your application contains many resources, such as large GraphQL schemas with many resolvers or many REST APIs, you may hit a service limit. To identify if exceeding an AWS Service level quotas caused a deployment failure, check the AWS console for the CloudFormation deployment/failure logs.
Suggested Resolution:
- If your application's resource requirements are impaired by AWS service quotas, you can use the AWS Service Quotas console to view and request increases for most AWS quotas.
- If you are using the Amplify DataStore, refer to Amplify DataStore Best Practices for insights into making the correct design decisions and optimize resource allocation in your application.
- If the service quotas cannot be increased, then this may require you to redesign some aspects of your application for sustainable scaling in a serverless environment. Referring to AWS Knowledge Center may help understand the different prescribed design changes. For example, a complex GraphQL schema could be simplified to reduce the number of GraphQL resources in use e.g rewriting the schema to have less models. Using escape hatches like overrides and export may help to scale the application beyond the CLI generated architecture.
Scenario 1: Optimizing REST API schema for reducing policy count:
Assume you have deployed a REST API using Amplify CLI with many routes and one Lambda to handle all routes. Amplify CLI in this case generates one policy per route and applies it to the Lambda execution role. Therefore in this configuration, the max number of allowed routes is limited by the “Max policies per role” limit in AWS IAM limits. The following table shows the distribution of policies with regards to routes in such a configuration. Note: The term "Resource" represents an API Gateway resource allocated to service the "Route".
| Resources | Policies | Role | Handler |
|---|---|---|---|
| /items/rock | amplify generated policy1 | ||
| /items/paper | amplify generated policy2 | Lambda Execution Role | Lambda function |
| /items/scissors | amplify generated policy3 |
However, if your application has many routes, one way to reduce the number of policies generated is by creating a single route resource and to support additional paths as query parameters: /items?item=rock, /items?item=paper, /items?item=scissors In this case the Amplify CLI creates only 1 policy for the /items resource.
| Resources | Policies | Role | Handler |
|---|---|---|---|
| /items | amplify generated policy1 | Lambda Execution Role | Lambda function |
Push failures from GraphQL schema syntax errors
After making any GraphQL schema changes, run amplify api gql-compile to ensure that the schema is valid and Amplify is able to generate correct CloudFormation templates from the GraphQL schema. Refer to the Amplify CLI GraphQL documentation to understand the latest Amplify GraphQL directives.
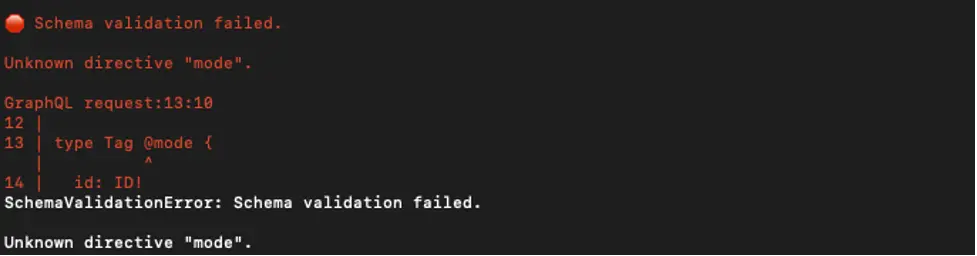
Scenario 1: GraphQL Schema errors
Assume your GraphQL schema has an error where the directive "@model" is misspelled as "@mode":
type Tag @mode { /** @mode is an invalid directive **/ id : ID! tag: String topics: [Topic]}When running amplify api gql-compile the transform step will fail with an invalid directive error.
Troubleshooting other GraphQL schema related errors
If amplify push fails while deploying any of the scenarios below, refer to the Amplify GraphQL Troubleshooting Guide.
- Deploying multiple index changes in a single
amplify push - Backfill OpenSearch index from DynamoDB table
- Index with Multi-Sort Key Fields
Troubleshooting "amplify pull" failures
Pull failures with large number of UI components
Starting with v12.2.0, Amplify CLI has introduced a configurable timeout for generating UI components during amplify pull. By default this timeout is set to 2 minutes, however you can increase the timeout using the UI_BUILDER_CODEGENJOB_TIMEOUT environment variable.
For example, if you'd like to increase the timeout to 5 minutes (i.e. 300000ms)
export UI_BUILDER_CODEGENJOB_TIMEOUT=300000amplify pullTroubleshooting "Failed to get profile credentials"
If you receive the following error and are using AWS IAM Identity Center (previously AWS SSO), you may be missing the credential_process workaround
🛑 Failed to get profile credentialsCannot read properties of undefined (reading 'accessKeyId')
Learn more at: https://docs.amplify.aws/cli/project/troubleshooting/
"Unexpected token A in JSON at position 0"
If you receive this error and are using AWS IAM Identity Center (previously AWS SSO), this error can be caused by selecting the sso-session entry when prompted for an AWS profile in Amplify CLI workflows. If this occurs, re-run the previous command and select the associated SSO profile.
Deployment Best Practices
This section describes the various best practices which help developers avoid deployment errors and scaling problems in their Amplify projects.
Overriding Amplify CLI default behavior
Any changes to your application must be performed only through the Amplify CLI and the associated configuration files or through Amplify Studio. Never manually edit any resources directly from the AWS console or using the AWS CLI/SDK, unless explicitly noted. To override the Amplify-generated resources beyond the customizations available within an Amplify CLI command, you must follow the instructions in the Amplify extensibility documentation which details all the “escape hatches” available in the Amplify CLI.
Understanding the impact of changing model names in the GraphQL Schema
Amplify automatically creates DynamoDB database tables for GraphQL types annotated with the @model directive in your GraphQL schema. Therefore if you rename models in the GraphQL Schema, to protect the application data from accidental deletion, the Amplify CLI will block subsequent amplify push operations and prompt you to explicitly pass the --allow-destructive-graphql-schema-updates flag. This flag grants Amplify CLI the ability to make destructive database changes, such as deleting the DynamoDB tables for the original model names and create new tables with the new model names specified in the schema. Amplify currently doesn't support automatic data migration. If the data in the original tables is required, then you will need to backup the DynamoDB tables and migrate the data after the destructive deployment of the new tables.

Migration from GraphQL transformer V1 to V2
If you have previously deployed an application using GraphQL transformer V1 and have decided to migrate to GraphQL transformer V2, go through the GraphQL transformer migration documentation to understand the impact of the migration on the schema directives and limitations prior to updating. You can confirm the version of the GraphQL transformer using the amplify status command. You can also inspect the transformerversion feature flag in ${project-root}/amplify/cli.json, to confirm.
Version 11 migration from AWS CDK V1 to V2
If the Amplify project has been deployed with an Amplify CLI version prior to 11.0.0 that utilizes overrides or custom resources, go through the AWS CDK migration documentation. If the problem persists, create an issue
Learn more about migrating to CDK v2
Local testing
Test schema changes and business logic as much as you can prior to deployment. The amplify mock command allows validation of your cloud dependencies locally. Follow the mock testing examples in Advanced workflows documentation to dive deeper.
Further reading
| Amplify CLI troubleshooting Guides | Description |
|---|---|
| Amplify CLI GraphQL troubleshooting | Troubleshoot and fix issues encountered when deploying GraphQL Schema through Amplify CLI |
| Amplify Console custom domain troubleshooting | Troubleshoot and fix issues encountered when adding Custom Domains to your Apps from the Amplify Console |
| IAM troubleshooting | Troubleshoot and fix common issues encountered when working with Amplify and IAM. |
| Amplify CLI extensibility | Learn about the different escape hatches provided by the Amplify CLI to extend your application and override default behavior |
| Amplify DataStore best practices | Learn the best practices to build your applications 'Offline First' using Amplify DataStore |
| AWS knowledge center | Learn about the most frequent questions and requests for your AWS services |
| AWS CloudFormation drift | Detect and View CloudFormation Drift |
Contacting support
Search for similar issues or open new issues on Github
Connect with AWS Enterprise support
Join our community Discord Channel