Set up Amplify PubSub
The AWS Amplify PubSub category provides connectivity with cloud-based message-oriented middleware. You can use PubSub to pass messages between your app instances and your app's backend creating real-time interactive experiences.
PubSub is available with AWS IoT and Generic MQTT Over WebSocket Providers.
AWS IoT
The default export for PubSub will sign requests according to Signature Version 4.
To use in your app, import PubSub from the root export path:
import { Amplify} from 'aws-amplify';import { PubSub } from '@aws-amplify/pubsub';Create a new instance for your endpoint and region in your configuration:
// Apply plugin with configurationconst pubsub = new PubSub({ region: '<YOUR-IOT-REGION>', endpoint: 'wss://xxxxxxxxxxxxx.iot.<YOUR-IOT-REGION>.amazonaws.com/mqtt'});Find your aws_pubsub_endpoint by logging onto your AWS Console, choosing IoT Core from the list of services and then choosing Settings from the left navigation pane.
Step 1: Create IAM policies for AWS IoT
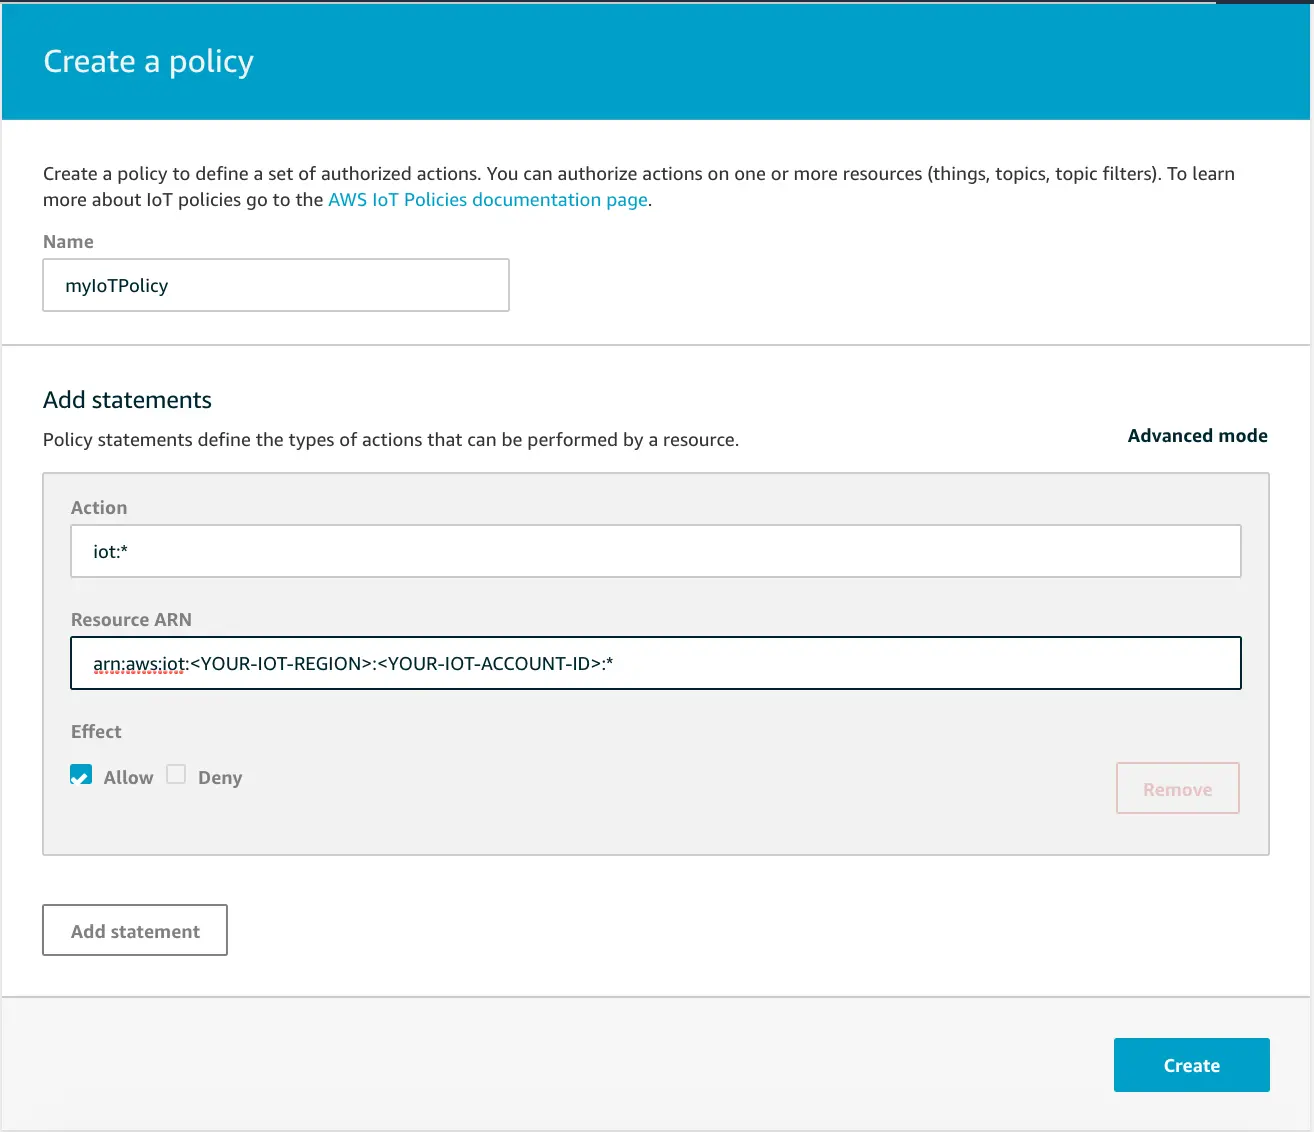
To use PubSub with AWS IoT, you will need to create the necessary IAM policies in the AWS IoT Console, and attach them to your Amazon Cognito Identity.
Go to IoT Core and choose Security from the left navigation pane, and then Policies from the dropdown menu. Next, click Create. The following myIoTPolicy policy will allow full access to all the topics.
Step 2: Attach your policy to your Amazon Cognito Identity
The next step is attaching the policy to your Cognito Identity.
You can retrieve the Cognito Identity Id of a logged in user with Auth Module:
import { fetchAuthSession } from 'aws-amplify/auth';fetchAuthSession().then((info) => { const cognitoIdentityId = info.identityId;});Then, you need to send your Cognito Identity Id to the AWS backend and attach myIoTPolicy. You can do this with the following AWS CLI command:
aws iot attach-policy --policy-name 'myIoTPolicy' --target '<YOUR_COGNITO_IDENTITY_ID>'Step 3: Allow the Amazon Cognito Authenticated Role to access IoT Services
For your Cognito Authenticated Role to be able to interact with AWS IoT it may be necessary to update its permissions, if you haven't done this before.
One way of doing this is to log to your AWS Console, select CloudFormation from the available services. Locate the parent stack of your solution: it is usually named <SERVICE-NAME>-<CREATION_TIMESTAMP>.
Select the Resources tab and tap on AuthRole Physical ID.
The IAM console will be opened in a new tab. Once there, tap on the button Attach Policies, then search AWSIoTDataAccess and AWSIoTConfigAccess, select them and tap on Attach policy.
If you are using Cognito Groups, the IAM role associated with that group also need the AWSIoTDataAccess and AWSIoTConfigAccess policies attached to it.
Failing to grant IoT related permissions to the Cognito Authenticated Role will result in errors similar to the following in your browser console:
errorCode: 8, errorMessage: AMQJS0008I Socket closed.
Keeping track of your pubsub instances
In a real-world application, the code that sets up a pubsub instance (const pubsub = new PubSub(...)) will be used in multiple places. This means that the configuration will be separate from where your application publishes (pubsub.publish(...)) or subscribes (pubsub.subscribe(...)).
If you already know all the connections when deploying your application, you can export singleton instances for other parts of your application to easily import and use.
Example
./src/utils/pubsub.ts:
import { PubSub } from '@aws-amplify/pubsub';export const pubsub = new PubSub({...});./src/components/LatestMessage.tsx:
import { useState, useEffect } from 'react';import { pubsub } from '../utils/pubsub';
export function LatestMessage() {  const [message, setMessage] = useState<string>("");  useEffect(() => {    pubsub.subscribe({topics: ['messages']}).subscribe({        next: (data) => {          setMessage(data.msg);        }    });  }, [])  return <>{message}</>}
This means you will maintain a single connection to the target endpoint without needing to pass the pubsub instance as a property through layers of components.
Third Party MQTT Providers
Import PubSub from the mqtt specific export path
import { PubSub } from '@aws-amplify/pubsub/mqtt';Create a new instance for your endpoint and region in your configuration:
// Apply plugin with configurationconst pubsub = new PubSub({ endpoint: 'wss://iot.eclipse.org:443/mqtt'});You can integrate any MQTT Over WebSocket provider with your app. Click here to learn more about MQTT Over WebSocket.