Connect to existing AWS resources built with the CDK
This guide shows you how to connect a new app to AWS resources you've already created using the AWS Cloud Development Kit (AWS CDK). The AWS CDK is an open-source software development framework for defining cloud infrastructure as code with modern programming languages. This infrastructure is then deployed through AWS CloudFormation.
In this guide, you will use the Amplify Data CDK to create a GraphQL API backend with AWS AppSync. This creates the core backend. You will then build and integrate a Flutter app with the GraphQL API.
Before you begin, you will need:
- An AWS account: If you don't already have an account, follow the Setting Up Your AWS Environment tutorial for a quick overview.
- The Amplify CLI installed and configured.
- A text editor. For this guide, we will use VS Code, but you can use your preferred IDE.
- Flutter and its command-line tools installed and configured.
Build a GraphQL API using the Amplify Data CDK construct
The CDK provides a simple way to define cloud infrastructure in code. In this section, we will use the CDK to build out the backend resources for our application.
Step 1: Create a folder for the CDK app by running the following command in your terminal.
mkdir cdk-backendStep 2: Navigate to the cdk-backend folder and create a new CDK project by running the cdk init command and specifying your preferred language.
cd cdk-backend cdk init --language typescriptStep 3: Open the newly created CDK project using VS Code, or your preferred IDE.
Step 4: In your terminal, navigate to the cdk_backend root folder, and install the AWS Amplify Data package by running the following command.
npm install @aws-amplify/data-constructStep 5: Update the cdk_backend/lib/cdk-backend-stack.ts file as shown in the following code to use the AmplifyData construct to create an AWS AppSync API.
import * as cdk from 'aws-cdk-lib';import { Construct } from 'constructs';import { AmplifyData, AmplifyDataDefinition} from '@aws-amplify/data-construct';
export class CdkBackendStack extends cdk.Stack { constructor(scope: Construct, id: string, props?: cdk.StackProps) { super(scope, id, props);
new AmplifyData(this, 'AmplifyCdkData', { definition: AmplifyDataDefinition.fromString(/* GraphQL */ ` type Todo @model @auth(rules: [{ allow: public }]) { id: ID! name: String! description: String complete: Boolean } `), authorizationModes: { defaultAuthorizationMode: 'API_KEY', apiKeyConfig: { expires: cdk.Duration.days(30) } } }); }}Step 6: Deploy the CDK stacks by running the following command.
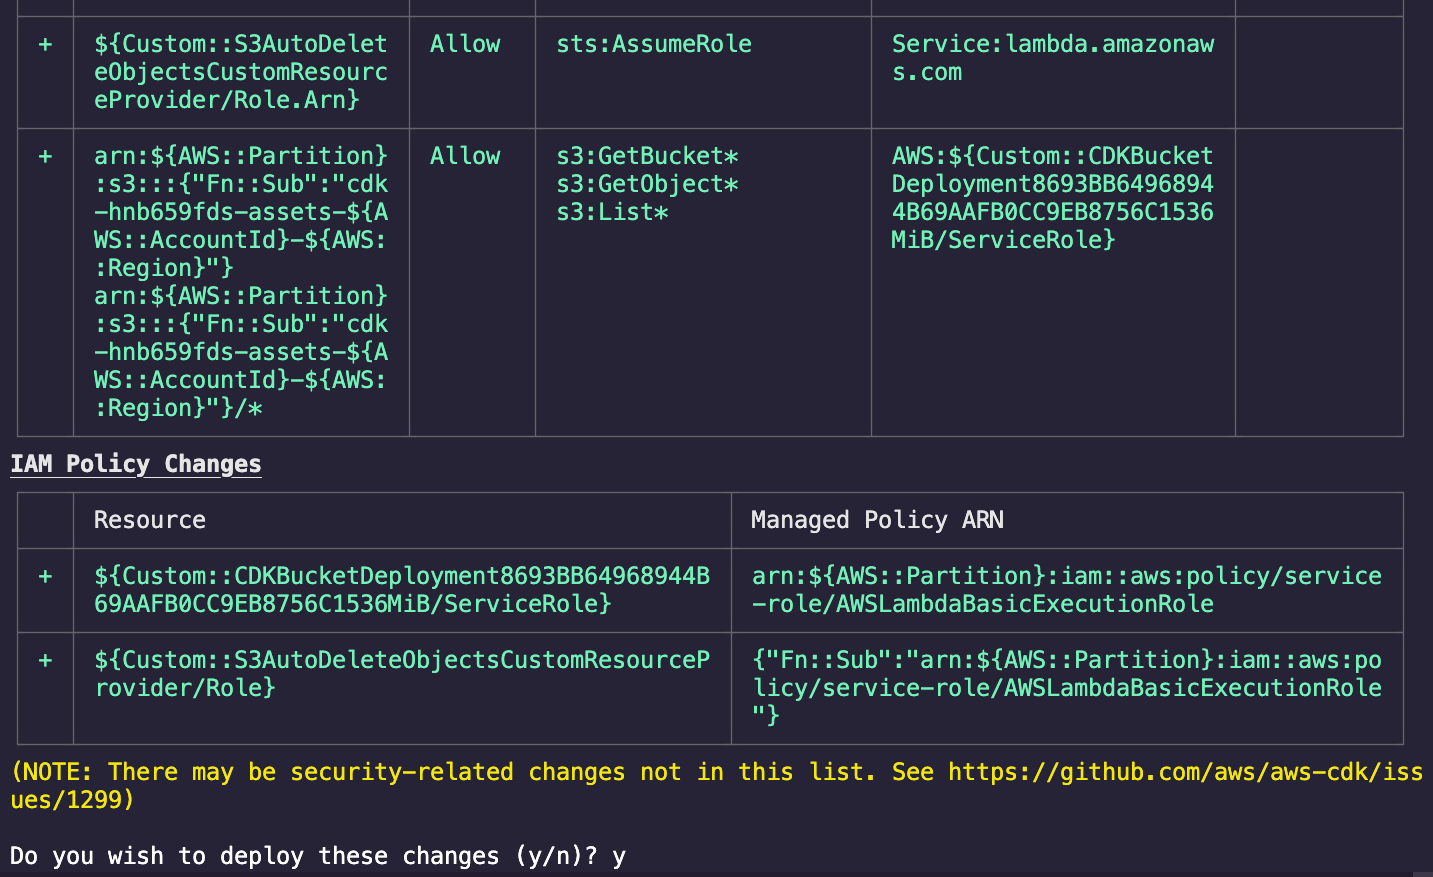
cdk deployStep 7: The CDK will prepare the resources for deployment and will display the following prompt. Enter Y and press Enter.
The CDK will deploy the stacks and display the following confirmation. Note the details of the deployed API; we’re going to use them in the next section.
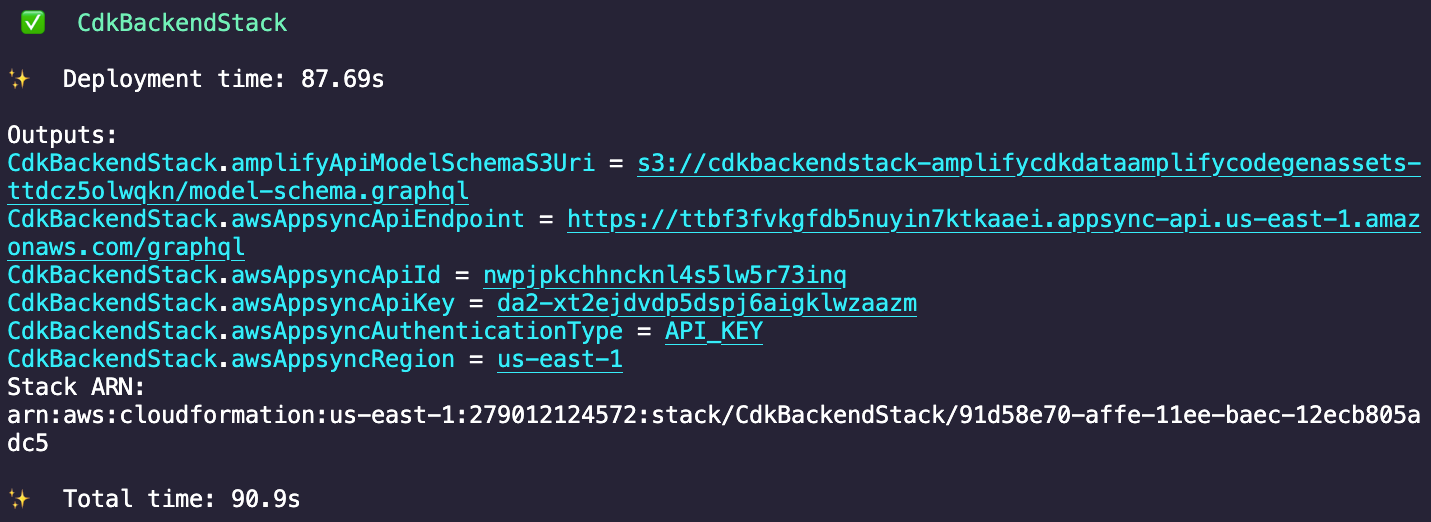
Now that you have built the backend API with the CDK, you can connect a frontend.
Build a Flutter app and connect to the GraphQL API
In this section, we will connect a Flutter mobile app to the GraphQL API we created with the CDK. First, we will initialize a Flutter project, define models matching our schema, and use Amplify to integrate CRUD operations. Then we will add UI pages to manage to-do items with queries and mutations. Finally, we will configure Amplify with our backend details and run the app to demonstrate full functionality with our existing API.
Step 1: Create a Flutter app by running the following command in your terminal.
flutter create flutter_todo_app --platforms=webStep 2: Open the newly created Flutter app by running the following commands in your terminal.
cd flutter_todo_app code . -rStep 3: Update the pubspec.yaml file in the app’s root directory to add the required dependencies, as shown in the following code.
name: flutter_todo_appdescription: "A new Flutter project."publish_to: 'none' # Remove this line if you wish to publish to pub.devversion: 1.0.0+1
dependencies: flutter: sdk: flutter amplify_flutter: ^2.0.0 amplify_api: ^2.0.0 go_router: ^6.5.5 cupertino_icons: ^1.0.2
dev_dependencies: flutter_test: sdk: flutter flutter_lints: ^2.0.0
flutter: uses-material-design: trueStep 4: Run the following command in your terminal to install the dependencies you added to the pubspec.yaml file.
flutter pub getStep 5: Install the @aws-amplify/cli packages by running the following command.
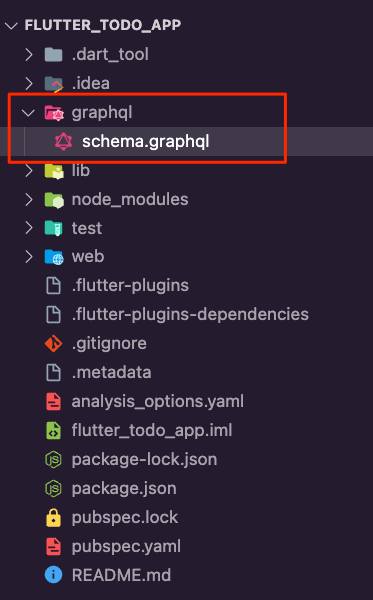
npm install @aws-amplify/cliStep 6: Create a new folder and name it graphql. Inside it, create the file schema.graphql.
Step 7: Update the file schema.graphql, as shown in the following example, to define the Todo data model, similar to what you used for the CDK app.
type Todo @model @auth(rules: [{ allow: public }]) { id: ID! name: String! description: String complete: Boolean}Step 8: Run the following command to generate the GraphQL client helper models inside the lib/models folder.
npx @aws-amplify/cli codegen models --model-schema ./graphql --target flutter --output-dir ./lib/models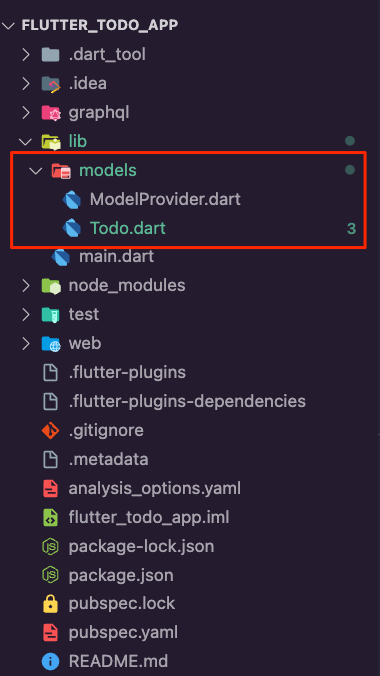
Step 9: Create the file todo_item_page.dart inside the lib folder and update it with the following code to present a form to the user for creating a to-do item. Once submitted, the form will initiate a GraphQL mutation to add or modify the item in the database.
import 'package:amplify_api/amplify_api.dart';import 'package:amplify_flutter/amplify_flutter.dart';import 'package:flutter/material.dart';import 'package:go_router/go_router.dart';
import '../models/ModelProvider.dart';
class ToDoItemPage extends StatefulWidget { const ToDoItemPage({ required this.todoItem, super.key, });
final Todo? todoItem;
State<ToDoItemPage> createState() => _ToDoItemPageState();}
class _ToDoItemPageState extends State<ToDoItemPage> { final _formKey = GlobalKey<FormState>(); final TextEditingController _nameController = TextEditingController(); final TextEditingController _descriptionController = TextEditingController();
late final String _nameText; late bool _isDone;
bool get _isCreate => _todoItem == null; Todo? get _todoItem => widget.todoItem;
void initState() { super.initState();
final todoItem = _todoItem; if (todoItem != null) { _nameController.text = todoItem.name; _descriptionController.text = todoItem.description ?? '';
_nameText = 'Update to-do Item'; _isDone = todoItem.complete ?? false; } else { _nameText = 'Create to-do Item'; _isDone = false; } }
void dispose() { _nameController.dispose(); _descriptionController.dispose();
super.dispose(); }
Future<void> submitForm() async { if (!_formKey.currentState!.validate()) { return; }
// If the form is valid, submit the data final name = _nameController.text; final description = _descriptionController.text; final complete = _isDone;
if (_isCreate) { // Create a new todo item final newEntry = Todo( name: name, description: description.isNotEmpty ? description : null, complete: complete, ); final request = ModelMutations.create(newEntry); final response = await Amplify.API.mutate(request: request).response; safePrint('Create result: $response'); } else { // Update todoItem instead final updateToDoItem = _todoItem!.copyWith( name: name, description: description.isNotEmpty ? description : null, complete: complete, ); final request = ModelMutations.update(updateToDoItem); final response = await Amplify.API.mutate(request: request).response; safePrint('Update result: $response'); }
// Navigate back to homepage after create/update executes if (mounted) { context.pop(); } }
Widget build(BuildContext context) { return Scaffold( appBar: AppBar( title: Text(_nameText), ), body: Align( alignment: Alignment.topCenter, child: ConstrainedBox( constraints: const BoxConstraints(maxWidth: 800), child: Padding( padding: const EdgeInsets.all(16), child: SingleChildScrollView( child: Form( key: _formKey, child: Column( crossAxisAlignment: CrossAxisAlignment.start, children: [ TextFormField( controller: _nameController, decoration: const InputDecoration( labelText: 'Name (required)', ), validator: (value) { if (value == null || value.isEmpty) { return 'Please enter a name'; } return null; }, ), TextFormField( controller: _descriptionController, decoration: const InputDecoration( labelText: 'Description', ), ), SwitchListTile( title: const Text('Done'), value: _isDone, onChanged: (bool value) { setState(() { _isDone = value; }); }, secondary: const Icon(Icons.done_all_outlined), ), const SizedBox(height: 20), ElevatedButton( onPressed: submitForm, child: Text(_nameText), ), ], ), ), ), ), ), ), ); }}Step 10: Create the file home_page.dart.dart inside the lib folder and update it with the following code. This page will use a GraphQL query to retrieve the list of to-do items and display them in a ListView widget. The page will also allow the user to delete a to-do item by using a GraphQL mutation.
import 'package:amplify_api/amplify_api.dart';import 'package:amplify_flutter/amplify_flutter.dart';import 'package:flutter/material.dart';import 'package:go_router/go_router.dart';
import '../models/ModelProvider.dart';
class HomePage extends StatefulWidget { const HomePage({super.key});
State<HomePage> createState() => _HomePageState();}
class _HomePageState extends State<HomePage> { var _todoItems = <Todo>[];
void initState() { super.initState(); _refreshTodoItems(); }
Future<void> _refreshTodoItems() async { try { final request = ModelQueries.list(Todo.classType); final response = await Amplify.API.query(request: request).response;
final todos = response.data?.items; if (response.hasErrors) { safePrint('errors: ${response.errors}'); return; } setState(() { _todoItems = todos!.whereType<Todo>().toList(); }); } on ApiException catch (e) { safePrint('Query failed: $e'); } }
Future<void> _deleteToDoItem(Todo todoItem) async { final request = ModelMutations.delete<Todo>(todoItem); final response = await Amplify.API.mutate(request: request).response; safePrint('Delete response: $response'); await _refreshTodoItems(); }
Future<void> _openToDoItem({Todo? todoItem}) async { await context.pushNamed('manage', extra: todoItem); // Refresh the entries when returning from the // todo item screen. await _refreshTodoItems(); }
Widget _buildRow({ required String name, required String description, required bool isDone, TextStyle? style, }) { return Row( children: [ Expanded( child: Text( name, textAlign: TextAlign.center, style: style, ), ), Expanded( child: Text( description, textAlign: TextAlign.center, style: style, ), ), Expanded( child: isDone ? const Icon(Icons.done) : const SizedBox(), ), ], ); }
Widget build(BuildContext context) { return Scaffold( floatingActionButton: FloatingActionButton( // Navigate to the page to create new todo item onPressed: _openToDoItem, child: const Icon(Icons.add), ), appBar: AppBar( title: const Text('To-Do List'), ), body: Center( child: Padding( padding: const EdgeInsets.only(top: 25), child: RefreshIndicator( onRefresh: _refreshTodoItems, child: Column( children: [ if (_todoItems.isEmpty) const Text('Use the \u002b sign to add new to-do items') else const SizedBox(height: 30), _buildRow( name: 'Name', description: 'Description', isDone: false, style: Theme.of(context).textTheme.titleMedium, ), const Divider(), Expanded( child: ListView.builder( itemCount: _todoItems.length, itemBuilder: (context, index) { final todoItem = _todoItems[index]; return Dismissible( key: ValueKey(todoItem), background: const ColoredBox( color: Colors.red, child: Padding( padding: EdgeInsets.only(right: 10), child: Align( alignment: Alignment.centerRight, child: Icon(Icons.delete, color: Colors.white), ), ), ), onDismissed: (_) => _deleteToDoItem(todoItem), child: ListTile( onTap: () => _openToDoItem( todoItem: todoItem, ), title: _buildRow( name: todoItem.name, description: todoItem.description ?? '', isDone: todoItem.complete ?? false, ), ), ); }, ), ), ], ), ), ), ), ); }}Step 11: Update main.dart to configure Amplify using the details of the GraphQL API you created using the CDK app in the previous section.
import 'package:amplify_api/amplify_api.dart';
import 'package:amplify_flutter/amplify_flutter.dart';import 'package:flutter/material.dart';import 'package:go_router/go_router.dart';
import 'models/ModelProvider.dart';import 'home_page.dart';import 'todo_item_page.dart';
Future<void> main() async { WidgetsFlutterBinding.ensureInitialized(); await _configureAmplify(); runApp(const MyApp());}
Future<void> _configureAmplify() async { try { final api = AmplifyAPI(modelProvider: ModelProvider.instance);
await Amplify.addPlugins([api]); const amplifyconfig = '''{ "api": { "plugins": { "awsAPIPlugin": { "flutter_todo_app": { "endpointType": "GraphQL", "endpoint": "<The-GraphQL-Endpoint>", "region": "<The-Region>", "authorizationType": "API_KEY", "apiKey": "<The-API-KEY-Value>" } } } }}''';
await Amplify.configure(amplifyconfig);
safePrint('Successfully configured'); } on Exception catch (e) { safePrint('Error configuring Amplify: $e'); }}
class MyApp extends StatelessWidget { const MyApp({super.key});
// GoRouter configuration static final _router = GoRouter( routes: [ GoRoute( path: '/', builder: (context, state) => const HomePage(), ), GoRoute( path: '/manage-todo-item', name: 'manage', builder: (context, state) => ToDoItemPage( todoItem: state.extra as Todo?, ), ), ], );
Widget build(BuildContext context) { return MaterialApp.router( routerConfig: _router, debugShowCheckedModeBanner: false, builder: (context, child) { return child!; }, ); }}Step 12: Run the app in the Chrome browser using the following command.
flutter run -d chromeConclusion
Congratulations! You used the AWS Amplify Data CDK construct to create a GraphQL API backend using AWS AppSync. You then connected your app to that API using the Amplify libraries. If you have any feedback, leave a GitHub issue or join our Discord Community!
Clean up resources
Once you're finished experimenting with this demo app, we recommend deleting the backend resources to avoid incurring unexpected costs. You can do this by running the following command in the root folder of the CDK app created above.
cdk destroy