Use existing AWS resources
An application’s backend is built with cloud resources such as AWS AppSync GraphQL APIs, Amazon S3 storage, and Amazon Cognito authentication. The Amplify CLI simplifies the provisioning of new backend resources across these different categories. However, you can alternatively use the Amplify libraries to add or re-use existing AWS resources that you provisioned without the CLI. The Amplify libraries support configuration through the amplifyconfiguration.json file which defines all the regions and service endpoints for your backend AWS resources.
Add an existing AWS resource to an Android application
Before you can add an existing AWS resource to an Android application, the application must have the Amplify libraries installed. For detailed instructions, see Install Amplify Libraries.
1. Manually create the Amplify configuration file for your Android project
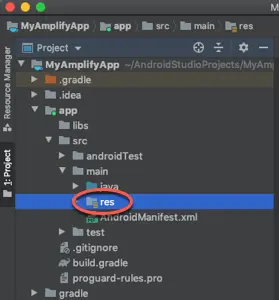
First, locate your project’s res folder. For example, if the name of your project is MyAmplifyApp, you can find the res folder at the following location, MyAmplifyApp/app/src/main/res:
Next, in your project’s res folder, create a new folder named raw.
Finally, in the raw folder, create a file named amplifyconfiguration.json. At this point the contents of your amplifyconfiguration.json file can be an empty object, {}.
2. Initialize Amplify in your application
To initialize Amplify when your application is launched, you will need to create a new Application class and override its onCreate() method.
First, locate your application’s namespace where you will create the new application class. For example, if your application is named MyAmplifyApp, navigate to either MyAmplifyApp/app/src/main/java/com.example.MyAmplifyApp or MyAmplifyApp/app/src/main/kotlin/com.example.MyAmplifyApp depending on the programming language you are using.
From the Android Studio main menu, choose File -> New and select either Java Class or Kotlin File/Class depending your programming language.
Select Class, and specify a name for your new class in the Name field.
Paste the following code for the onCreate() method inside your new class:
public void onCreate() {    super.onCreate();
try { Amplify.configure(getApplicationContext()); Log.i("MyAmplifyApp", "Initialized Amplify"); } catch (AmplifyException e) { Log.e("MyAmplifyApp", "Could not initialize Amplify", e); }}override fun onCreate() { super.onCreate()
try { Amplify.configure(applicationContext) Log.i("MyAmplifyApp", "Initialized Amplify") } catch (error: AmplifyException) { Log.e("MyAmplifyApp", "Could not initialize Amplify", error) }}Next, configure your application to use your new custom Application class. Open the AndroidManifest.xml file located in your project directory at app/src/main/AndroidManifest.xml.
Add the android:name attribute to the application node. For example, if the application name is MyAmplifyApp and the new class is named MyAmplifyApplication, the update to the AndroidManifest.xml file looks as follows:
<?xml version="1.0" encoding="utf-8"?><manifest xmlns:android="http://schemas.android.com/apk/res/android"    package="com.example.MyAmplifyApp">
    <!-- Add the android:name attribute to the application node -->    <application        android:name=".MyAmplifyApplication"        ...    </application></manifest>
3. Edit your configuration file to use an existing AWS resource
Now you’re ready to customize your application’s amplifyconfiguration.json file to specify an existing AWS resource to use.
Note that before you can add an AWS resource to your application, the application must have the Amplify libraries installed. If you need to perform this step, see Install Amplify Libraries.
Select a category from the following list to view an example amplifyconfiguration.json file you can use as a template to author your own amplifyconfiguration.json file:
- See the Analytics category to use existing AWS Pinpoint resources.
- See the API (GraphQL) category to use existing AWS AppSync resources.
- See the API (REST) category to use existing Amazon API Gateway and AWS Lambda resources.
- See the Authentication category to use existing Amazon Cognito resources.
- See the Storage category to use existing Amazon S3 resources.