Sign-in
Amplify provides a client library that enables you to interact with backend resources such as Amplify Auth.
Using the signIn API
Future<void> signInUser(String username, String password) async { try { final result = await Amplify.Auth.signIn( username: username, password: password, ); await _handleSignInResult(result); } on AuthException catch (e) { safePrint('Error signing in: ${e.message}'); }}Depending on your configuration and how the user signed up, one or more confirmations will be necessary. Use the SignInResult returned from Amplify.Auth.signIn to check the next step for signing in. When the value is done, the user has successfully signed in.
Future<void> _handleSignInResult(SignInResult result) async {  switch (result.nextStep.signInStep) {    case AuthSignInStep.confirmSignInWithSmsMfaCode:      final codeDeliveryDetails = result.nextStep.codeDeliveryDetails!;      _handleCodeDelivery(codeDeliveryDetails);      break;    case AuthSignInStep.confirmSignInWithNewPassword:      safePrint('Enter a new password to continue signing in');      break;    case AuthSignInStep.confirmSignInWithCustomChallenge:      final parameters = result.nextStep.additionalInfo;      final prompt = parameters['prompt']!;      safePrint(prompt);      break;    case AuthSignInStep.resetPassword:      final resetResult = await Amplify.Auth.resetPassword(        username: username,      );      await _handleResetPasswordResult(resetResult);      break;    case AuthSignInStep.confirmSignUp:      // Resend the sign up code to the registered device.      final resendResult = await Amplify.Auth.resendSignUpCode(        username: username,      );      _handleCodeDelivery(resendResult.codeDeliveryDetails);      break;    case AuthSignInStep.done:      safePrint('Sign in is complete');      break;  }}
void _handleCodeDelivery(AuthCodeDeliveryDetails codeDeliveryDetails) {  safePrint(    'A confirmation code has been sent to ${codeDeliveryDetails.destination}. '    'Please check your ${codeDeliveryDetails.deliveryMedium.name} for the code.',  );}
The signIn API response will include a nextStep property, which can be used to determine if further action is required. It may return the following next steps:
| Next Step | Description |
|---|---|
confirmSignInWithNewPassword | The user was created with a temporary password and must set a new one. Complete the process with confirmSignIn. |
confirmSignInWithCustomChallenge | The sign-in must be confirmed with a custom challenge response. Complete the process with confirmSignIn. |
confirmSignInWithTotpMfaCode | The sign-in must be confirmed with a TOTP code from the user. Complete the process with confirmSignIn. |
confirmSignInWithSmsMfaCode | The sign-in must be confirmed with a SMS code from the user. Complete the process with confirmSignIn. |
confirmSignInWithOtpCode | The sign-in must be confirmed with a code from the user (sent via SMS or Email). Complete the process with confirmSignIn. |
continueSignInWithMfaSelection | The user must select their mode of MFA verification before signing in. Complete the process with confirmSignIn. |
continueSignInWithMfaSetupSelection | The user must select their mode of MFA verification to setup. Complete the process by passing either "EMAIL" or "TOTP" to confirmSignIn. |
continueSignInWithTotpSetup | The TOTP setup process must be continued. Complete the process with confirmSignIn. |
continueSignInWithEmailMfaSetup | The EMAIL setup process must be continued. Complete the process by passing a valid email address to confirmSignIn. |
resetPassword | The user must reset their password via resetPassword. |
confirmSignUp | The user hasn't completed the sign-up flow fully and must be confirmed via confirmSignUp. |
done | The sign in process has been completed. |
For more information on handling the MFA steps that may be returned, see multi-factor authentication.
With multi-factor auth enabled
When you have Email or SMS MFA enabled, Cognito will send messages to your users on your behalf. Email and SMS messages require that your users have email address and phone number attributes respectively. It is recommended to set these attributes as required in your user pool if you wish to use either Email MFA or SMS MFA. When these attributes are required, a user must provide these details before they can complete the sign up process.
If you have set MFA to be required and you have activated more than one authentication factor, Cognito will prompt new users to select an MFA factor they want to use. Users must have a phone number to select SMS and an email address to select email MFA.
If a user doesn't have the necessary attributes defined for any available message based MFA, Cognito will prompt them to set up TOTP.
Visit the multi-factor authentication documentation to learn more about enabling MFA on your backend auth resource.
Confirm sign-in
Following sign in, you will receive a nextStep in the sign-in result of one of the following types. Collect the user response and then pass to the confirmSignIn API to complete the sign in flow.
| Next Step | Description |
|---|---|
confirmSignInWithTotpMfaCode | The sign-in must be confirmed with a TOTP code from the user. Complete the process with confirmSignIn. |
confirmSignInWithSmsMfaCode | The sign-in must be confirmed with a SMS code from the user. Complete the process with confirmSignIn. |
confirmSignInWithOtpCode | The sign-in must be confirmed with a code from the user (sent via SMS or Email). Complete the process with confirmSignIn. |
continueSignInWithMfaSelection | The user must select their mode of MFA verification before signing in. Complete the process with confirmSignIn. |
continueSignInWithMfaSetupSelection | The user must select their mode of MFA verification to setup. Complete the process by passing either MfaType.email.confirmationValue or MfaType.totp.confirmationValue to confirmSignIn. |
continueSignInWithTotpSetup | The TOTP setup process must be continued. Complete the process with confirmSignIn. |
continueSignInWithEmailMfaSetup | The EMAIL setup process must be continued. Complete the process by passing a valid email address to confirmSignIn. |
Sign in with an external identity provider
To sign in using an external identity provider such as Google, use the signInWithWebUI function.
How It Works
Sign-in with web UI will display the sign-in UI inside a webview. After the sign-in process is complete, the sign-in UI will redirect back to your app.
Platform Setup
Web
To use Hosted UI in your Flutter web application locally, you must run the app with the --web-port=3000 argument (with the value being whichever port you assigned to localhost host when configuring your redirect URIs).
Android
Add the following queries element to the AndroidManifest.xml file in your app's android/app/src/main directory, as well as the following intent-filter to the MainActivity in the same file.
Replace myapp with your redirect URI scheme as necessary:
<queries> <intent> <action android:name= "android.support.customtabs.action.CustomTabsService" /> </intent></queries><application> ... <activity android:name=".MainActivity" android:exported="true"> <intent-filter> <action android:name="android.intent.action.VIEW" /> <category android:name="android.intent.category.DEFAULT" /> <category android:name="android.intent.category.BROWSABLE" /> <data android:scheme="myapp" /> </intent-filter> </activity> ...</application>macOS
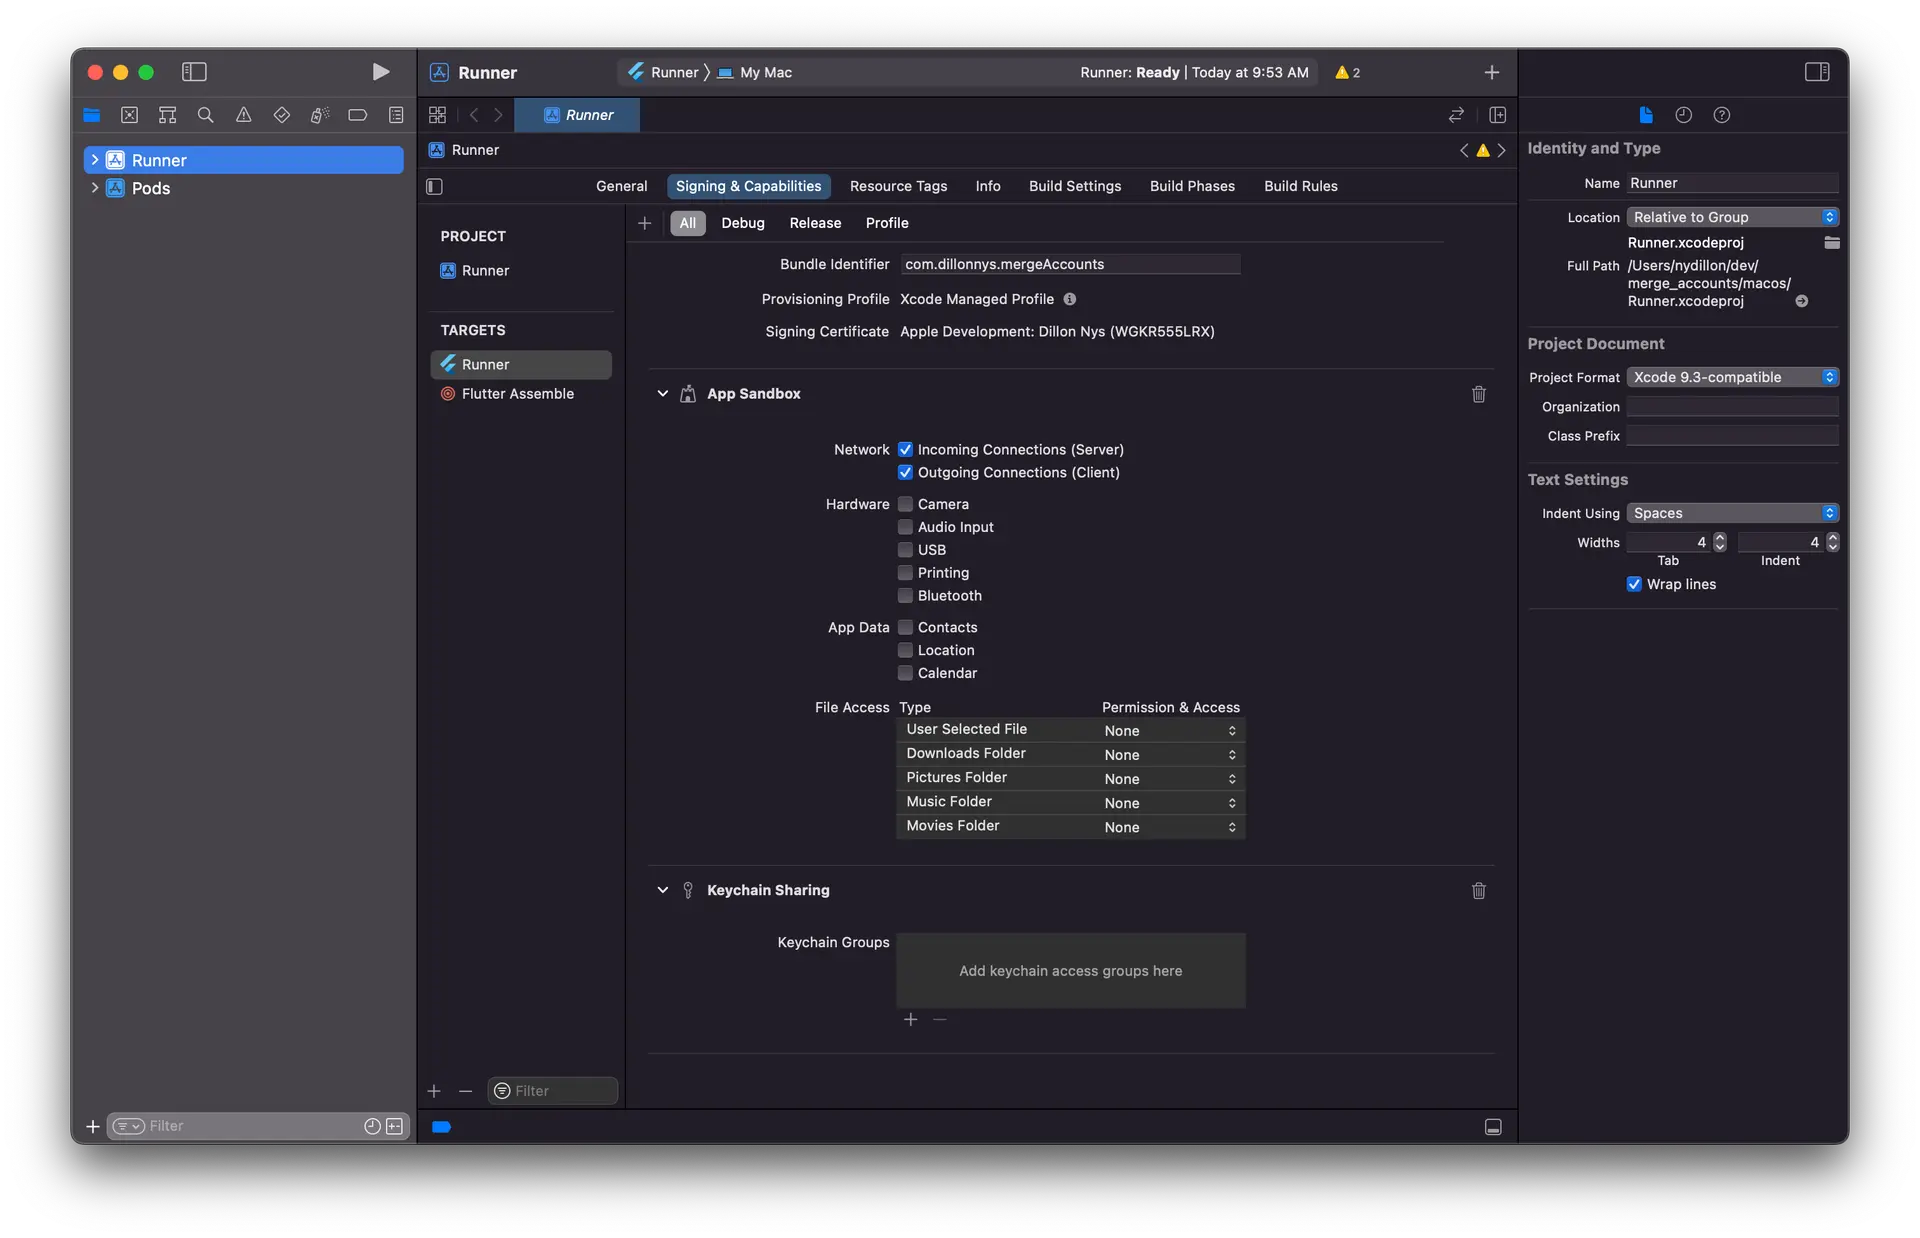
Open XCode and enable the App Sandbox capability and then select "Incoming Connections (Server)" under "Network".
iOS, Windows and Linux
No specific platform configuration is required.
Launch Social Web UI Sign In
You're now ready to launch sign in with your external provider's web UI.
Future<void> socialSignIn() async { try { final result = await Amplify.Auth.signInWithWebUI( provider: AuthProvider.google, ); safePrint('Sign in result: $result'); } on AuthException catch (e) { safePrint('Error signing in: ${e.message}'); }}