Connect to Amazon EventBridge to send and receive events
Amazon EventBridge is a serverless event bus that simplifies how applications communicate with each other. It acts as a central hub for events generated by various sources, including AWS services, custom applications, and third-party SaaS providers.
EventBridge delivers this event data in real-time, allowing you to build applications that react swiftly to changes. You define rules to filter and route these events to specific destinations, known as targets. Targets can include services like AWS Lambda, Amazon SQS Queues, Amazon SNS Topics. For the purpose of this guide, we will use AWS AppSync as the target for events.
By adopting an event-driven architecture with EventBridge, you can achieve:
-
Loose Coupling: Applications become independent and communicate through events, improving scalability and maintainability.
-
Increased Resilience: System failures are isolated as events are delivered asynchronously, ensuring overall application availability.
-
Simplified Integration: EventBridge provides a unified interface for integrating diverse event sources, streamlining development.
This section will guide you through adding an event bus as a datasource to your API, defining routing rules, and configuring targets to build robust event-driven applications with AWS Amplify Gen 2 and Amazon EventBridge.
- Set up your API
- Add your Amazon EventBridge event bus as a data source
- Define custom queries and mutations
- Configure custom business logic handler code
- Invoke custom mutations to send events to EventBridge
- Subscribe to mutations invoked by EventBridge
- Invoke mutations and trigger subscriptions from EventBridge
Step 1 - Set up your API
For the purpose of this guide, we will define an OrderStatusChange custom type that represents an order status change event. This type includes fields for the order ID, status, and message.
In your amplify/data/resource.ts file, use the following code to define an OrderStatusChange custom type and an OrderStatus enum, adding them to your schema:
import { type ClientSchema, a, defineData } from "@aws-amplify/backend";
const schema = a.schema({ Todo: a .model({ content: a.string(), }) .authorization(allow => [allow.publicApiKey()]), OrderStatus: a.enum(["OrderPending", "OrderShipped", "OrderDelivered"]), OrderStatusChange: a.customType({ orderId: a.id().required(), status: a.ref("OrderStatus").required(), message: a.string().required(), }),});
export type Schema = ClientSchema<typeof schema>;
export const data = defineData({ schema, authorizationModes: { defaultAuthorizationMode: 'apiKey', apiKeyAuthorizationMode: { expiresInDays: 30, }, },});Step 2 - Add your Amazon EventBridge event bus as a data source
In your amplify/backend.ts file, use the following code to add the default event bus as a data source for your API:
import { defineBackend } from "@aws-amplify/backend";import { auth } from "./auth/resource";import { data } from "./data/resource";import { aws_events } from "aws-cdk-lib";import { Effect, PolicyDocument, PolicyStatement, Role, ServicePrincipal,} from "aws-cdk-lib/aws-iam";
export const backend = defineBackend({ auth, data,});
// Create a new stack for the EventBridge data sourceconst eventStack = backend.createStack("MyExternalDataSources");
// Reference or create an EventBridge EventBusconst eventBus = aws_events.EventBus.fromEventBusName( eventStack, "MyEventBus", "default");
// Add the EventBridge data sourcebackend.data.addEventBridgeDataSource("MyEventBridgeDataSource", eventBus);
// Create a policy statement to allow invoking the AppSync API's mutationsconst policyStatement = new PolicyStatement({ effect: Effect.ALLOW, actions: ["appsync:GraphQL"], resources: [`${backend.data.resources.graphqlApi.arn}/types/Mutation/*`],});
// Create a role for the EventBus to assumeconst eventBusRole = new Role(eventStack, "AppSyncInvokeRole", { assumedBy: new ServicePrincipal("events.amazonaws.com"), inlinePolicies: { PolicyStatement: new PolicyDocument({ statements: [policyStatement], }), },});
// Create an EventBridge rule to route events to the AppSync APIconst rule = new aws_events.CfnRule(eventStack, "MyOrderRule", { eventBusName: eventBus.eventBusName, name: "broadcastOrderStatusChange", eventPattern: { source: ["amplify.orders"], /* The shape of the event pattern must match EventBridge's event message structure. So, this field must be spelled as "detail-type". Otherwise, events will not trigger the rule.
https://docs.aws.amazon.com/AmazonS3/latest/userguide/ev-events.html */ ["detail-type"]: ["OrderStatusChange"], detail: { orderId: [{ exists: true }], status: ["PENDING", "SHIPPED", "DELIVERED"], message: [{ exists: true }], }, }, targets: [ { id: "orderStatusChangeReceiver", arn: backend.data.resources.cfnResources.cfnGraphqlApi .attrGraphQlEndpointArn, roleArn: eventBusRole.roleArn, appSyncParameters: { graphQlOperation: ` mutation PublishOrderFromEventBridge( $orderId: String! $status: String! $message: String! ) { publishOrderFromEventBridge(orderId: $orderId, status: $status, message: $message) { orderId status message } }`, }, inputTransformer: { inputPathsMap: { orderId: "$.detail.orderId", status: "$.detail.status", message: "$.detail.message", }, inputTemplate: JSON.stringify({ orderId: "<orderId>", status: "<status>", message: "<message>", }), }, }, ],});In the code snippet above, the addEventBridgeDataSource method is used to add the default event bus as a data source to your API. This allows you to reference the event bus in your custom queries and mutations.
The CfnRule construct is used to create an EventBridge rule that routes events to the AppSync API. The rule specifies the event pattern to match and the target to invoke when the event is received. In this example, the target is an AppSync mutation named publishOrderFromEventBridge.
The appSyncParameters property specifies the mutation to invoke when the event is received. The inputTransformer property maps the event data to the mutation arguments.
Step 3 - Define custom queries and mutations
Now that your event bus has been added as a data source, you can reference it in custom queries and mutations using the a.handler.custom() modifier which accepts the name of the data source and an entry point for your resolver.
Use the following code to add publishOrderToEventBridge and publishOrderFromEventBridge custom mutations, and an onOrderStatusChange custom subscription to your schema:
import { type ClientSchema, a, defineData } from "@aws-amplify/backend";
const schema = a.schema({ // ... OrderStatus: a.enum(["OrderPending", "OrderShipped", "OrderDelivered"]), OrderStatusChange: a.customType({ orderId: a.id().required(), status: a.ref("OrderStatus").required(), message: a.string().required(), }), publishOrderToEventBridge: a .mutation() .arguments({ orderId: a.id().required(), status: a.string().required(), message: a.string().required(), }) .returns(a.ref("OrderStatusChange")) .authorization((allow) => [allow.publicApiKey()]) .handler( a.handler.custom({ dataSource: "EventBridgeDataSource", entry: "./publishOrderToEventBridge.js", }) ), publishOrderFromEventBridge: a .mutation() .arguments({ orderId: a.id().required(), status: a.string().required(), message: a.string().required(), }) .returns(a.ref("OrderStatusChange")) .authorization((allow) => [allow.publicApiKey(), allow.guest()]) .handler( a.handler.custom({ entry: "./publishOrderFromEventBridge.js", }) ), onOrderFromEventBridge: a .subscription() .for(a.ref("publishOrderFromEventBridge")) .authorization((allow) => [allow.publicApiKey()]) .handler( a.handler.custom({ entry: "./onOrderFromEventBridge.js", }) ),});
export type Schema = ClientSchema<typeof schema>;
export const data = defineData({ schema, name: "MyLibrary", authorizationModes: { defaultAuthorizationMode: "apiKey", apiKeyAuthorizationMode: { expiresInDays: 30, }, },});In the code snippet above:
-
The
publishOrderToEventBridgecustom mutation uses an EventBridge data source and so it is able to publish events to the event bus from its resolver. -
The
publishOrderFromEventBridgecustom mutation uses a None data source as a passthrough and is invoked by the EventBridge rule when an event is received that matches the rule pattern. Theallow.guestrule uses IAM under the hood and allows the mutation to be invoked by the EventBridge rule. -
The
onOrderFromEventBridgecustom subscription can be triggered either by EventBridge invoking thepublishOrderFromEventBridgemutation or by a client invoking thepublishOrderToEventBridgemutation.
Step 4 - Configure custom business logic handler code
Next, create the following files in your amplify/data folder and use the code examples to define custom resolvers for the custom queries and mutations added to your schema from the previous step. These are AppSync JavaScript resolvers
The following code defines the custom business logic handler for the onOrderStatusChange subscription. Since the subscription uses a None data source the response function is empty as the subscription does not require any additional processing.
export function request(ctx) {  return {    payload: {},  };}
export function response(ctx) {}
In the following code, the request function constructs the event payload to be published to the event bus. To match the rule pattern configured in the previous steps, the event source is set to amplify.orders and the detail-type is set to OrderStatusChange. The mutation arguments are passed to the event detail.
export function request(ctx) {  return {    operation: "PutEvents",    events: [      {        source: "amplify.orders",        ["detail-type"]: "OrderStatusChange",        detail: { ...ctx.args },      },    ],  };}
export function response(ctx) {  return ctx.args;}
The following code defines the custom business logic handler for the publishOrderFromEventBridge mutation. The request function constructs the mutation arguments from the event payload received from the event bus. The response function returns the mutation arguments.
export function request(ctx) {  return {    payload: ctx.arguments,  };}
export function response(ctx) {  return ctx.arguments;}
Step 5 - Invoke custom mutations to send events to EventBridge
From your generated Data client, you can find all your custom queries and mutations under the client.queries and client.mutations APIs respectively.
The custom mutation below will publish an order status change event to the event bus:
await client.mutations.publishOrderToEventBridge({ orderId: "12345", status: "SHIPPED", message: "Order has been shipped",});Step 6 - Subscribe to mutations invoked by EventBridge
To subscribe to events from your event bus, you can use the client.subscriptions API:
// Subscribe to the mutations triggered by the EventBridge ruleconst sub = client.subscriptions.onOrderStatusChange().subscribe({  next: (data) => {    console.log(data);  },});
//...
// Clean up subscriptionsub.unsubscribe();
Step 7 - Invoke a mutation and trigger a subscription from EventBridge
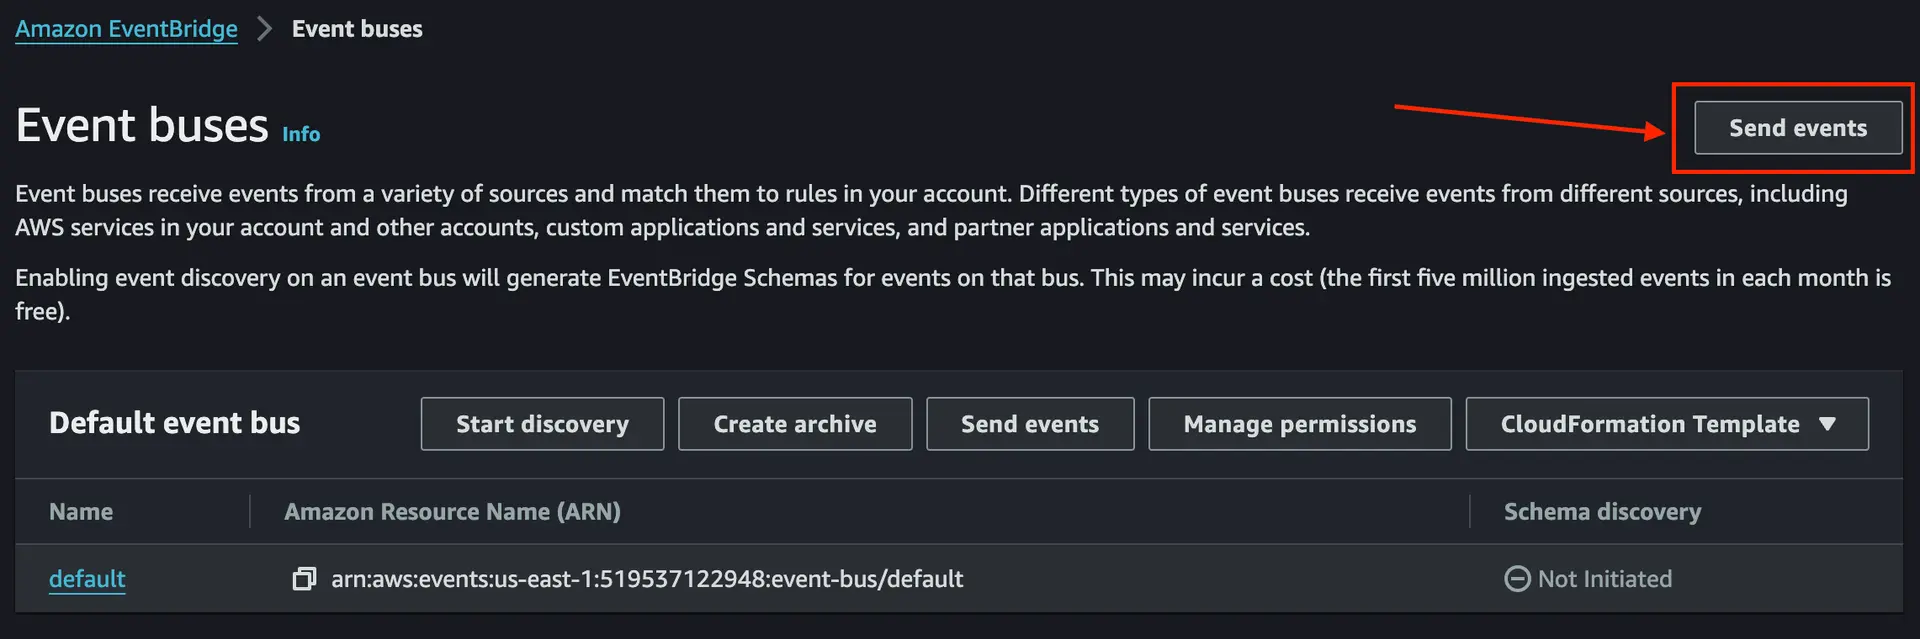
You can test your custom mutation and subscriptions by using the EventBridge console to send an event which will invoke the custom mutation. You can then observe the results from the subscription being triggered:
- Navigate to the Amazon EventBridge console and choose "Send Events"
- Fill out the form, specifying the event source to be
amplify.ordersand thedetail-typeto beOrderStatusChange.
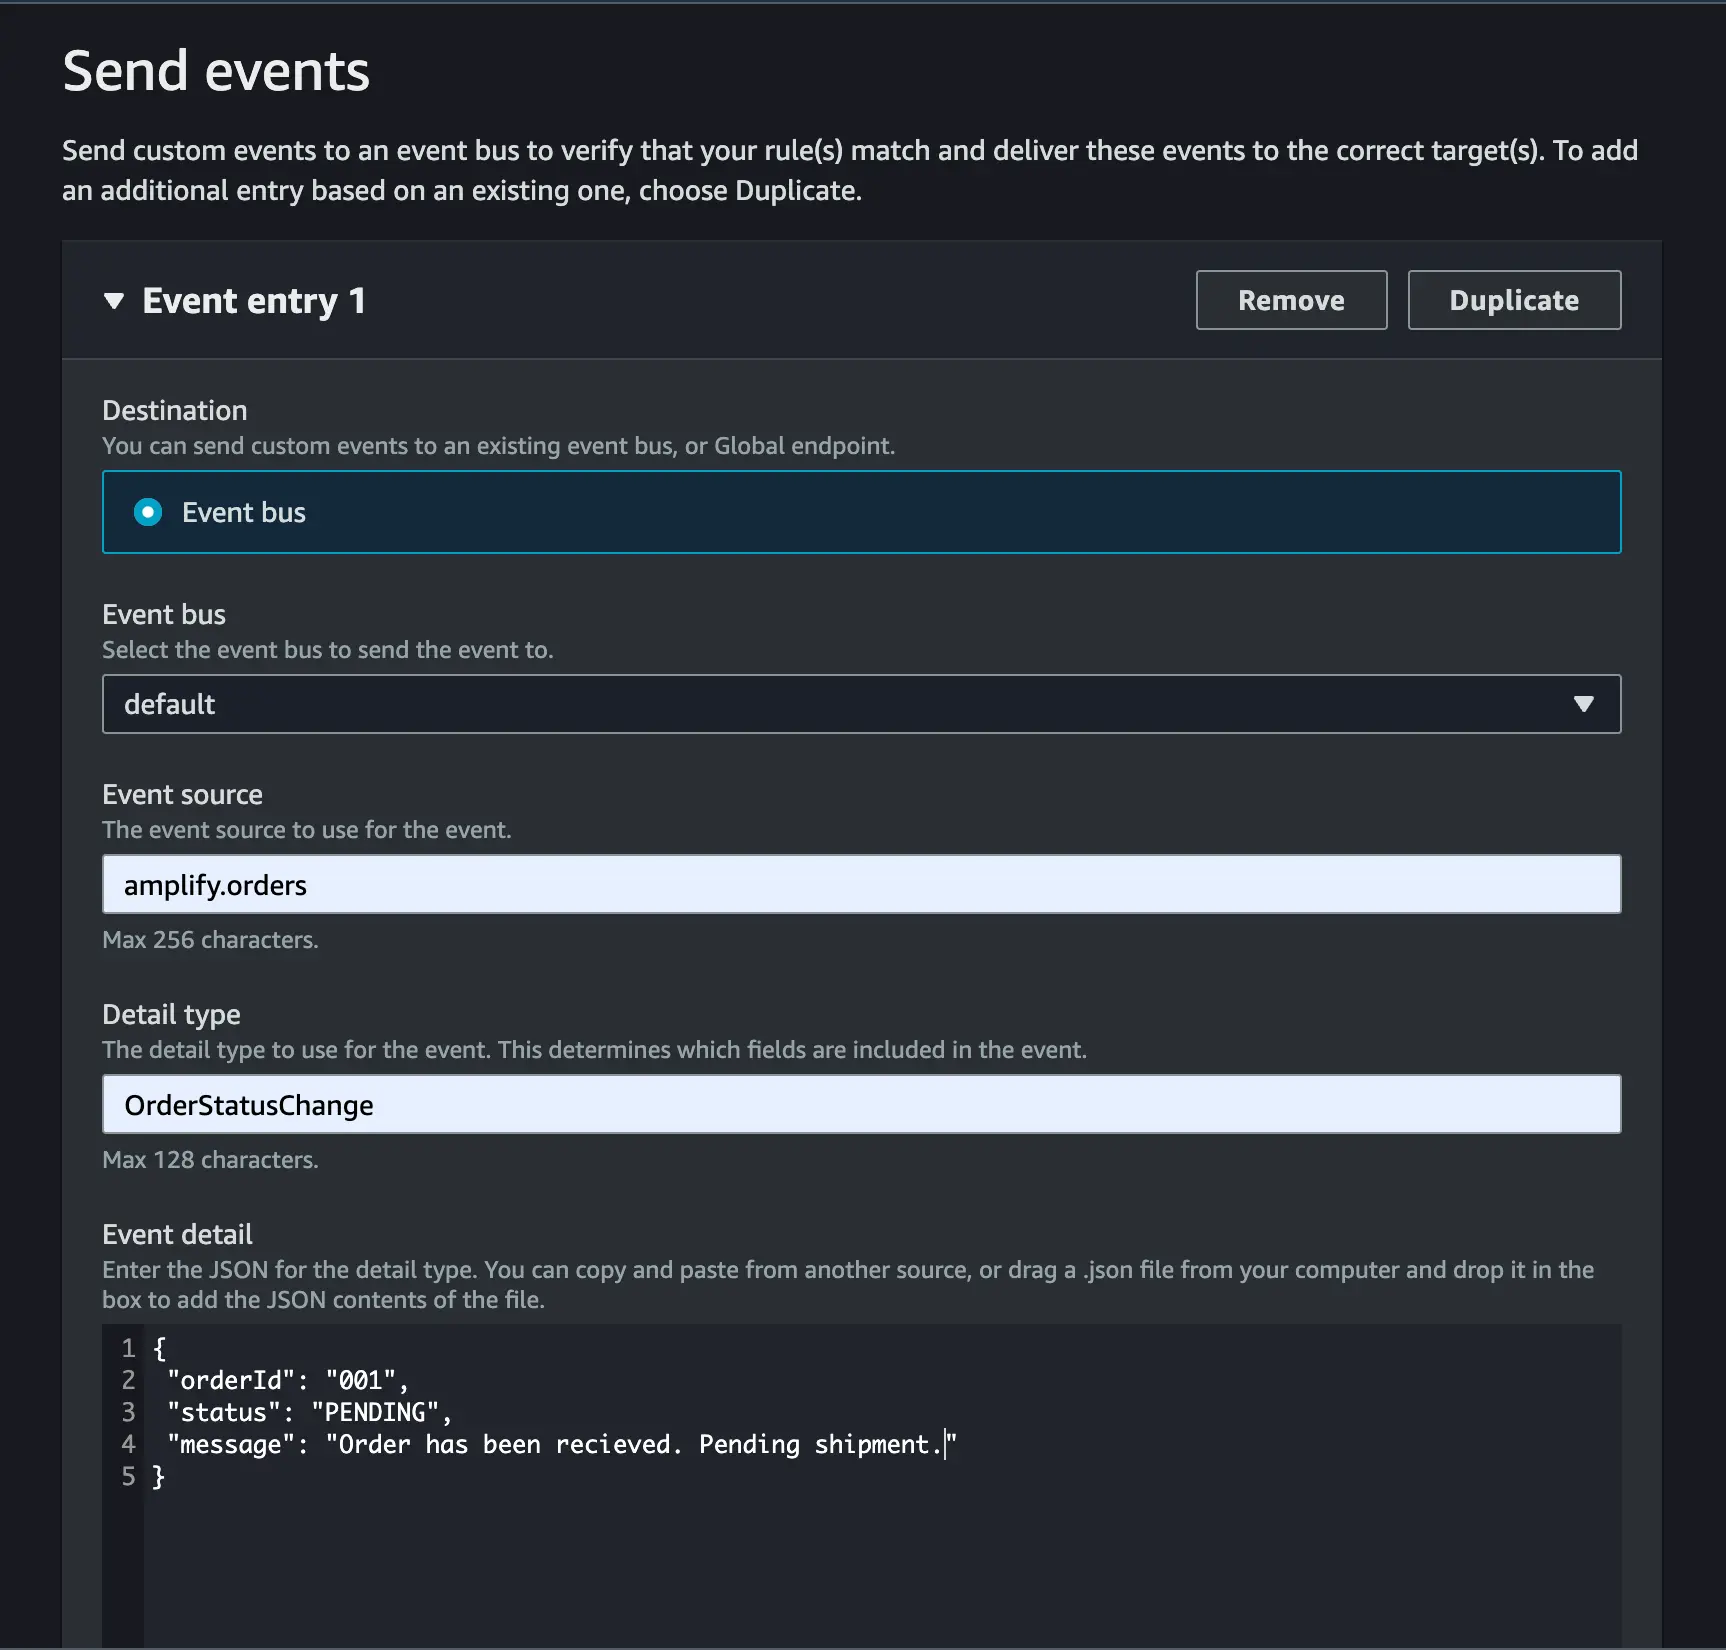
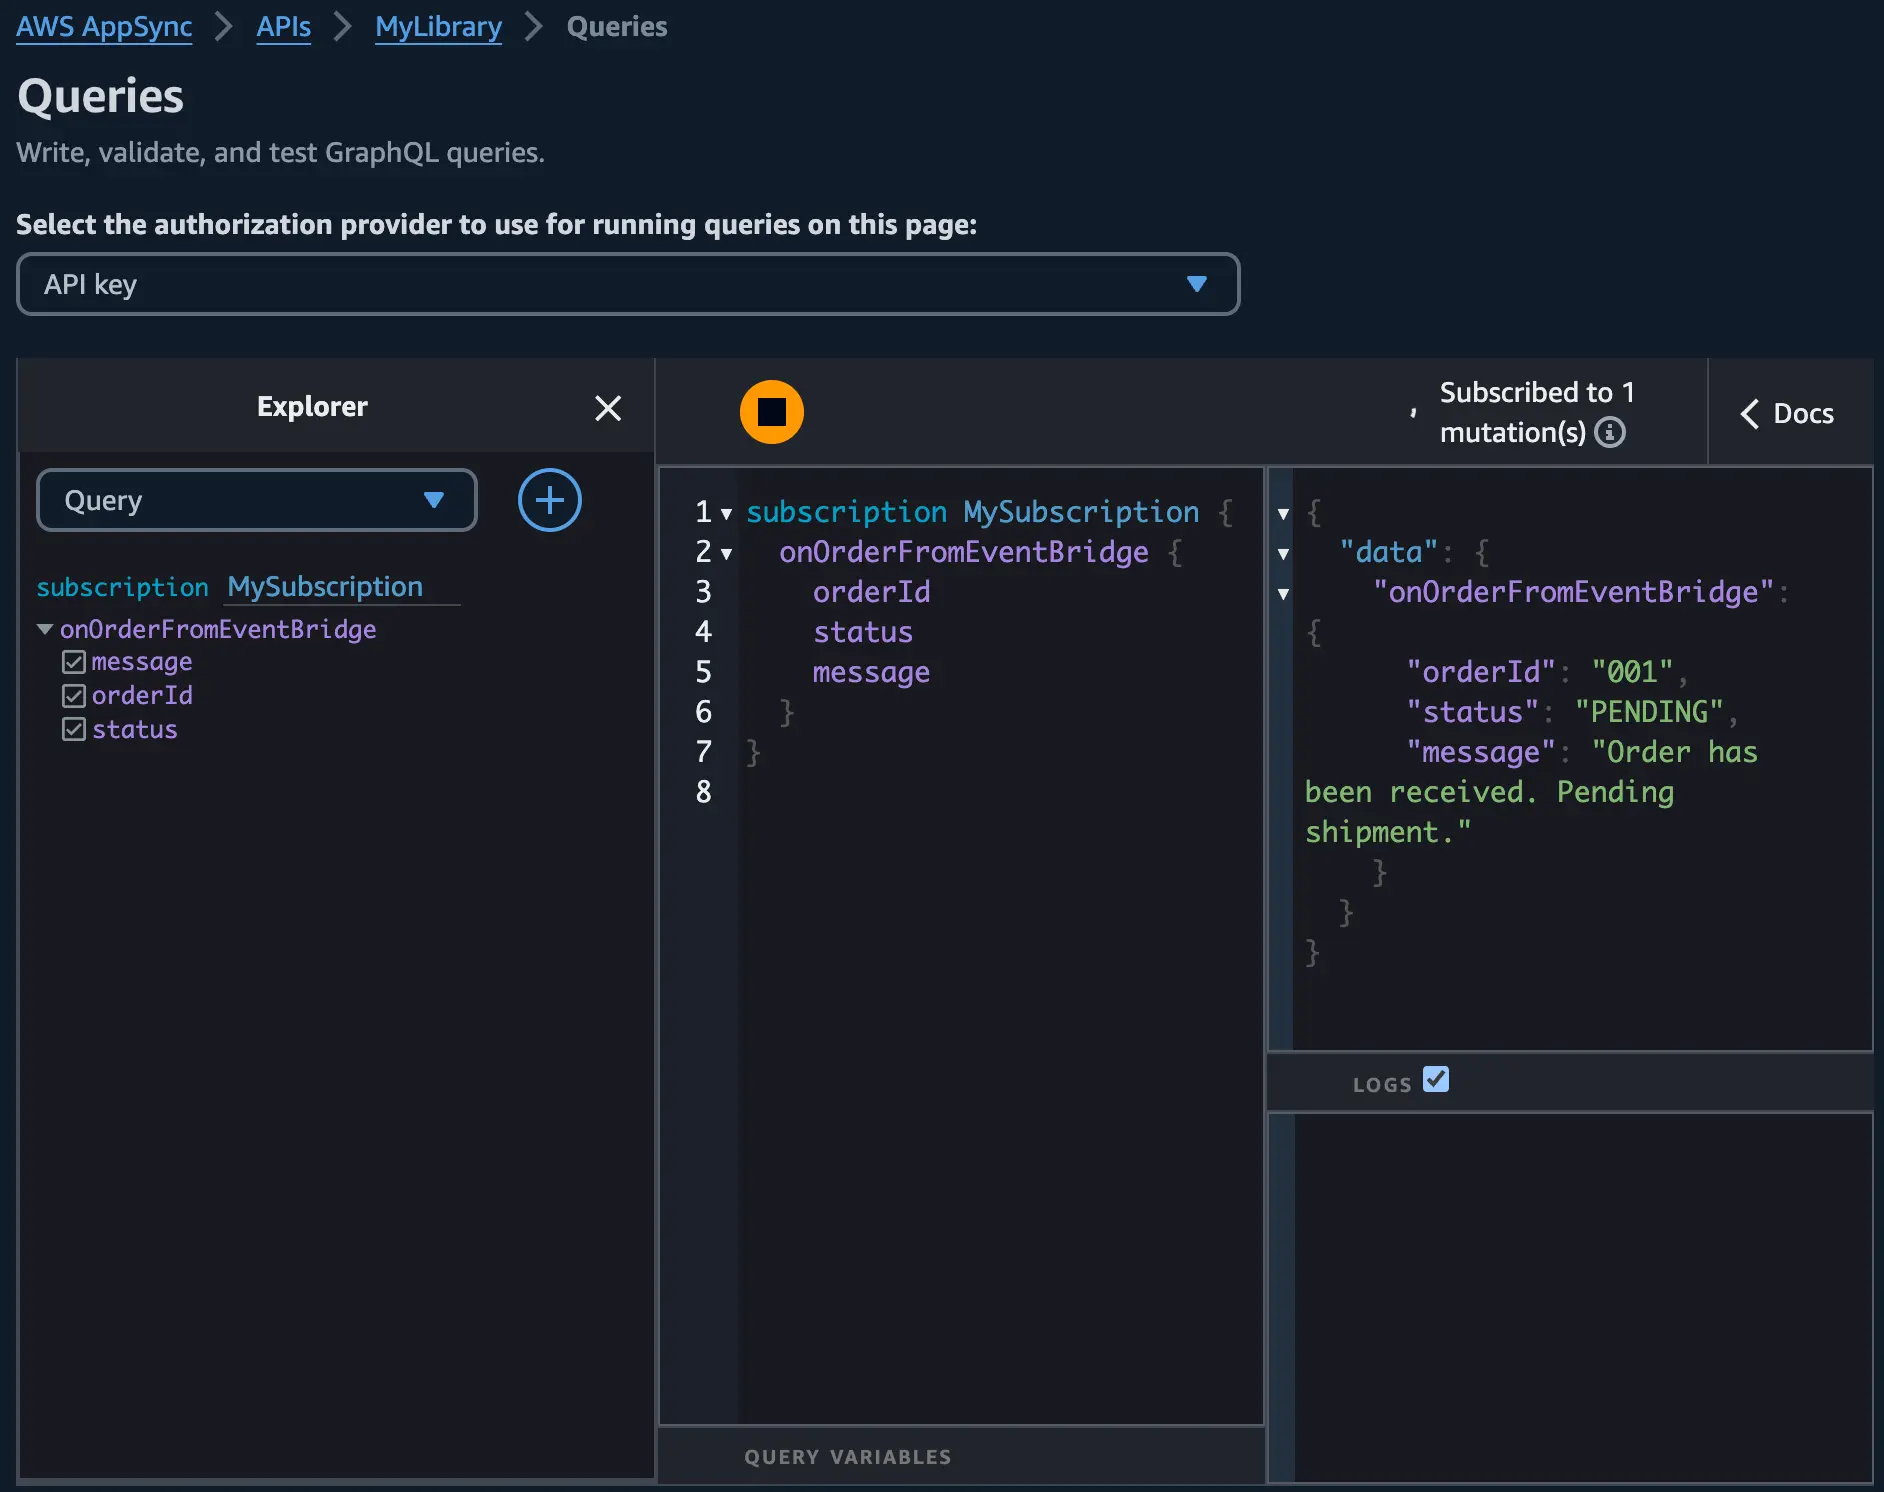
- Choose "Send" and observe the subscription output in the AppSync Queries console.
Conclusion
In this guide, you’ve added an Amazon EventBridge event bus as a data source to an Amplify API and defined custom queries and mutations to publish and receive events from the event bus. You’ve also configured custom business logic handler code to handle the event data and invoke the appropriate mutations.
To clean up, you can delete your sandbox by accepting the prompt when terminating the sandbox process in your terminal. Alternatively, you can also use the AWS Amplify console to manage and delete sandbox environments.