Amplify project setup
Before you begin, make sure you have the following installed:
- Install a stable version of Flutter.
- For the stable release, use version 2.10.0 or higher
- For the developer preview, use version 3.0.0 or higher
- Setup your IDE
Configure the Amplify CLI
To set up the Amplify CLI on your local machine, you have to configure it to connect to your AWS account.
Configure Amplify by running the following command:
amplify configureamplify configure will ask you to sign into the AWS Console.
Once you're signed in, Amplify CLI will ask you to use the AWS Identity and Access Management (IAM) to create an IAM user.
Specify the AWS Region? region: # Your preferred regionFollow the instructions athttps://docs.amplify.aws/cli/start/install/#configure-the-amplify-cli
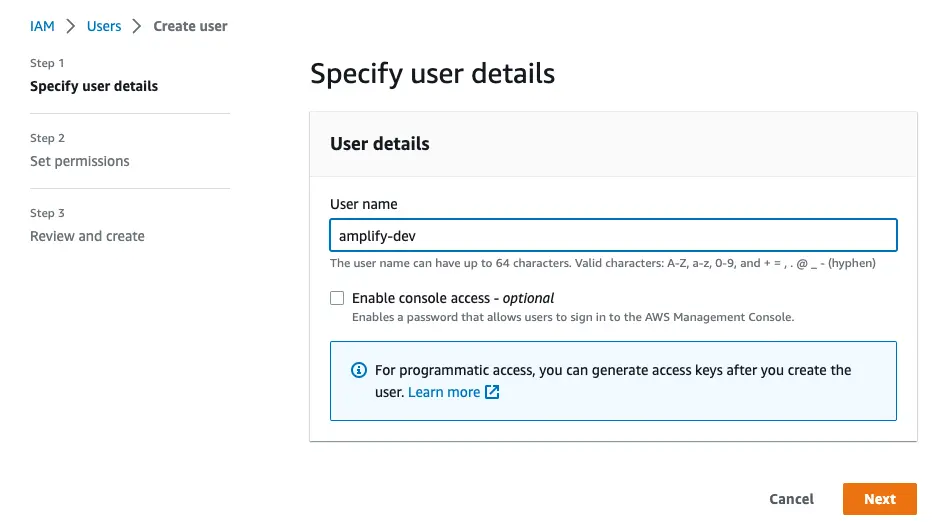
to complete the user creation in the AWS consolehttps://console.aws.amazon.com/iamv2/home#/users/createNavigate to the IAM User creation page if it's not already open.
Enter a User name and select Next. You can name the user anything but we'll call it "amplify-dev".
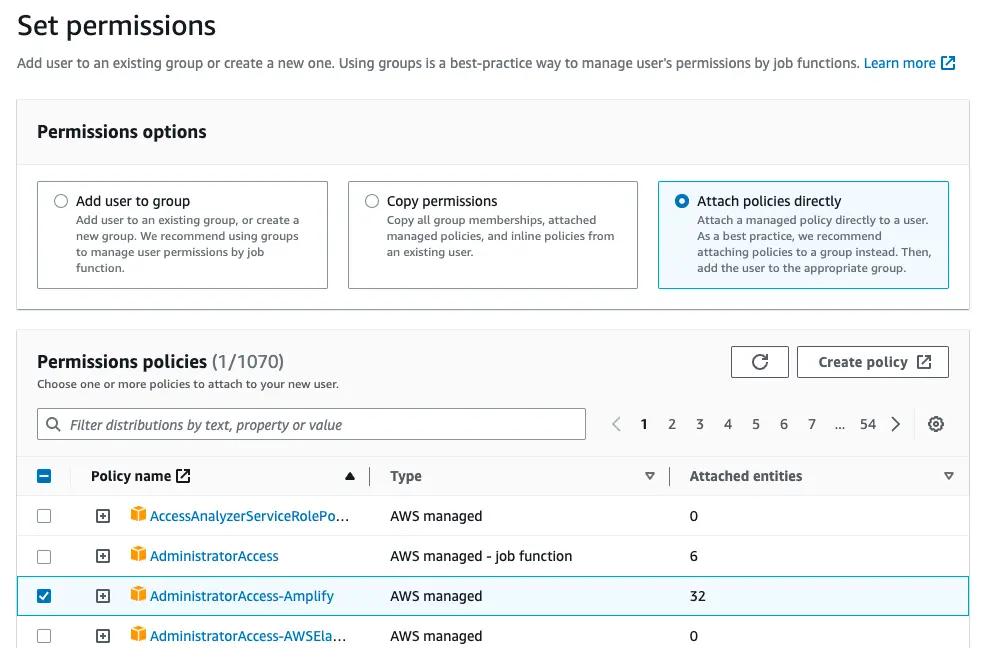
Select Attach policies directly and select AdministratorAccess-Amplify as the Permissions policy. Select Next.
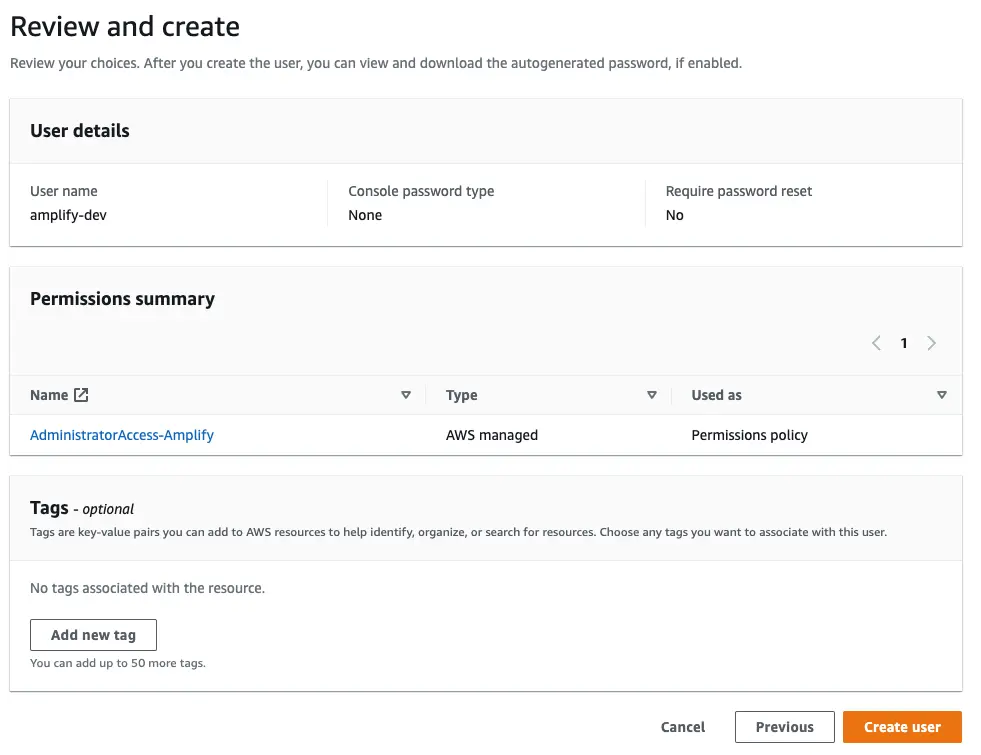
On the Review page, check that everything looks good and select Create user.
This will redirect to the users list page. Select the user you just created.
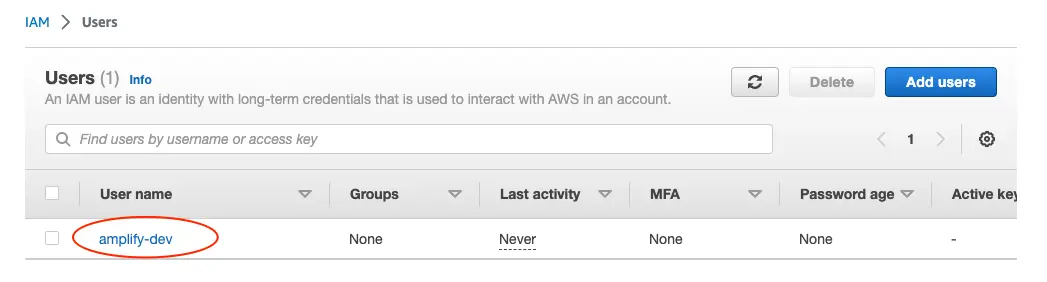
On the user details page, navigate to the Security credentials tab, scroll down to Access keys and select Create access keys.

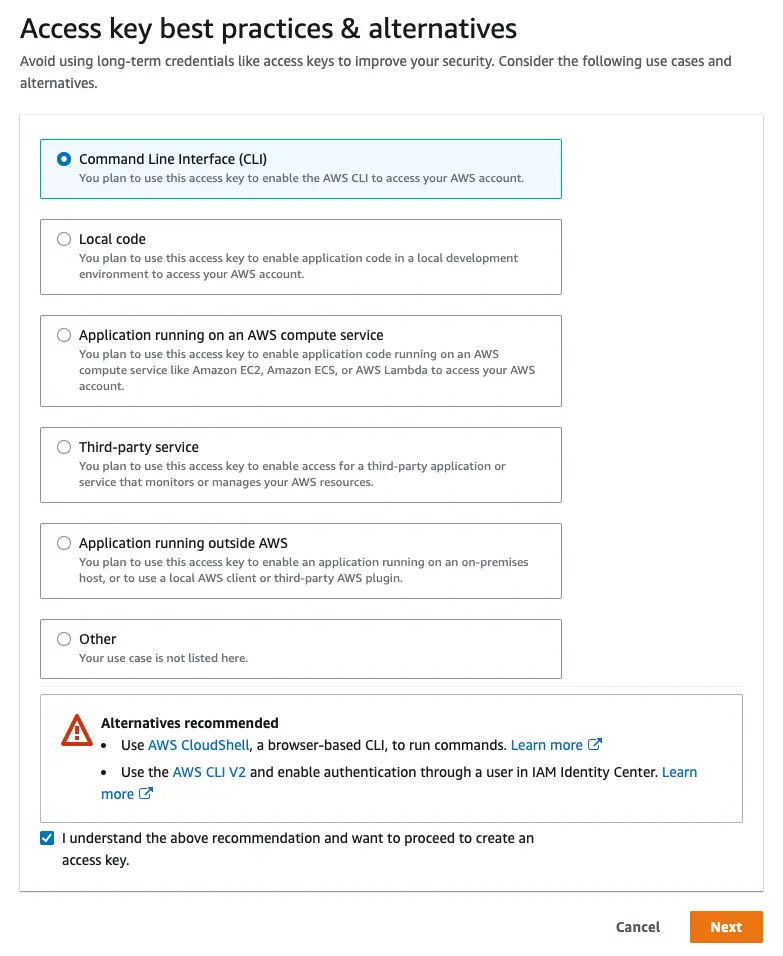
On the next page, select Command Line Interface, acknowledge the warning, and select Next.
On the next page select Create access key. You'll then see a page with the access keys for the user. Use the copy icon to copy these values to your clipboard, then return to the Amplify CLI.
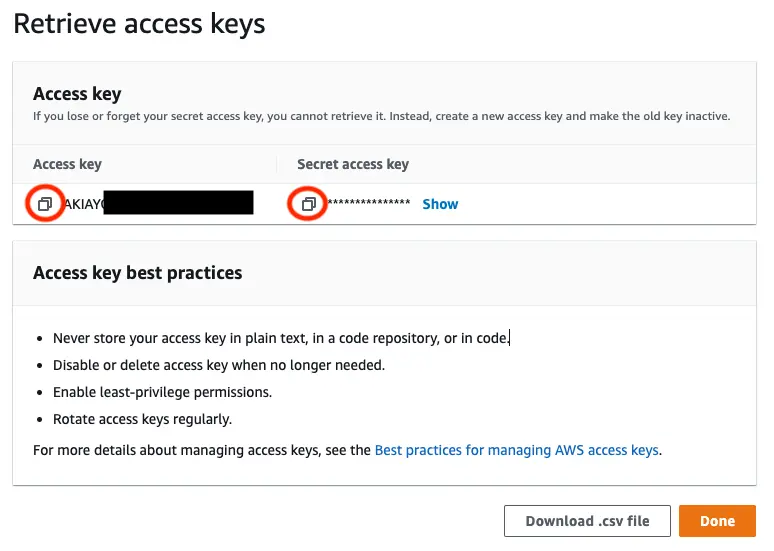
Enter the values you just copied into the corresponding CLI prompts.
Enter the access key of the newly created user:? accessKeyId:  # YOUR_ACCESS_KEY_ID? secretAccessKey:  # YOUR_SECRET_ACCESS_KEYThis would update/create the AWS Profile in your local machine? Profile Name:  # (default)
Successfully set up the new user.
Manually configure the Amplify CLI
If you are using an IAM role or IAM Identity Center (previously AWS SSO), you can configure your local machine for use with Amplify CLI by creating AWS profile entries manually rather than the amplify configure wizard.
To create an AWS profile locally using IAM Identity Center, you can use the AWS CLI wizard, aws configure sso, or write to ~/.aws/config directly:
[profile my-sso-profile]sso_session = my-ssosso_account_id = 123456789011sso_role_name = AdministratorAccess-Amplifyregion = us-west-2output = json
[sso-session my-sso]sso_region = us-east-1sso_start_url = https://my-sso-portal.awsapps.com/startsso_registration_scopes = sso:account:access
Currently, the Amplify CLI requires a workaround for use with IAM Identity Center due to an issue in how it resolves credentials.
[profile my-sso-profile]sso_session = my-ssosso_account_id = 123456789011sso_role_name = AdministratorAccess-Amplifyregion = us-west-2output = json+ credential_process = aws configure export-credentials --profile my-sso-profile[sso-session my-sso]sso_region = us-east-1sso_start_url = https://my-sso-portal.awsapps.com/startsso_registration_scopes = sso:account:accessUsing the example above, when creating a new app or pulling an existing app, specify my-sso-profile as the AWS profile you'd like to use with the Amplify app.
To create an AWS profile locally using an IAM role, assign the AdministratorAccess-Amplify permissions set to the role and set the role in your ~/.aws/config file:
[profile amplify-admin]role_arn = arn:aws:iam::123456789012:role/amplify-adminsource_profile = amplify-user
[profile amplify-user]region=us-east-1
Using the example above, when creating a new app or pulling an existing app, specify amplify-admin as the AWS profile you'd like to use with the Amplify app
Next, you'll set up the app and initialize Amplify!
Create your application
For this section you will set up a skeleton project so that Amplify categories can be added to it.
1. Create a new project
Create a new project using Flutter CLI:
flutter create <your_app_name>You now have an empty Flutter project into which you'll add Amplify in the next steps.
2. Install Amplify Libraries
Amplify for Flutter is distributed via pub.dev.
- From your project root directory, find and modify
pubspec.yamland add required Amplify plugins to the project dependencies. E.g.
environment:  sdk: ">=2.15.0 <3.0.0"
dependencies:  flutter:    sdk: flutter
amplify_flutter: ^0.6.0 amplify_auth_cognito: ^0.6.0-
Install the dependencies by running the following command. Depending on your development environment, you may perform this step via your IDE (or it may even be performed for you automatically).
flutter pub get
3. Provision the backend with Amplify CLI
To start provisioning resources in the backend, change directories to your project directory and run amplify init:
# Make sure you have Amplify CLI v4.28 and above for Flutter supportamplify initAmplify CLI then will suggest you an auto-generated options for you to speed up the process:
Project information| Name: yourprojectname| Environment: dev| Default editor: Visual Studio Code| App type: flutter| Configuration file location: ./lib/
? Initialize the project with the above configuration?
If any of the following does not work for you, you can say no to the question that is prompted.
After that, Amplify CLI will take you through the installation process. Enter the following when prompted:
? Enter a name for the environment `dev`? Choose your default editor: `IntelliJ IDEA`? Choose the type of app that you're building: 'flutter'? Where do you want to store your configuration file? ./lib/After the project information is filled, you will be prompted to select the AWS profile for you to host your information.
? Select the authentication method you want to use: (Use arrow keys)❯ AWS profile  AWS access keys
# This is the profile you created with the `amplify configure` command in the introduction step.Please choose the profile you want to use (Use arrow keys)> default
Where possible, the CLI will infer the proper configuration based on the type of project Amplify is being initialized in. In this case, it knew you are using a Flutter app, source, distribution, build, and start options.
Upon successfully running amplify init, you will see a configuration file created in ./lib/ called amplifyconfiguration.dart.
This file will be bundled into your application so that the Amplify libraries know how to reach your provisioned backend resources at runtime.
4. Initialize Amplify in the application
Before using any methods in the Amplify Flutter Library, it's important to add all necessary plugins and to call configure once in your app. The steps below will guide you through configuring Amplify Flutter at the root level of your flutter app.
Add the necessary dart dependencies at the top of main.dart alongside to other imports:
// Amplify Flutter Packagesimport 'package:amplify_flutter/amplify_flutter.dart';import 'package:amplify_auth_cognito/amplify_auth_cognito.dart';
// Generated in previous stepimport 'amplifyconfiguration.dart';
Add the following code to your application's root Stateful Widget, for the default Flutter app this should be the class _MyHomePageState extends State<MyHomePage>.
class _MyHomePageState extends State<MyHomePage> {
initState() { super.initState(); _configureAmplify(); }
Future<void> _configureAmplify() async {
// Add any Amplify plugins you want to use final authPlugin = AmplifyAuthCognito(); await Amplify.addPlugin(authPlugin);
// You can use addPlugins if you are going to be adding multiple plugins // await Amplify.addPlugins([authPlugin, analyticsPlugin]);
// Once Plugins are added, configure Amplify // Note: Amplify can only be configured once. try { await Amplify.configure(amplifyconfig); } on AmplifyAlreadyConfiguredException { safePrint("Tried to reconfigure Amplify; this can occur when your app restarts on Android."); } }
// customize the rest of your Widget below as you wish...Note that all calls to addPlugin() or addPlugins() are made before Amplify.configure() is called.
Next steps
Congratulations! You've created a skeleton app and are ready to start adding Amplify categories to your application. The following are some categories that you can start to build into your application:
- Analytics - for logging metrics and understanding your users
- API (GraphQL) - for adding a GraphQL endpoint to your app
- API (REST) - for adding a REST endpoint to your app
- Authentication - for managing your users
- DataStore - for making it easier to program for a distributed data store for offline and online scenarios
- Storage - store complex objects like pictures and videos to the cloud.
Further customization
Platform setup
iOS
From your project root, navigate to the ios/ directory and modify the Podfile using a text editor of your choice and update the target iOS platform to 11.0 or higher.
platform :ios, '11.0'Android
From your project root, navigate to the android/app/ directory and modify build.gradle using a text editor of your choice and update the target Android SDK version to 21 or higher:
minSdkVersion 21Escape hatch
As an alternative to the Amplify client libraries, or in situations where the libraries do not provide the functionality you require, the underlying AWS services can be communicated with directly using an HTTP client and the AWS Signature V4 (SigV4) package.
Using the Signer
To get started using the signer, add it as a dependency in your pubspec.yaml like the following:
dependencies: aws_common: ^0.1.0 aws_signature_v4: ^0.1.0After that create an instance of the signer in your project.
import 'package:aws_signature_v4/aws_signature_v4.dart';
const signer = AWSSigV4Signer();
AWS credentials are configured in the signer by overriding the credentialsProvider parameter of the constructor. By default, the signer
pulls credentials from your environment via the AWSCredentialsProvider.environment() provider. On mobile and web, this means using
the Dart environment which is configured by passing the dart-define flag to your flutter commands, like the following:
$ flutter run --dart-define=AWS_ACCESS_KEY_ID=... --dart-define=AWS_SECRET_ACCESS_KEY=...On Desktop, credentials are retrieved from the system's environment using Platform.environment.
Signing a Request
The signer works by transforming HTTP requests using your credentials to create signed HTTP requests which can be sent off in the same way as normal HTTP requests.
As an example, here's how you would sign a request to Cognito to gather information about a User Pool.
import 'dart:convert';
import 'package:aws_common/aws_common.dart';import 'package:aws_signature_v4/aws_signature_v4.dart';
// Create the signer instance with credentials from the environment.const AWSSigV4Signer signer = AWSSigV4Signer(  credentialsProvider: AWSCredentialsProvider.environment(),);
// Create the signing scope and HTTP requestconst region = '<YOUR-REGION>';
Future<void> main() async {  final scope = AWSCredentialScope(    region: region,    service: AWSService.cognitoIdentityProvider,  );
  final request = AWSHttpRequest(    method: AWSHttpMethod.post,    uri: Uri.https('cognito-idp.$region.amazonaws.com', '/'),    headers: const {      AWSHeaders.target: 'AWSCognitoIdentityProviderService.DescribeUserPool',      AWSHeaders.contentType: 'application/x-amz-json-1.1',    },    body: json.encode({      'UserPoolId': '<YOUR-USER-POOL-ID>',    }).codeUnits,  );
  // Sign and send the HTTP request  final signedRequest = await signer.sign(    request,    credentialScope: scope,  );  final resp = await signedRequest.send();  final respBody = await resp.decodeBody();  print(respBody);}
For a full example, check out the example project in the GitHub repo.
And for specifics on the different AWS operations you can perform, check out the AWS API Reference docs for the service. For example,
here are the docs for the DescribeUserPool API used above.