Amplify project setup
Before you begin, make sure you have the following installed:
- Android Studio version 4.0 or higher
- Android SDK API level 16 (Jelly Bean) or higher
Configure the Amplify CLI
To set up the Amplify CLI on your local machine, you have to configure it to connect to your AWS account.
Configure Amplify by running the following command:
1amplify configureamplify configure will ask you to sign into the AWS Console.
Once you're signed in, Amplify CLI will ask you to use the AWS Identity and Access Management (IAM) to create an IAM user.
1Specify the AWS Region2? region:  # Your preferred region3Follow the instructions at4https://docs.amplify.aws/cli/start/install/#configure-the-amplify-cli5
6to complete the user creation in the AWS console7https://console.aws.amazon.com/iamv2/home#/users/create
Navigate to the IAM User creation page if it's not already open.
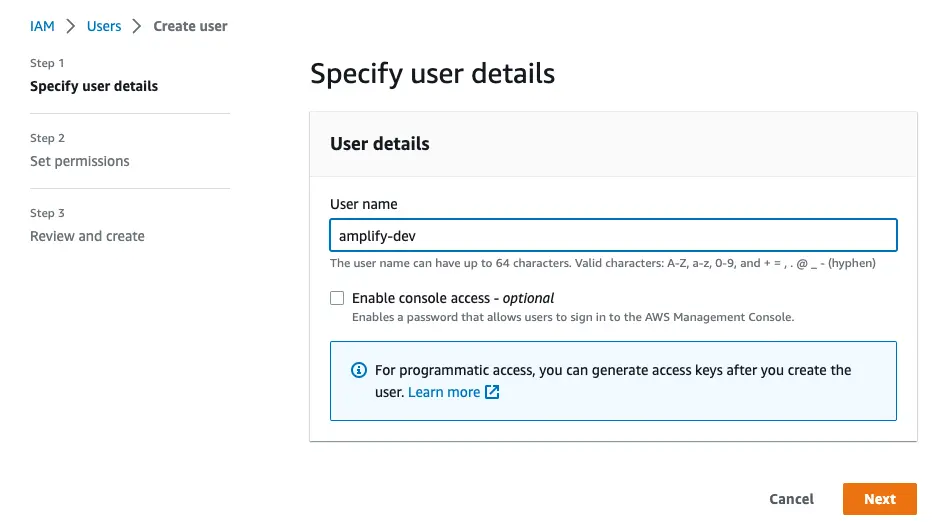
Enter a User name and select Next. You can name the user anything but we'll call it "amplify-dev".
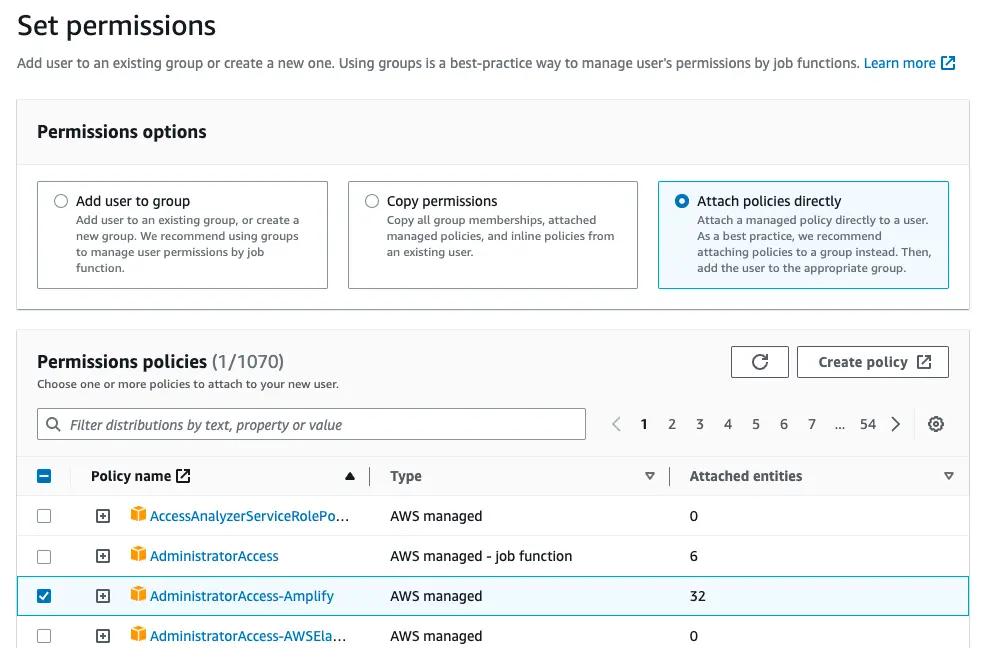
Select Attach policies directly and select AdministratorAccess-Amplify as the Permissions policy. Select Next.
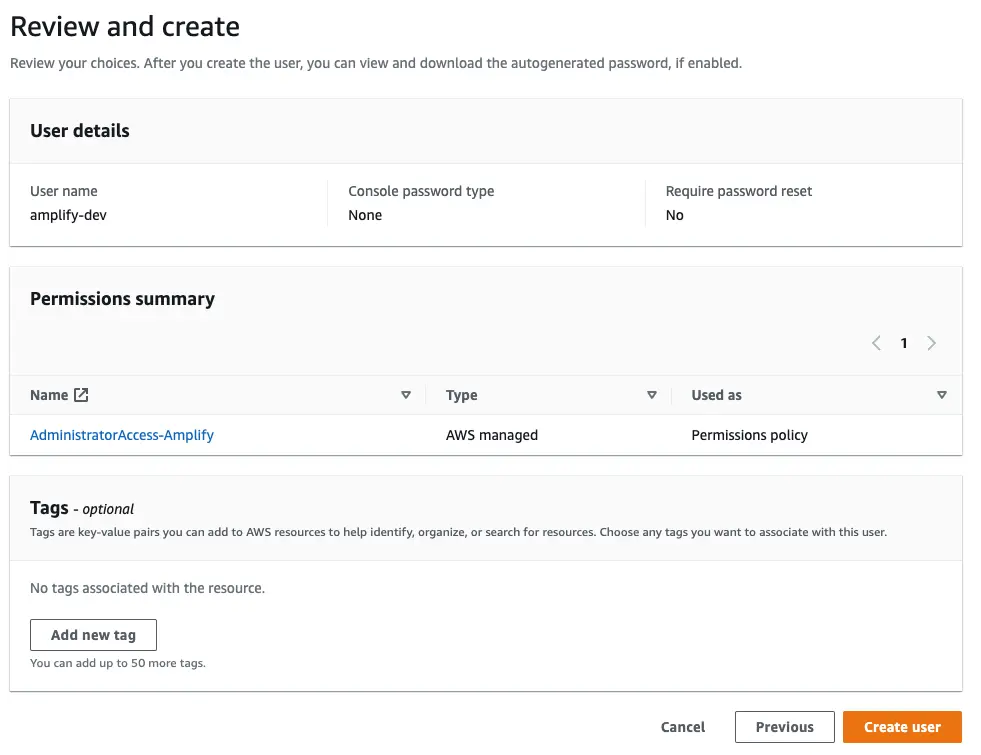
On the Review page, check that everything looks good and select Create user.
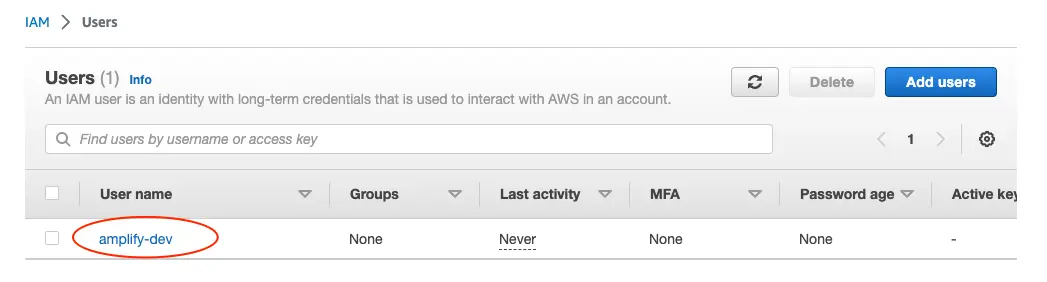
This will redirect to the users list page. Select the user you just created.
On the user details page, navigate to the Security credentials tab, scroll down to Access keys and select Create access keys.

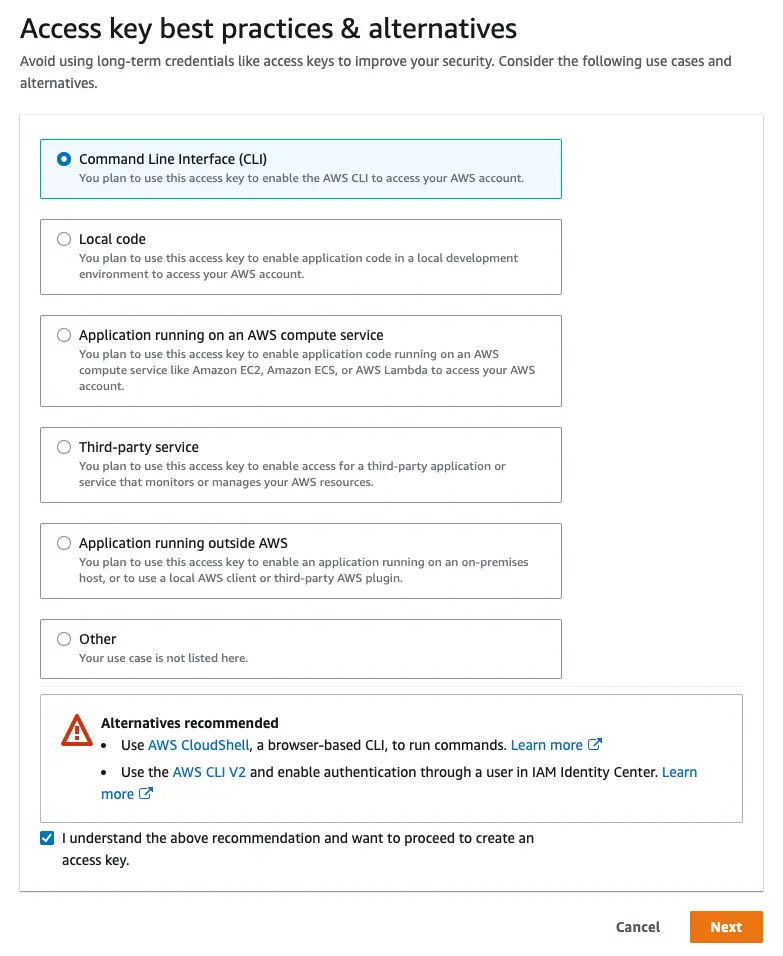
On the next page, select Command Line Interface, acknowledge the warning, and select Next.
On the next page select Create access key. You'll then see a page with the access keys for the user. Use the copy icon to copy these values to your clipboard, then return to the Amplify CLI.
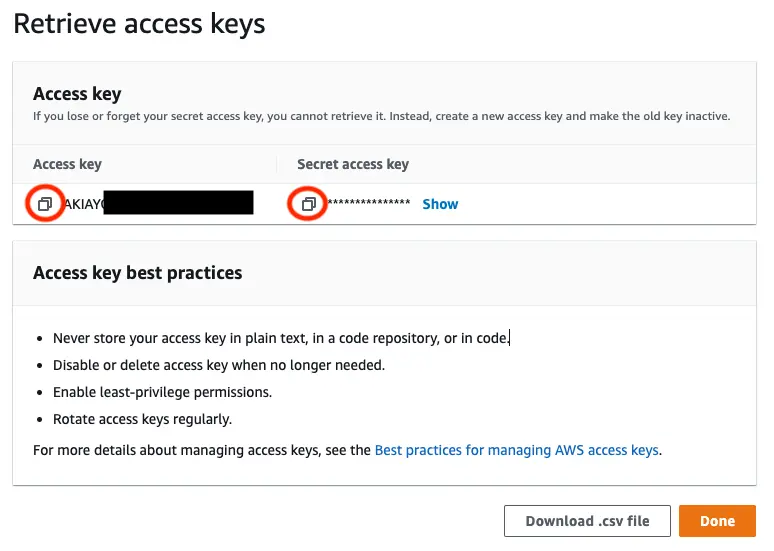
Enter the values you just copied into the corresponding CLI prompts.
1Enter the access key of the newly created user:2? accessKeyId:  # YOUR_ACCESS_KEY_ID3? secretAccessKey:  # YOUR_SECRET_ACCESS_KEY4This would update/create the AWS Profile in your local machine5? Profile Name:  # (default)6
7Successfully set up the new user.
Manually configure the Amplify CLI
If you are using an IAM role or IAM Identity Center (previously AWS SSO), you can configure your local machine for use with Amplify CLI by creating AWS profile entries manually rather than the amplify configure wizard.
To create an AWS profile locally using IAM Identity Center, you can use the AWS CLI wizard, aws configure sso, or write to ~/.aws/config directly:
1[profile my-sso-profile]2sso_session = my-sso3sso_account_id = 1234567890114sso_role_name = AdministratorAccess-Amplify5region = us-west-26output = json7
8[sso-session my-sso]9sso_region = us-east-110sso_start_url = https://my-sso-portal.awsapps.com/start11sso_registration_scopes = sso:account:access
Currently, the Amplify CLI requires a workaround for use with IAM Identity Center due to an issue in how it resolves credentials.
1[profile my-sso-profile]2sso_session = my-sso3sso_account_id = 1234567890114sso_role_name = AdministratorAccess-Amplify5region = us-west-26output = json7+ credential_process = aws configure export-credentials --profile my-sso-profile89[sso-session my-sso]10sso_region = us-east-111sso_start_url = https://my-sso-portal.awsapps.com/start12sso_registration_scopes = sso:account:accessUsing the example above, when creating a new app or pulling an existing app, specify my-sso-profile as the AWS profile you'd like to use with the Amplify app.
To create an AWS profile locally using an IAM role, assign the AdministratorAccess-Amplify permissions set to the role and set the role in your ~/.aws/config file:
1[profile amplify-admin]2role_arn = arn:aws:iam::123456789012:role/amplify-admin3source_profile = amplify-user4
5[profile amplify-user]6region=us-east-1
Using the example above, when creating a new app or pulling an existing app, specify amplify-admin as the AWS profile you'd like to use with the Amplify app
Next, you'll set up the app and initialize Amplify!
Create your application
For this section you will set up a skeleton project so that Amplify categories can be added to it.
1. Create a new project
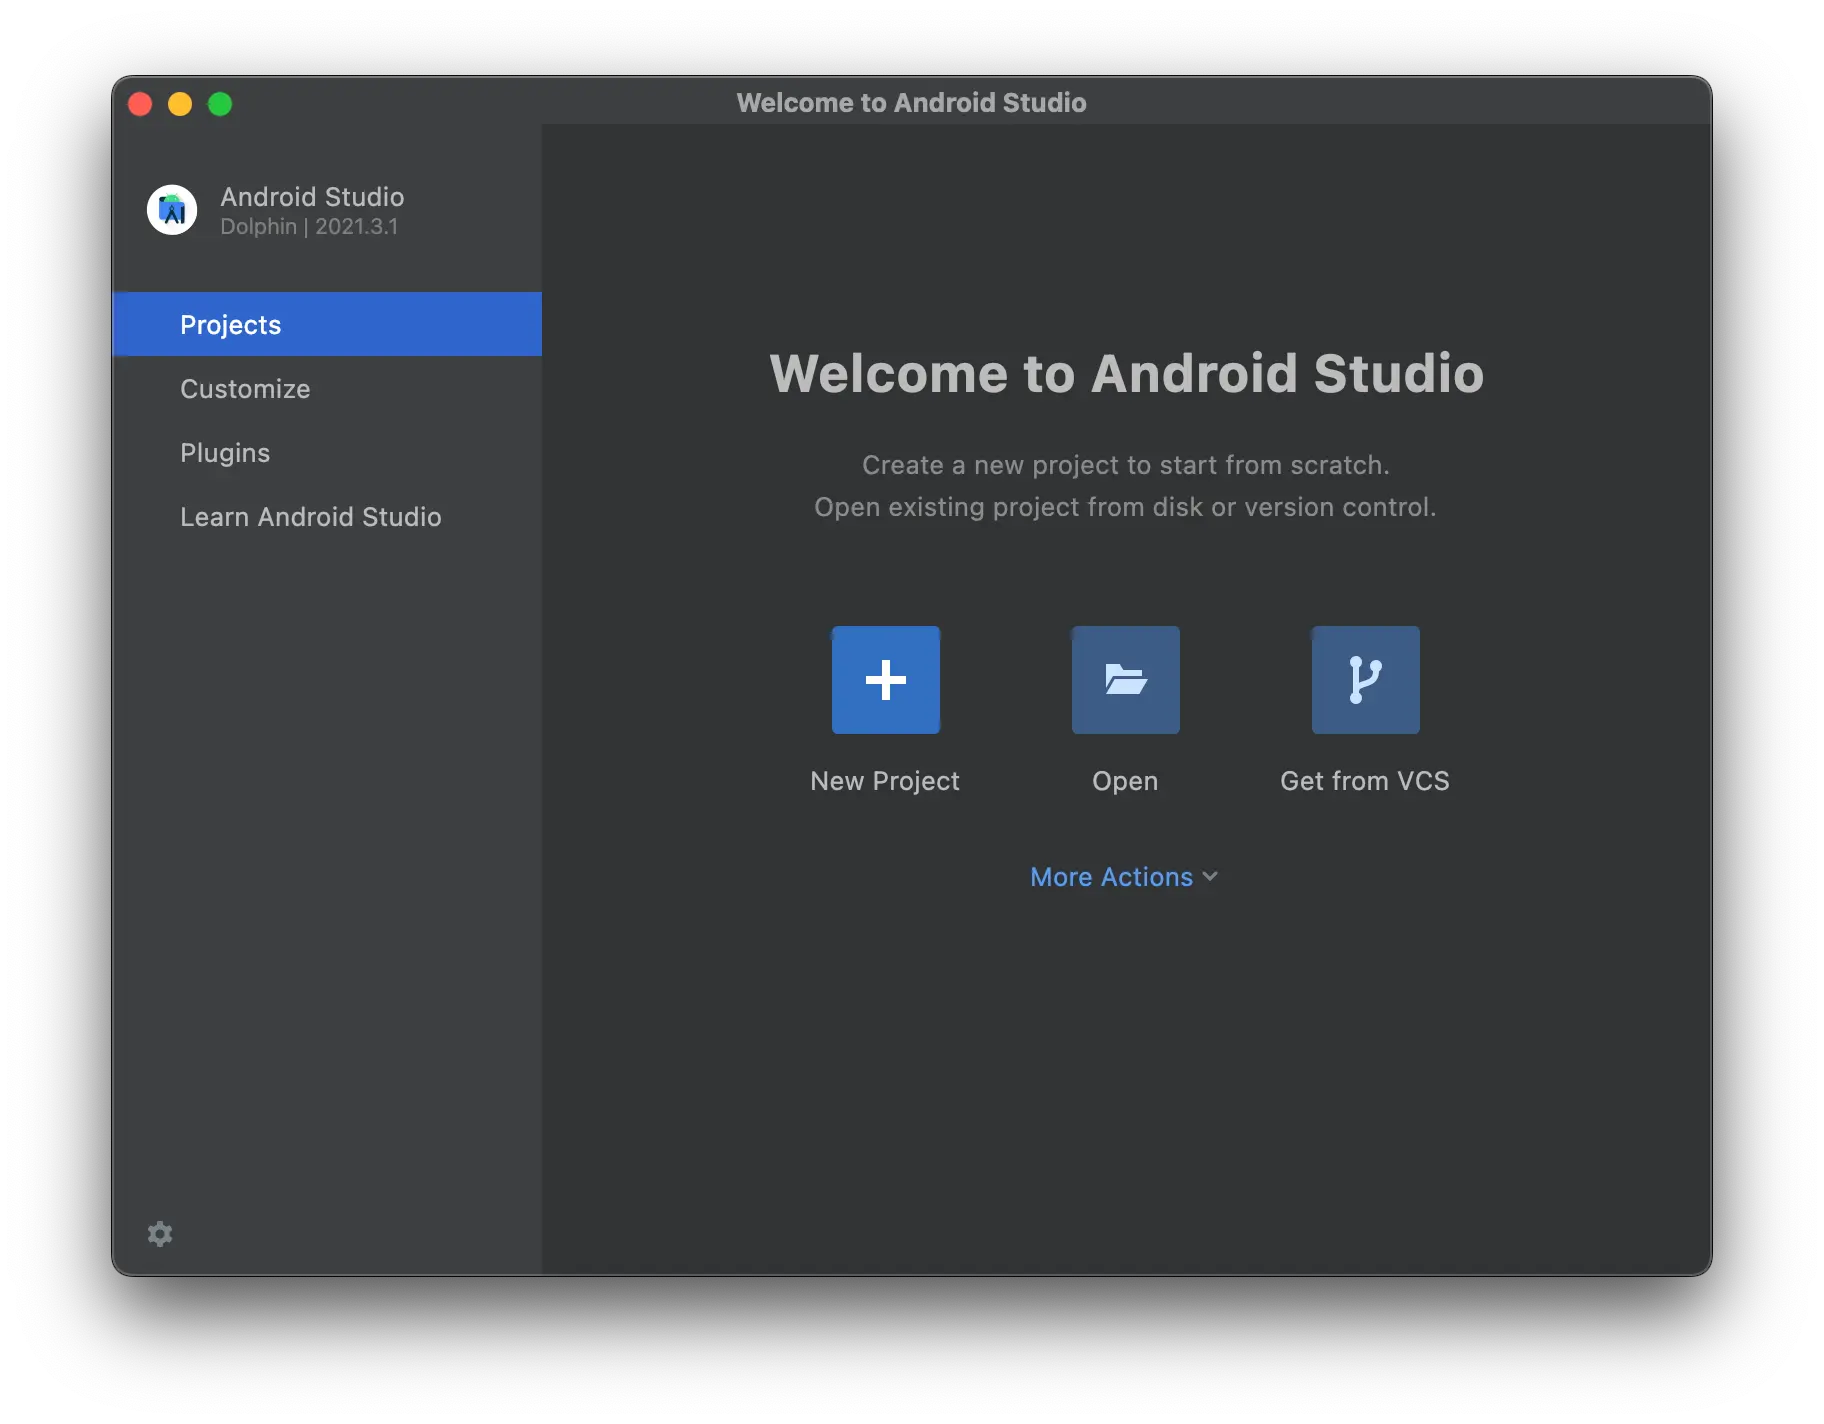
Open Android Studio. Select + Create New Project.
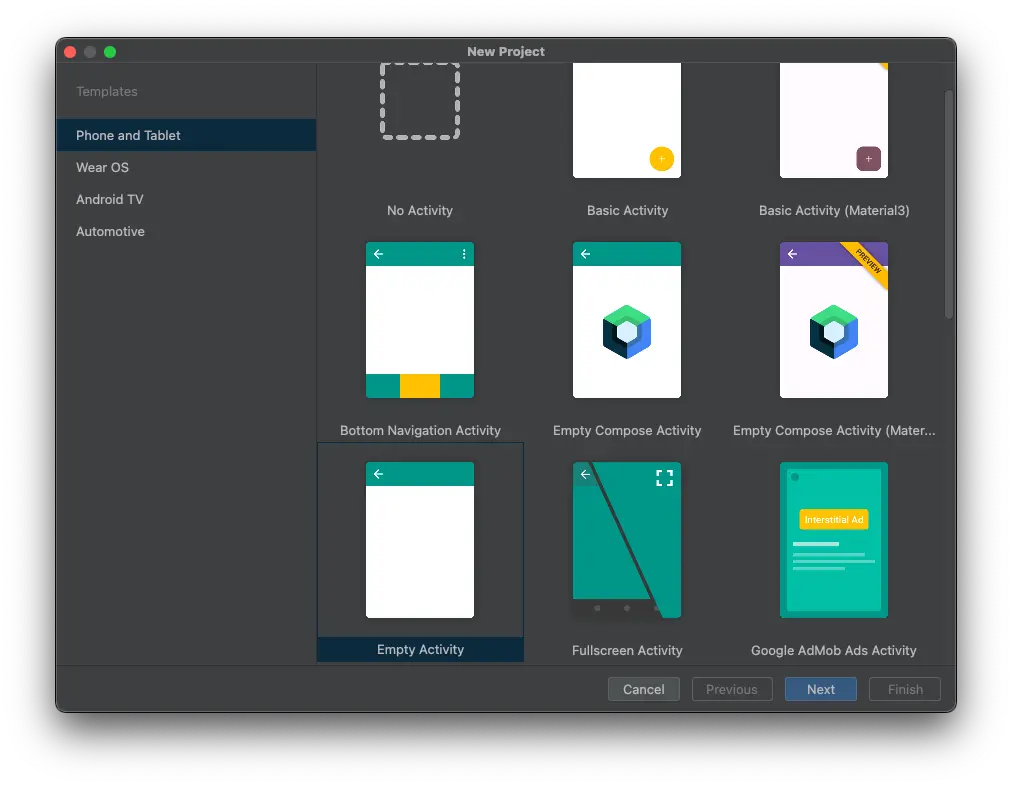
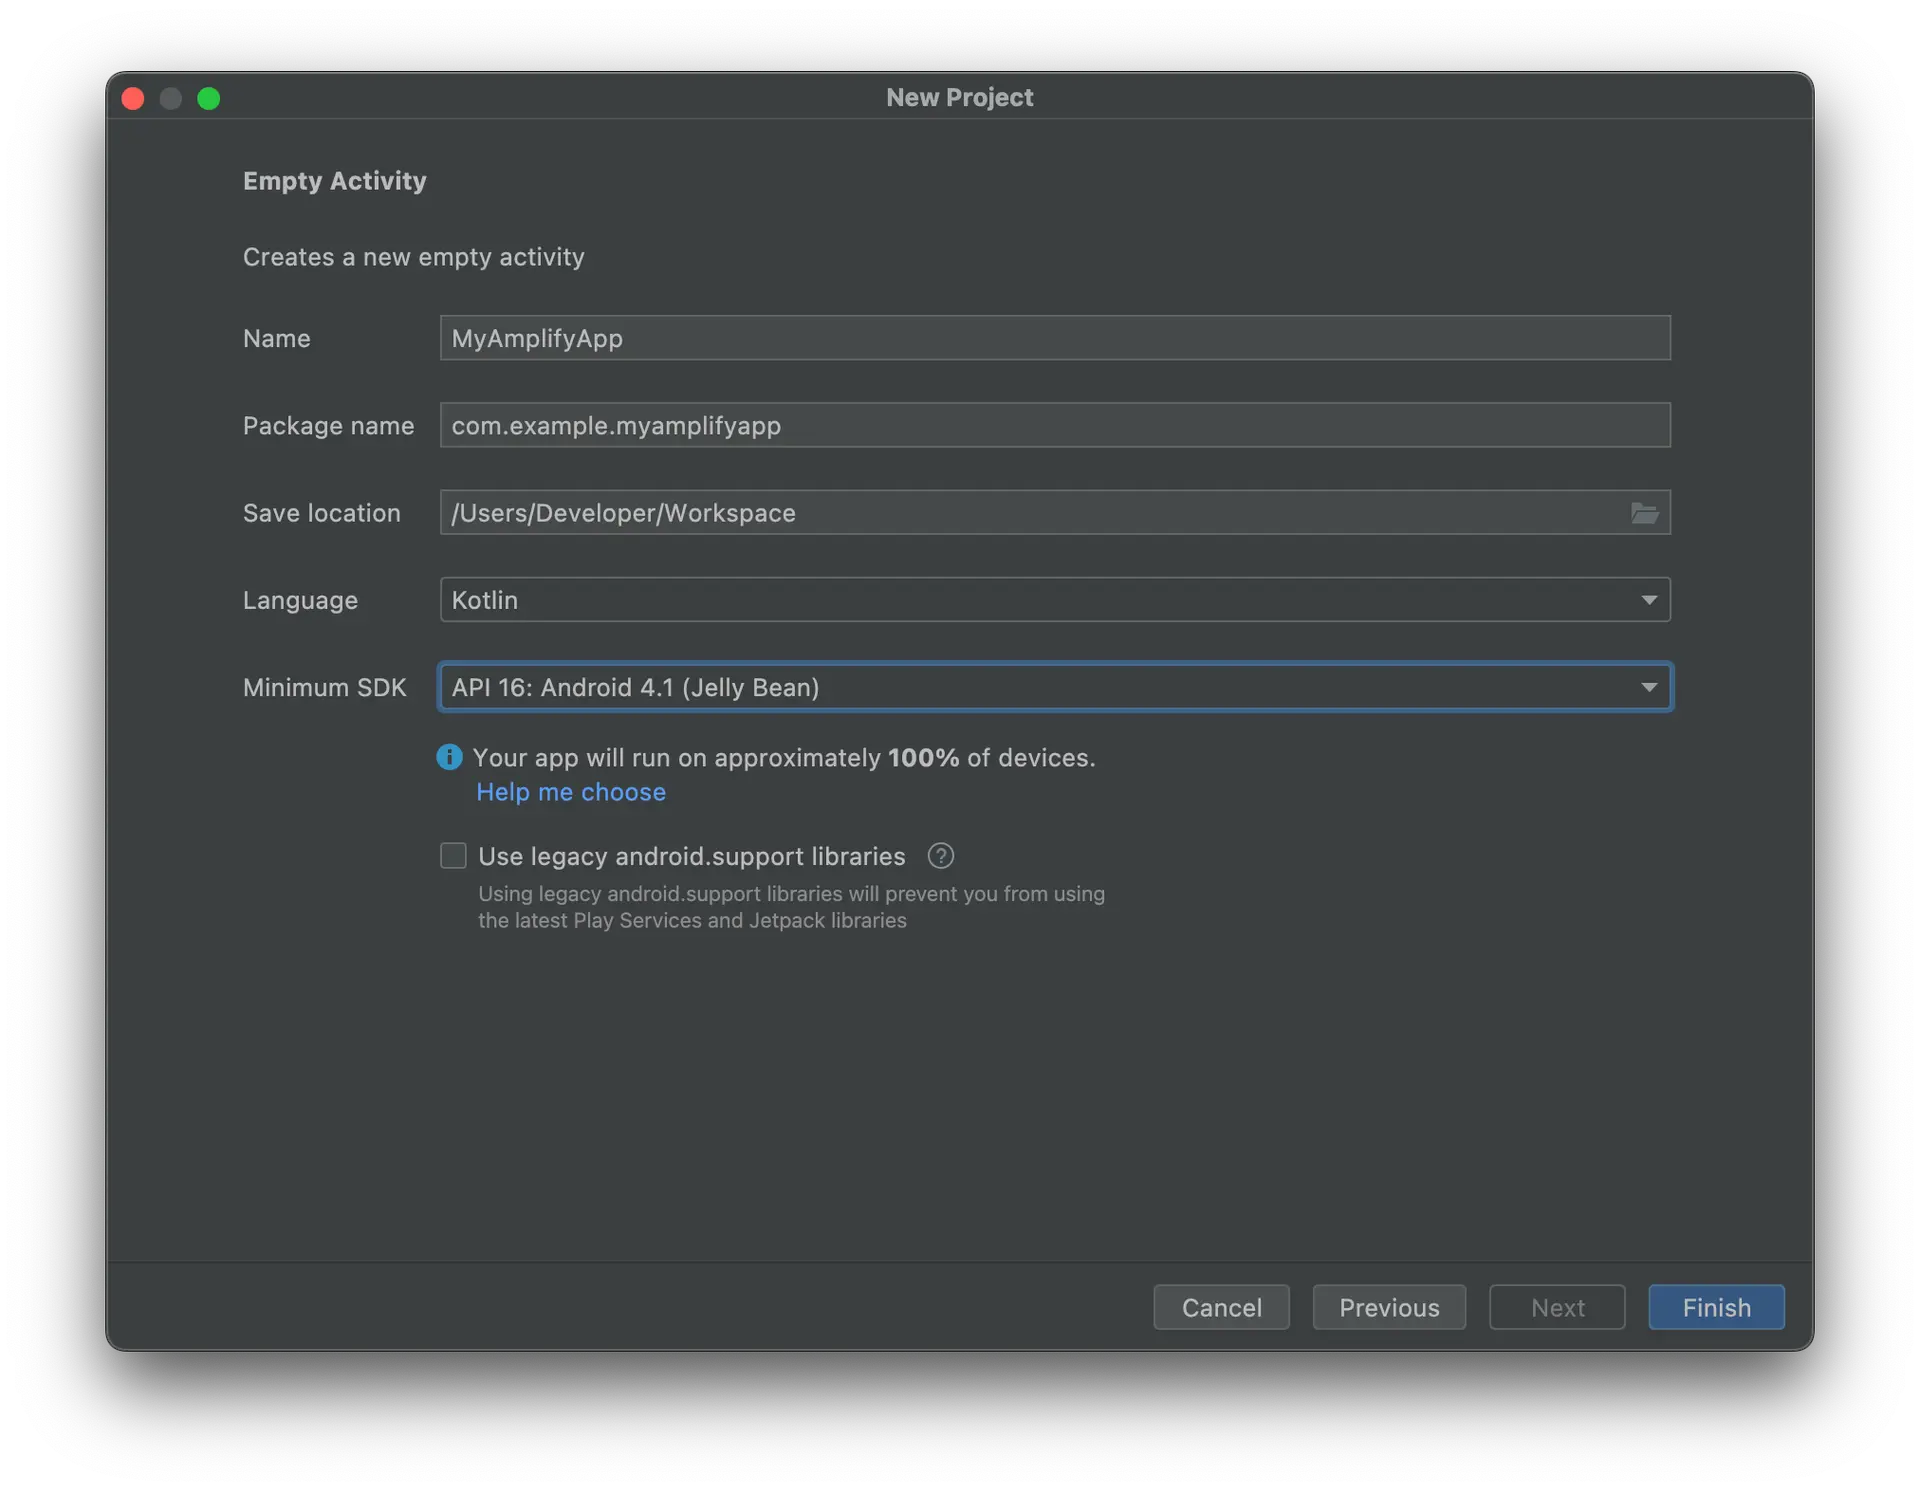
In Select a Project Template, select Empty Activity. Press Next.
Next, configure your project:
- Enter MyAmplifyApp in the Name field
- Select either Java or Kotlin from the Language dropdown menu
- Select API 16: Android 4.1 (Jelly Bean) from the Minimum SDK dropdown menu
- Press Finish
Android Studio will open your project with a tab opened to either MainActivity.java or MainActivity.kt depending upon if you created a Java or Kotlin project respectively.
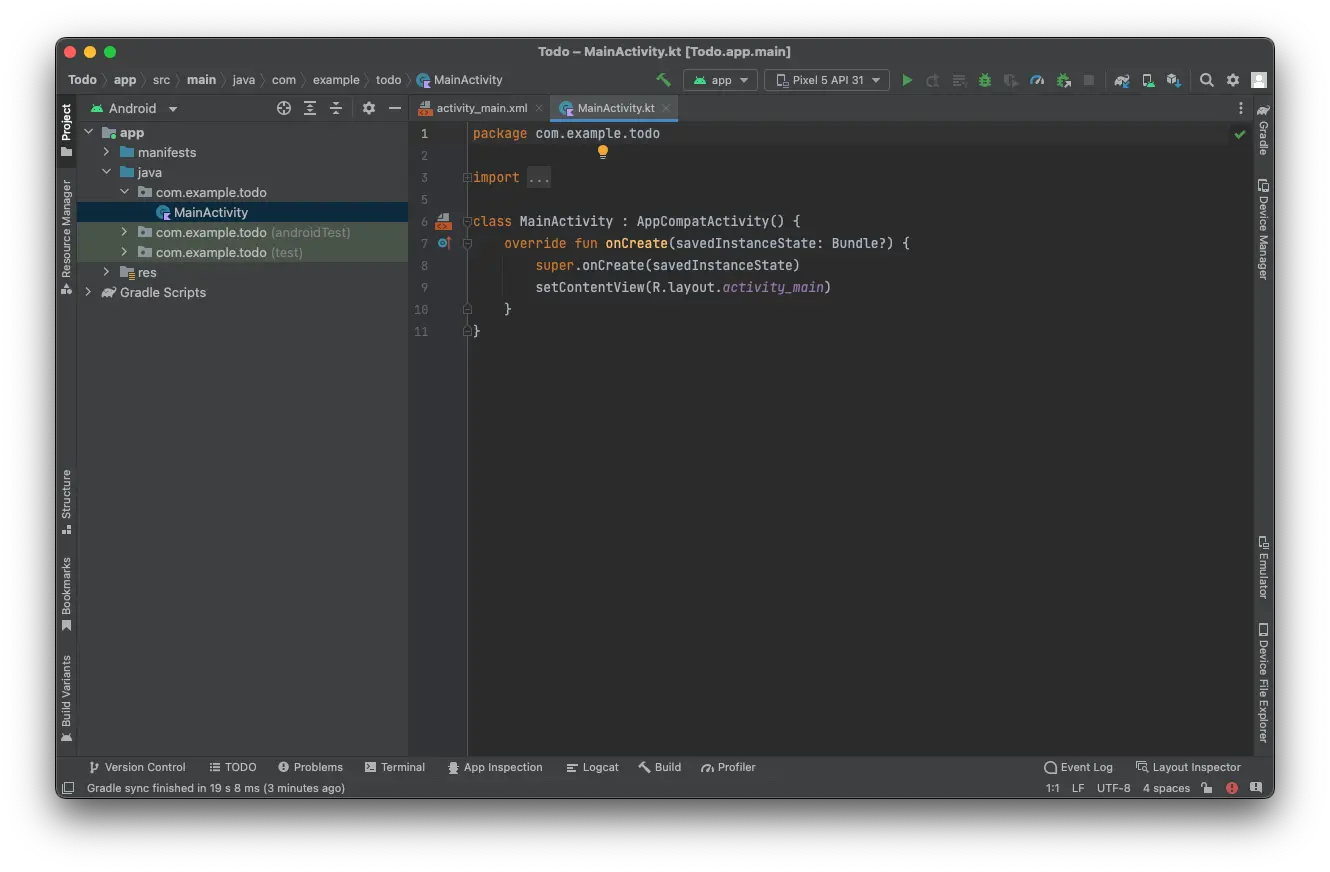
You now have an empty Android project into which you'll add Amplify in the next steps.
2. Install Amplify Libraries
Amplify for Android is distributed as Apache Maven packages. In this section, you'll add the packages and other required directives to your build configuration.
Under Gradle Scripts, open build.gradle (Module :app).
Add the following lines:
1android {2    compileOptions {3        // Support for Java 8 features4        coreLibraryDesugaringEnabled true5        sourceCompatibility JavaVersion.VERSION_1_86        targetCompatibility JavaVersion.VERSION_1_87    }8}9
10dependencies {11    // Amplify core dependency12    implementation 'com.amplifyframework:core:ANDROID_V1_VERSION'13
14 // Support for Java 8 features15 coreLibraryDesugaring 'com.android.tools:desugar_jdk_libs:1.1.5'16}- Set
coreLibraryDesugaringEnabled,sourceCompatibility, andtargetCompatibilityto allow your application to make use of Java 8 features like Lambda expressions - Add Amplify Core and Desugaring libraries to the
dependenciesblock
Run Gradle Sync
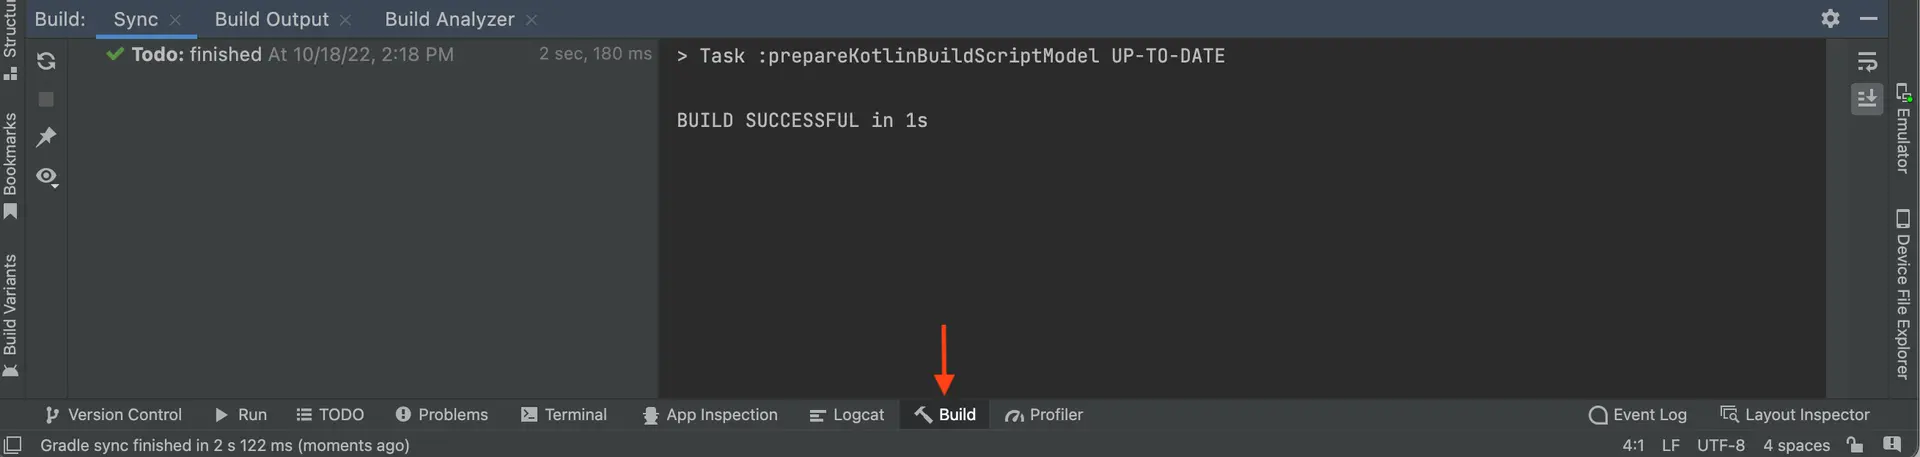
Android Studio requires you to sync your project with your new configuration. To do this, click Sync Now in the notification bar above the file editor.

When complete, you will see CONFIGURE SUCCESSFUL in the output in the Build tab at the bottom of your screen.
3. Provision the backend with Amplify CLI
To start provisioning resources in the backend, change directories to your project directory and run amplify init:
1amplify initEnter the following when prompted:
1? Enter a name for the project2 `MyAmplifyApp`3? Initialize the project with the above configuration?4 `No`5? Enter a name for the environment6 `dev`7? Choose your default editor:8 `Android Studio`9? Choose the type of app that you're building10 `android`11? Where is your Res directory:12 `app/src/main/res`13? Select the authentication method you want to use:14 `AWS profile`15? Please choose the profile you want to use16 `default`Upon successfully running amplify init, you will see a configuration file created in ./app/src/main/res/raw/ called amplifyconfiguration.json.
This file will be bundled into your application so that the Amplify libraries know how to reach your provisioned backend resources at runtime.
4. Initialize Amplify in the application
Create an Application class and add the Amplify initialization into its onCreate() to initialize Amplify once in your application.
Right-click on your namespace (e.g. com.example.MyAmplifyApp), click New, and click Java Class or Kotlin File/Class depending on which language you choose.
Configure the new class in New Java Class:
- Enter MyAmplifyApp in the Name field
- Press enter
- Extend MyAmplifyApp from android.app.Application by adding
extends Applicationto your class
Initialize Amplify by adding an onCreate method with the following code:
1public void onCreate() {2      super.onCreate();3
4      try {5          Amplify.configure(getApplicationContext());6          Log.i("MyAmplifyApp", "Initialized Amplify");7      } catch (AmplifyException error) {8          Log.e("MyAmplifyApp", "Could not initialize Amplify", error);9      }10  }
Configure the new class in New Kotlin File/Class:
- Enter MyAmplifyApp in the Name field
- Press enter
- Extend MyAmplifyApp from android.app.Application by adding
: Application()to your class
Initialize Amplify by adding an onCreate method with the following code:
1override fun onCreate() {2    super.onCreate()3
4    try {5        Amplify.configure(applicationContext)6        Log.i("MyAmplifyApp", "Initialized Amplify")7    } catch (error: AmplifyException) {8        Log.e("MyAmplifyApp", "Could not initialize Amplify", error)9    }10}
This overrides the onCreate() to initialize Amplify when your application is launched.
Next, configure your application to use your new custom Application class. Open manifests > AndroidManifest.xml, and add a android:name attribute with the value of your new class name:
1<?xml version="1.0" encoding="utf-8"?>2<manifest xmlns:android="http://schemas.android.com/apk/res/android"3    package="com.example.MyAmplifyApp">4
5    <!-- Add the android:name attribute to the application node -->6    <application7        android:name=".MyAmplifyApp"8        ...9    </application>10</manifest>
Next, build and run the application. In logcat, you'll see a log line indicating success:
1com.example.MyAmplifyApp I/MyAmplifyApp: Initialized AmplifyNext steps
Congratulations! You've created a skeleton app and are ready to start adding Amplify categories to your application. The following are some categories that you can start to build into your application:
- Analytics - for logging metrics and understanding your users
- API (GraphQL) - for adding a GraphQL endpoint to your app
- API (REST) - for adding a REST endpoint to your app
- Authentication - for managing your users
- DataStore - for making it easier to program for a distributed data store for offline and online scenarios
- Geo - to use location data and map UI components.
- Predictions - to detect text, images, and more!
- Storage - store complex objects like pictures and videos to the cloud.
Further customization
Async Programming Model
Most functionalities in Amplify Android are exposed as asynchronous functions. These functions return immediately, returning a result at a later time:
1val post = Post.builder()2    .title("My First Post")3    .build()4
5// Time 0: save() is called.6Amplify.DataStore.save(post,7    {8        // Time 2, later: a result or error is emitted9        Log.i("MyAmplifyApp", "Saved a post")10    },11    {12        // Time 2, later: a result of error is emitted13        Log.e("MyAmplifyApp", "Save failed", it)14    }15)16// Time 1: save() yields execution to following lines,17// but no result available, yet.
This is a familiar pattern to many Android developers, and so is the default way of interacting with Amplify Android.
However, this development model has some challenges. Let's say you need to wait for an operation to complete, so that you can perform additional logic that depends on its result. This can quickly become unmaintainable, resulting in a situation known as "callback hell":
Consider a relational model where the creation of a Post also requires the creation of a User for the editor, and a PostEditor object to link the two together:
1Post post = Post.builder()2    .title("My First Post")3    .build();4
5User editor = User.builder()6    .username("Nadia")7    .build();8
9PostEditor postEditor = PostEditor.builder()10    .post(post)11    .user(editor)12    .build();
Using callbacks, you can save these objects via:
1Amplify.DataStore.save(post,2 {3 Log.i("MyAmplifyApp", "Post saved")4 Amplify.DataStore.save(editor,5 {6 Log.i("MyAmplifyApp", "Editor saved")7 Amplify.DataStore.save(postEditor,8 { Log.i("MyAmplifyApp", "PostEditor saved") },9 { Log.e("MyAmplifyApp", "PostEditor not saved", it) }10 )11 },12 { Log.e("MyAmplifyApp", "Editor not saved", it) }13 )14 },15 { Log.e("MyAmplifyApp", "Post not saved", it) }16)After three calls, you're no longer writing down the page, you're writing down-and-right. As your program grows, this may become difficult to scale.
There are a variety of different technologies that aim to solve this particular problem: Promises/Futures, RxJava, Kotlin Coroutines, and more.
Amplify Android includes optional support for Kotlin Coroutines and RxJava.
Kotlin Coroutines support
Amplify provides an optional and separate API surface which is entirely focused on using Kotlin's coroutines and flows.
To use it, import Amplify facade from core-kotlin instead of from core. See the Installation notes below for more details.
With the Coroutines APIs, most Amplify functions are expressed as suspend functions. Suspending functions can be launched using one of the lifecycle-aware coroutine scopes in the Android Architecture components:
1import com.amplifyframework.kotlin.core.Amplify2// ...3
4val post = Post.builder()5    .title("My First Post")6    .build()7
8lifecycleScope.launch {9    try {10        Amplify.DataStore.save(post) // This is suspending function!11        Log.i("AmplifyKotlinDemo", "Saved a post")12    } catch (failure: DataStoreException) {13        Log.e("AmplifyKotlinDemo", "Save failed", failure)14    }15}
Coroutines can greatly improve the readability of dependent, asynchronous calls. Moreover, you can use scopes, dispatchers, and other Kotlin coroutine primitives to get more control over your execution context.
Let's consider what happens when you have three dependent operations. You want to save a Post, then an Editor, and finally a PostEditor. With Amplify's coroutines interface, you can write these operations sequentially:
1lifecycleScope.launch {2 try {3 listOf(post, editor, postEditor)4 .forEach { Amplify.DataStore.save(it) }5 Log.i("AmplifyKotlinDemo", "Post, Editor, and PostEditor saved")6 } catch (failure: DataStoreException) {7 Log.e("AmplifyKotlinDemo", "An item failed to save", failure)8 }9}In Amplify's vanilla APIs, this would have created a large block of code with three nested callbacks.
Install coroutine support
Amplify's coroutine support is included in an optional module, core-kotlin.
-
Under Gradle Scripts, open build.gradle (Module :app), and add the following line in
dependencies:1dependencies {2 // Add the below line in `dependencies`3 implementation 'com.amplifyframework:core-kotlin:ANDROID_V1_KOTLIN_VERSION'4} -
Wherever you use the
Amplifyfacade, importcom.amplifyframework.kotlin.core.Amplifyinstead ofcom.amplifyframework.core.Amplify:1import com.amplifyframework.kotlin.core.Amplify
Using Kotlin primitives
Amplify tries to map the behavior of your callback-based APIs to Kotlin primitives in an intuitive way. Functions whose callbacks emit a single value (or error) are now expressed as suspending functions, returning the value instead. Functions whose callbacks emit a stream of values will now return Kotlin Flows, instead.
Special cases with Kotlin
Some APIs return an operation which can be cancelled. Examples include realtime subscriptions to an API, and uploading/downloading objects from Storage.
API subscriptions with Kotlin
The API category's subscribe() function uses both a suspend function and a Flow. The function suspends until the API subscription is established. Then, it starts emitting values over the Flow.
1lifecycleScope.async {2 try {3 Amplify.API.subscribe(request) // Suspends until subscription established4 .catch { Log.e("AmplifyKotlinDemo", "Error on subscription", it) }5 .collect { Log.i("AmplifyKotlinDemo", "Data on subscription = $it") }6 } catch (error: ApiException) {7 Log.e("AmplifyKotlinDemo", "Failed to establish subscription", error)8 }9}Storage upload and download operations with Kotlin
The Storage category's downloadFile() and uploadFile() functions are bit more complex. These APIs allow you to observe transfer progress, and also to obtain a result. Progress results are delivered over a Flow, returned from the progress() function. Completion events are delivered by a suspending result() function.
1// Download2val download = Amplify.Storage.downloadFile(remoteKey, localFile)3
4lifecycleScope.async {5    download6        .progress()7        .collect { Log.i("AmplifyKotlinDemo", "Download progress = $it") }8}9
10lifecycleScope.async {11    try {12        val result = download.result()13        Log.i("AmplifyKotlinDemo", "Download finished! ${result.file.path}")14    } catch (failure: StorageException) {15        Log.e("AmplifyKotlinDemo", "Download failed", failure)16    }17}18
19// Upload20val upload = Amplify.Storage.uploadFile(remoteKey, localFile)21
22lifecycleScope.async {23    upload24        .progress()25        .collect { Log.i("AmplifyKotlinDemo", "Upload progress = $it") }26}27lifecycleScope.async {28    try {29        val result = upload.result()30        Log.i("AmplifyKotlinDemo", "Upload finished! ${result.key}")31    } catch (failure: StorageException) {32        Log.e("AmplifyKotlinDemo", "Upload failed", failure)33    }34}
Using RxJava with Amplify
Amplify also provides a set of APIs that expose Reactive Extensions, a cross-platform library for asynchronous and event-based programs.
To use it, you'll interact with the RxAmplify facade instead of the default Amplify facade.
1import com.amplifyframework.rx.RxAmplify;2// ...3
4Post post = Post.builder()5    .title("My First Post")6    .build();7
8RxAmplify.DataStore.save(post)9    .subscribe(10        () -> Log.i("RxAmplifyDemo", "Saved a post"),11        failure -> Log.e("RxAmplifyDemo", "Save failed", failure)12    );
Compared to the traditional callback API, this doesn't make a big difference when used for a single method call.
However, it greatly improves readability when chaining asynchronous calls. Moreover, you can use standard RxJava operators to compose other complex functionality into readable chunks.
Let's revisit your nested example where you saved Post, Editor, and PostEditor. With Amplify's RxJava interface you can merge these operations together.
1Completable.mergeArray(2 RxAmplify.DataStore.save(post),3 RxAmplify.DataStore.save(editor)4).andThen(5 RxAmplify.DataStore.save(postEditor)6).subscribe(7 () -> Log.i("RxAmplifyDemo", "Post, Editor, and PostEditor saved"),8 failure -> Log.e("RxAmplifyDemo", "One or more items not saved", failure)9);Compared to nesting these dependent calls in callbacks, this provides a much more readable pattern.
Install RxJava support
Amplify's RxJava support is included in an optional module, rxbindings. To start using the Rx APIs, add the following dependency to your application's Gradle file:
Under Gradle Scripts, open build.gradle (Module :app).
Add the following line in dependencies:
1dependencies {2 // Add the below line in `dependencies`3 implementation 'com.amplifyframework:rxbindings:ANDROID_V1_VERSION'4}Using Rx primitives
Amplify tries to map the behavior of your callback-based APIs to well-known Rx primitives in an intuitive way. Functions whose callbacks emit a single value (or error) will now return Rx Singles, instead. Functions whose callbacks emit no particular value will now return Rx Completables, instead. Lastly, functions whose callbacks emit a stream of values will now return Observables, instead.
Special cases with RxJava
Some APIs return an operation which can be cancelled. Examples include subscribing to an API or uploading or downloading objects from Storage.
API subscriptions with RxJava
The API category's subscribe() method exposes two Observables: one for subscription data, and one for connection state. You can access these Observables using observeConnectionState() and observeSubscriptionData() on the returned operation:
1RxSubscriptionOperation<? extends GraphQLResponse<?>> subscription =2    RxAmplify.API.subscribe(request);3
4subscription5    .observeConnectionState()6    .subscribe(7        connectionStateEvent -> Log.i("RxAmplifyDemo", String.valueOf(connectionStateEvent))8    );9
10subscription11    .observeSubscriptionData()12    .subscribe(13        data -> Log.i("RxAmplifyDemo", "Data on subscription = " + data),14        failure -> Log.e("RxAmplifyDemo", "Subscription failed", failure),15        () -> Log.i("RxAmplifyDemo", "Subscription completed")16    );
Storage upload and download operations with RxJava
The Storage category's downloadFile() and uploadFile() work largely the same way. uploadFile() and downloadFile() both return an operation containing a Single and an Observable. The Single can be used to obtain the result of the download, and the Observable can be used to monitor download/upload progress.
1// Download2RxProgressAwareSingleOperation<StorageDownloadFileResult> download =3    RxAmplify.Storage.downloadFile(remoteKey, localFile);4
5download6    .observeProgress()7    .subscribe(8        progress -> Log.i("RxAmplifyDemo", "Download progress = " + progress.toString())9    );10
11download12    .observeResult()13    .subscribe(14        result -> Log.i("RxAmplifyDemo", "Download finished! " + result.getFile().getPath()),15        failure -> Log.e("RxAmplifyDemo", "Download failed", failure)16    );17
18// Upload19RxProgressAwareSingleOperation<StorageUploadFileResult> upload =20    RxAmplify.Storage.uploadFile(remoteKey, localFile);21
22upload23    .observeProgress()24    .subscribe(25        progress -> Log.i("RxAmplifyDemo", "Upload progress = " + progress.toString())26    );27
28upload29    .observeResult()30    .subscribe(31        result -> Log.i("RxAmplifyDemo", "Upload finished! " + result.getKey()),32        failure -> Log.e("RxAmplifyDemo", "Upload failed", failure)33    );
Use existing AWS resources
An application’s backend is built with cloud resources such as AWS AppSync GraphQL APIs, Amazon S3 storage, and Amazon Cognito authentication. The Amplify CLI simplifies the provisioning of new backend resources across these different categories. However, you can alternatively use the Amplify libraries to add or re-use existing AWS resources that you provisioned without the CLI. The Amplify libraries support configuration through the amplifyconfiguration.json file which defines all the regions and service endpoints for your backend AWS resources.
Add an existing AWS resource to an Android application
Before you can add an existing AWS resource to an Android application, the application must have the Amplify libraries installed. For detailed instructions, see Install Amplify Libraries.
1. Manually create the Amplify configuration file for your Android project
First, locate your project’s res folder. For example, if the name of your project is MyAmplifyApp, you can find the res folder at the following location, MyAmplifyApp/app/src/main/res:
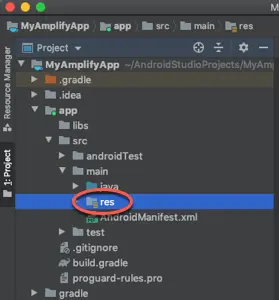
Next, in your project’s res folder, create a new folder named raw.
Finally, in the raw folder, create a file named amplifyconfiguration.json. At this point the contents of your amplifyconfiguration.json file can be an empty object, {}.
2. Initialize Amplify in your application
To initialize Amplify when your application is launched, you will need to create a new Application class and override its onCreate() method.
First, locate your application’s namespace where you will create the new application class. For example, if your application is named MyAmplifyApp, navigate to either MyAmplifyApp/app/src/main/java/com.example.MyAmplifyApp or MyAmplifyApp/app/src/main/kotlin/com.example.MyAmplifyApp depending on the programming language you are using.
From the Android Studio main menu, choose File -> New and select either Java Class or Kotlin File/Class depending your programming language.
Select Class, and specify a name for your new class in the Name field.
Paste the following code for the onCreate() method inside your new class:
1public void onCreate() {2    super.onCreate();3
4 try {5 Amplify.configure(getApplicationContext());6 Log.i("MyAmplifyApp", "Initialized Amplify");7 } catch (AmplifyException e) {8 Log.e("MyAmplifyApp", "Could not initialize Amplify", e);9 }10}1override fun onCreate() {2 super.onCreate()3
4 try {5 Amplify.configure(applicationContext)6 Log.i("MyAmplifyApp", "Initialized Amplify")7 } catch (error: AmplifyException) {8 Log.e("MyAmplifyApp", "Could not initialize Amplify", error)9 }10}Next, configure your application to use your new custom Application class. Open the AndroidManifest.xml file located in your project directory at app/src/main/AndroidManifest.xml.
Add the android:name attribute to the application node. For example, if the application name is MyAmplifyApp and the new class is named MyAmplifyApplication, the update to the AndroidManifest.xml file looks as follows:
1<?xml version="1.0" encoding="utf-8"?>2<manifest xmlns:android="http://schemas.android.com/apk/res/android"3    package="com.example.MyAmplifyApp">4
5    <!-- Add the android:name attribute to the application node -->6    <application7        android:name=".MyAmplifyApplication"8        ...9    </application>10</manifest>
3. Edit your configuration file to use an existing AWS resource
Now you’re ready to customize your application’s amplifyconfiguration.json file to specify an existing AWS resource to use.
Note that before you can add an AWS resource to your application, the application must have the Amplify libraries installed. If you need to perform this step, see Install Amplify Libraries.
Select a category from the following list to view an example amplifyconfiguration.json file you can use as a template to author your own amplifyconfiguration.json file:
- See the Analytics category to use existing AWS Pinpoint resources.
- See the API (GraphQL) category to use existing AWS AppSync resources.
- See the API (REST) category to use existing Amazon API Gateway and AWS Lambda resources.
- See the Authentication category to use existing Amazon Cognito resources.
- See the Storage category to use existing Amazon S3 resources.