Connect API to existing MySQL or PostgreSQL database
In this section, you'll learn how to:
- Connect Amplify GraphQL API to an existing MySQL or PostgreSQL database
- Execute SQL statements with custom GraphQL queries and mutations using the new
@sqldirective - Generate create, read, update, and delete API operations based on your SQL database schema
Connect your API with an existing MySQL or PostgreSQL database
Pre-requisites:
- Have an existing MySQL database or PostgreSQL database deployed
- The AWS CDK CLI is installed
- Have an AWS CDK application initialized
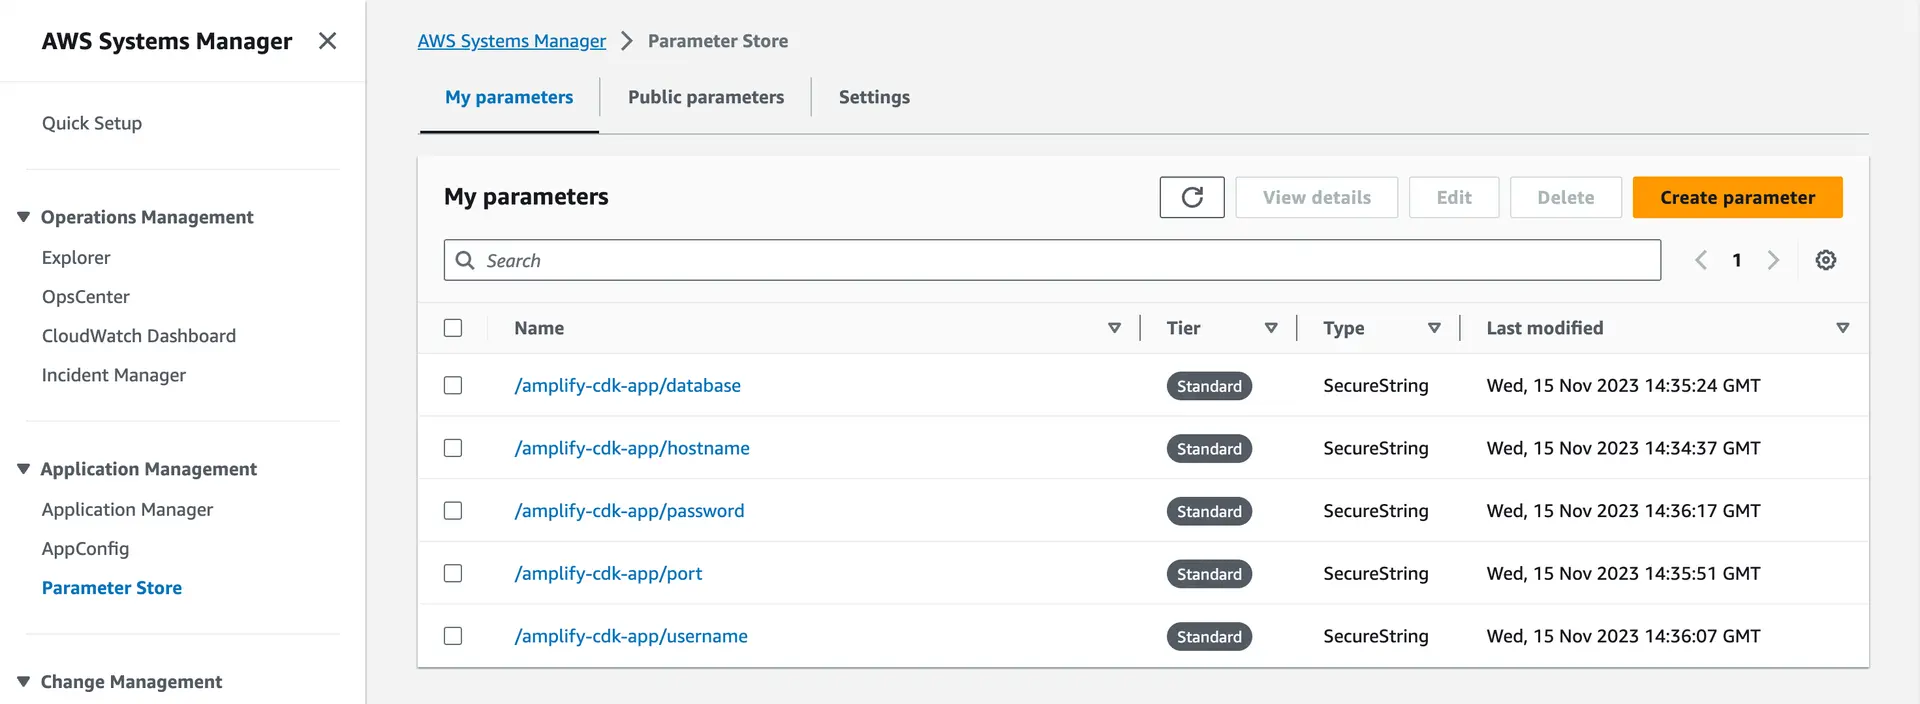
First, place your database connection information (hostname, username, password, port, and database name) into Systems Manager, each as a SecureString.
Go to the Systems Manager console, navigate to Parameter Store, and click "Create Parameter". Create five different SecureStrings: one each for the hostname of your database server, the username and password to connect, the database port, and the database name.
Your Systems Manager configuration should look something like this:
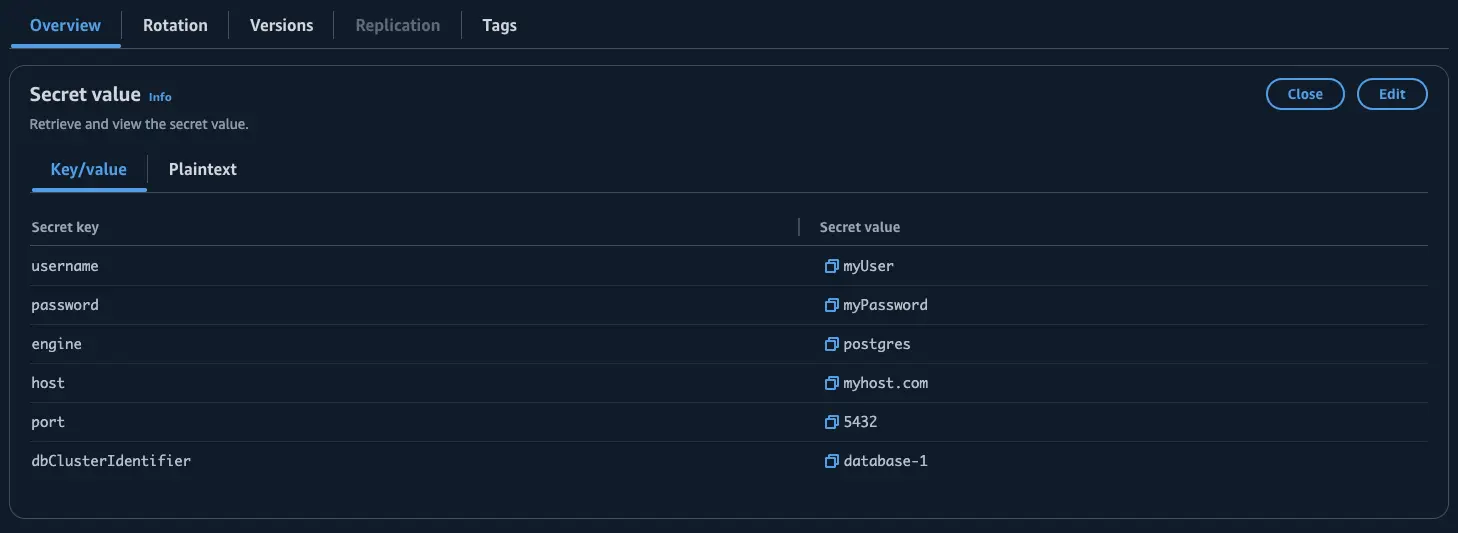
First, place your database connection information (hostname, username, password, port, and database name) into Secrets Manager.
Go to the Secrets Manager console, navigate to Secrets, and click "Store a new secret". You may create the secret in any manner as long as there are username and password keys defined.
Optionally, you can decide whether to encrypt the secret using the KMS key that Secrets Manager creates or a customer managed KMS key that you create.
You can also configure a rotation schedule and create a Lambda function or choose an existing Lambda function from your account to rotate the database credentials automatically.
Install the following package to add the Amplify GraphQL API construct to your dependencies:
npm install @aws-amplify/graphql-api-constructCreate a new schema.sql.graphql file within your CDK app’s lib/ folder that includes the APIs you want to expose. Define your GraphQL object types, queries, and mutations to match the APIs you wish to expose. For example, define object types for database tables, queries to fetch data from those tables, and mutations to modify those tables.
type Post {  id: Int!  title: String!  content: String!  published: Boolean  publishedDate: AWSDate @refersTo(name: "published_date")}
type Query {  searchPosts(contains: String!): [Post]    @sql(      statement: "SELECT * FROM posts WHERE title LIKE CONCAT('%', :contains, '%');"    )    @auth(rules: [{ allow: public }])}
type Mutation {  createPost(title: String! content: String!): AWSJSON    @sql(statement: "INSERT INTO posts (title, content) VALUES (:title, :content);")    @auth(rules: [{ allow: public }])}
You can use the :variable notation to reference input variables from the query request.
Next, open the main stack file in your CDK project (usually located in lib/<your-project-name>-stack.ts). Import the necessary constructs at the top of the file:
import {  AmplifyGraphqlApi,  AmplifyGraphqlDefinition} from '@aws-amplify/graphql-api-construct';
import path from 'path';
In the main stack class, add the following code to define a new GraphQL API. Replace stack with the name of your stack instance (often referenced via this):
new AmplifyGraphqlApi(stack, 'SqlBoundApi', { apiName: 'MySqlBoundApi', definition: AmplifyGraphqlDefinition.fromFilesAndStrategy( [path.join(__dirname, 'schema.sql.graphql')], { name: 'MySQLSchemaDefinition', dbType: 'MYSQL', vpcConfiguration: { vpcId: 'vpc-123456', securityGroupIds: ['sg-123', 'sg-456'], subnetAvailabilityZoneConfig: [ { subnetId: 'sn-123456', availabilityZone: 'us-east-1a' }, { subnetId: 'sn-987654', availabilityZone: 'us-east-1b' } ] }, dbConnectionConfig: { hostnameSsmPath: '/path/to/ssm/SecureString/containing/value/of/hostname', portSsmPath: '/path/to/ssm/SecureString/containing/value/of/port', usernameSsmPath: '/path/to/ssm/SecureString/containing/value/of/username', passwordSsmPath: '/path/to/ssm/SecureString/containing/value/of/password', databaseNameSsmPath: '/path/to/ssm/SecureString/containing/value/of/databaseName' } } ), authorizationModes: { defaultAuthorizationMode: 'API_KEY', apiKeyConfig: { expires: cdk.Duration.days(30) } }});new AmplifyGraphqlApi(this, 'SqlBoundApi', { apiName: 'MySqlBoundApi', definition: AmplifyGraphqlDefinition.fromFilesAndStrategy( [path.join(__dirname, 'schema.sql.graphql')], { name: 'MySQLSchemaDefinition', dbType: 'MYSQL', vpcConfiguration: { vpcId: 'vpc-123456', securityGroupIds: ['sg-123', 'sg-456'], subnetAvailabilityZoneConfig: [ { subnetId: 'sn-123456', availabilityZone: 'us-east-1a' }, { subnetId: 'sn-987654', availabilityZone: 'us-east-1b' }, ], }, dbConnectionConfig: { databaseName: 'database', port: 3306, hostname: 'database-1-instance-1.id.region.rds.amazonaws.com', secretArn: 'arn:aws:secretsmanager:Region1:123456789012:secret:MySecret-a1b2c3', }, } ), authorizationModes: { defaultAuthorizationMode: 'API_KEY', apiKeyConfig: { expires: cdk.Duration.days(30), }, },});The API will have an API key enabled for authorization.
Before deploying, make sure to:
-
Set a value for
name. This will be used to name the AppSync DataSource itself, plus any associated resources like resolver Lambdas. This name must be unique across all schema definitions in a GraphQL API. -
Change the
dbTypeto match your database engine. This is the type of the SQL database used to process model operations for this definition. Supported engines are"MYSQL"or"POSTGRES". -
Update the SSM parameter paths within
dbConnectionConfigto point to those existing in your AWS account. These are the parameters the SQL Lambda will use to connect to the database. -
If your database instance exists within a VPC, update the
vpcConfigurationproperties -vpcId,securityGroupIds, andsubnetAvailabilityZoneConfigwith your vpc details. This is the configuration of the VPC into which to install the SQL Lambda.
Learn moreConfigure VPC settings for your database
If your database exists within a VPC, the RDS instance must be configured to be Publicly accessible. This does not mean the instance needs to accessible from the internet.
The target security group(s) must have two inbound rules set up:
-
A rule allowing traffic on port 443 from the security group.
-
An inbound rule allowing traffic on the database port from the security group. (Default: 3306 for MySQL. 5432 for PostgreSQL.)
In addition, the target security group(s) must have two outbound rules set up:
-
An outbound rule allowing traffic on port 443 to the security group.
-
An outbound rule allowing traffic on the database port to the security group. (Default: 3306 for MySQL. 5432 for PostgreSQL.)
Learn moreRDS Proxy for improved connectivity
Consider adding an RDS Proxy in front of the cluster to manage database connections.
When using Amplify GraphQL API with a relational database like Amazon RDS, each query from your application needs to open a separate connection to the database.
If there are a large number of queries occurring concurrently, it can exceed the connection limit on the database and result in errors like "Too many connections". To avoid this, Amplify can use an RDS Proxy when connecting your GraphQL API to a database.
The RDS Proxy acts as an intermediary sitting in front of your database. Instead of each application query opening a direct connection to the database, they will connect through the Proxy. The Proxy helps manage and pool these connections to avoid overwhelming your database cluster. This improves the availability of your API, allowing more queries to execute concurrently without hitting connection limits.
However, there is a tradeoff of increased latency - queries may take slightly longer as they wait for an available connection from the Proxy pool. There are also additional costs associated with using RDS Proxy. Please refer to the pricing page for RDS Proxy to learn more.
Create custom queries and mutations
Amplify GraphQL API for SQL databases introduces the @sql directive, which allows you to define SQL statements in custom GraphQL queries and mutations. This provides more flexibility when the default, auto-generated GraphQL queries and mutations are not sufficient.
There are two ways to specify the SQL statement - inline or by referencing a .sql file.
Inline SQL Statement
For getting started, you can embed the SQL statement directly in the schema using the statement argument.
The SQL statement can use parameters in the format :variable, which will be bound to the input variables passed when executing a custom GraphQL query or mutation.
In the example below, a SQL statement is defined, accepting a searchTerm input variable.
type Query { searchPosts(searchTerm: String): [Post] @sql(statement: "SELECT * FROM posts WHERE title LIKE :searchTerm;") @auth(rules: [{ allow: public }])}SQL File Reference
For longer, more complex SQL queries, you can specify the statement in separate .sql files rather than inline. Referencing a file keeps your schema clean and allows reuse of SQL statements across fields.
First, update your GraphQL schema file to reference a SQL file name without the .sql extension:
type Query { getPublishedPosts(start: AWSDate, end: AWSDate): [Post] @sql(reference: "getPublishedPostsByDateRange") @auth(rules: [{ allow: public }])}Next, create a new lib/sql-statements folder and add any custom queries or mutations as SQL files. For example, you could create different .sql files for different queries:
-- lib/sql-statements/getPublishedPostsByDateRange.sqlSELECT p.id, p.title, p.content, p.published_dateFROM posts pWHERE p.published = 1 AND p.published_date > :startDate AND p.published_date < :endDateORDER BY p.published_date DESCLIMIT 10-- lib/sql-statements/getPostById.sqlSELECT * FROM posts WHERE id = :id;Then, you can import the SQLLambdaModelDataSourceStrategyFactory which helps define the datasource strategy from the custom .sql files you've created.
import { SQLLambdaModelDataSourceStrategyFactory } from '@aws-amplify/graphql-api-construct';import path from 'path';import fs from 'fs';In your lib/<your-project-name>-stack.ts file, read from the sql-statements/ folder and add them as custom SQL statements to your Amplify GraphQL API:
// Define custom SQL statements folder pathconst sqlStatementsPath = path.join(__dirname, 'sql-statements');
// Use the Factory to define the SQL data source strategyconst sqlStrategy = SQLLambdaModelDataSourceStrategyFactory.fromCustomSqlFiles(  // File paths to all SQL statements  fs    .readdirSync(sqlStatementsPath)    .map((file) => path.join(sqlStatementsPath, file)),  // Move your connection information and VPC config into here  {    dbType: 'MYSQL',    name: 'MySQLSchemaDefinition',    dbConnectionConfig: {      //...    },    vpcConfiguration: {      //...    }  });

const amplifyApi = new AmplifyGraphqlApi(this, 'SqlBoundApi', {  definition: AmplifyGraphqlDefinition.fromFilesAndStrategy(    [path.join(__dirname, 'schema.sql.graphql')],    sqlStrategy  ),  authorizationModes: {    defaultAuthorizationMode: 'API_KEY',    apiKeyConfig: {      expires: cdk.Duration.days(30)    }  }});
The SQL statements defined in the .sql files will be executed as if they were defined inline in the schema. The same rules apply in terms of using parameters, ensuring valid SQL syntax, and matching the return type to row data.
Custom Query
For reference, you define a GraphQL query by adding a new field under a type Query object:
type Query { searchPostsByTitle(title: String): [Post] @sql( statement: "SELECT * FROM posts WHERE title LIKE CONCAT('%', :title, '%');" ) @auth(rules: [{ allow: public }])}Custom Mutation
For reference, you define a GraphQL mutation by adding a new field under a type Mutation object:
type Mutation { publishPostById(id: ID!): AWSJSON @sql(statement: "UPDATE posts SET published = :published WHERE id = :id;") @auth(rules: [{ allow: public }])}Returning row data from custom mutations
SQL statements such as INSERT, UPDATE and DELETE return the number of rows affected.
If you want to return the result of the SQL statement, you can use AWSJSON as the return type.
type Mutation { publishPosts: AWSJSON @sql(statement: "UPDATE posts SET published = 1;") @auth(rules: [{ allow: public }])}This will return a JSON response similar to this:
{ "data": { "publishPosts": "{\"fieldCount\":0,\"affectedRows\":7,\"insertId\":0,\"info\":\"Rows matched: 7 Changed: 7 Warnings: 0\",\"serverStatus\":34,\"warningStatus\":0,\"changedRows\":7}" }}However, you might want to return the actual row data instead.
In MySQL, you can create and call a stored procedure that performs both an UPDATE statement and SELECT query to return a single post.
Create a stored procedure by running the following SQL statement in your MySQL database:
CREATE PROCEDURE publish_post (IN postId VARCHAR(255))
BEGINUPDATE posts SET published = 1 WHERE id = postId;
SELECT * FROM posts WHERE id = postId LIMIT 1;END
Call the stored procedure from the custom mutation:
type Mutation { publishPostById(id: String!): [Post] @sql(statement: "CALL publish_post(:id);") @auth(rules: [{ allow: public }])}In PostgreSQL, you can add a RETURNING clause to an INSERT, UPDATE, or DELETE statement and get the actual modified row data.
Example:
type Mutation { publishPostById(id: String!): [Post] @sql(statement: "UPDATE posts SET price = :id RETURNING *;") @auth(rules: [{ allow: public }])}Apply authorization rules
Model level authorization rules
The @auth directive can be used to restrict access to data and operations by specifying authorization rules. It allows granular access control over the GraphQL API based on the user's identity and attributes. You can for example, limit a query or mutation to only logged-in users via an @auth(rules: [{ allow: private }]) rule or limit access to only users of the "Admin" group via an @auth(rules: [{ allow: groups, groups: ["Admin"] }]) rule.
All model-level authorization rules are supported for Amplify GraphQL schemas generated from MySQL and PostgreSQL databases.
In the example below, public users authorized via API Key are granted unrestricted access to all posts.
Add the following auth rule to the Post model within the schema.sql.graphql file:
type Post @model @refersTo(name: "posts") @auth(rules: [{ allow: public }]) { id: String! @primaryKey title: String! content: String!}For more information on each rule please refer to our documentation on Authorization rules.
Field-level authorization rules
Field level auth rules are also supported for Amplify GraphQL schemas generated from MySQL and PostgreSQL databases.
In the example below, unauthenticated users can read post data but only the owner of the post can perform operations on the published field.
type Post @model @refersTo(name: "posts") @auth(rules: [ { allow: public, operations: [read] }, { allow: owner } ]) { id: String! @primaryKey title: String! content: String! published: Boolean @auth(rules: [{ allow: owner }])}For more information on field-level auth rules please refer to our documentation on Field-level authorization rules.
Deploy your API
To deploy the API, you can use the cdk deploy command:
cdk deployNow the API has been deployed and you can start using it!
You can start querying from the AWS AppSync console or integrate it into your application using the AWS Amplify libraries!
Auto-generate CRUDL operations for existing tables
You can generate common CRUDL operations for your database tables based on your database schema. This saves time from hand-authoring the GraphQL types, queries, and mutations and SQL statements for common CRUDL use cases. After you generate the operations, you can annotate the @model types with authorization rules.
Create a Ingredients table in your database:
CREATE TABLE Ingredients ( id varchar(255) NOT NULL PRIMARY KEY, name varchar(255) NOT NULL, unit_of_measurement varchar(255) NOT NULL, price decimal(10, 2) NOT NULL, supplier_id int,);Step 1 - Export database schema as CSV
Execute the following SQL statement on your database using a MySQL, PostgreSQL Client, or CLI tool similar to psql and export the output to a CSV file:
Replace <database-name> with the name of your database/schema.
SELECT DISTINCT INFORMATION_SCHEMA.COLUMNS.TABLE_NAME, INFORMATION_SCHEMA.COLUMNS.COLUMN_NAME, INFORMATION_SCHEMA.COLUMNS.COLUMN_DEFAULT, INFORMATION_SCHEMA.COLUMNS.ORDINAL_POSITION, INFORMATION_SCHEMA.COLUMNS.DATA_TYPE, INFORMATION_SCHEMA.COLUMNS.COLUMN_TYPE, INFORMATION_SCHEMA.COLUMNS.IS_NULLABLE, INFORMATION_SCHEMA.COLUMNS.CHARACTER_MAXIMUM_LENGTH, INFORMATION_SCHEMA.STATISTICS.INDEX_NAME, INFORMATION_SCHEMA.STATISTICS.NON_UNIQUE, INFORMATION_SCHEMA.STATISTICS.SEQ_IN_INDEX, INFORMATION_SCHEMA.STATISTICS.NULLABLEFROM INFORMATION_SCHEMA.COLUMNSLEFT JOIN INFORMATION_SCHEMA.STATISTICS ON INFORMATION_SCHEMA.COLUMNS.TABLE_NAME=INFORMATION_SCHEMA.STATISTICS.TABLE_NAME AND INFORMATION_SCHEMA.COLUMNS.COLUMN_NAME=INFORMATION_SCHEMA.STATISTICS.COLUMN_NAMEWHERE INFORMATION_SCHEMA.COLUMNS.TABLE_SCHEMA = '<database-name>';-- Replace database name here ^^^^^^^^^^^^^^^Your exported SQL schema should look something like this:
TABLE_NAME,COLUMN_NAME,COLUMN_DEFAULT,ORDINAL_POSITION,DATA_TYPE,COLUMN_TYPE,IS_NULLABLE,CHARACTER_MAXIMUM_LENGTH,INDEX_NAME,NON_UNIQUE,SEQ_IN_INDEX,NULLABLEIngredients,id,,1,int,int,NO,,PRIMARY,0,1,""Ingredients,name,,2,varchar,varchar(100),NO,100,,,,Ingredients,unit_of_measurement,,3,varchar,varchar(50),NO,50,,,,Ingredients,price,,4,decimal,"decimal(10,2)",NO,,,,,Ingredients,supplier_id,,6,int,int,YES,,,,,Meals,id,,1,int,int,NO,,PRIMARY,0,1,""SELECT DISTINCT INFORMATION_SCHEMA.COLUMNS.table_name, enum_name,enum_values,column_name,column_default,ordinal_position,data_type,udt_name,is_nullable,character_maximum_length,indexname,constraint_type, REPLACE(SUBSTRING(indexdef from '\((.*)\)'), '"', '') as index_columnsFROM INFORMATION_SCHEMA.COLUMNSLEFT JOIN pg_indexesON INFORMATION_SCHEMA.COLUMNS.table_name = pg_indexes.tablename AND INFORMATION_SCHEMA.COLUMNS.column_name = ANY(STRING_TO_ARRAY(REPLACE(SUBSTRING(indexdef from '\((.*)\)'), '"', ''), ', ')) LEFT JOIN ( SELECT t.typname AS enum_name, ARRAY_AGG(e.enumlabel) as enum_values FROM pg_type t JOIN pg_enum e ON t.oid = e.enumtypid JOIN pg_catalog.pg_namespace n ON n.oid = t.typnamespace WHERE n.nspname = 'public' GROUP BY enum_name ) enums ON enums.enum_name = INFORMATION_SCHEMA.COLUMNS.udt_name LEFT JOIN information_schema.table_constraints ON INFORMATION_SCHEMA.table_constraints.constraint_name = indexname AND INFORMATION_SCHEMA.COLUMNS.table_name = INFORMATION_SCHEMA.table_constraints.table_nameWHERE INFORMATION_SCHEMA.COLUMNS.table_schema = 'public' AND INFORMATION_SCHEMA.COLUMNS.TABLE_CATALOG = '<database-name>';-- Replace database name here ^^^^^^^^^^^^^^^Your exported SQL schema should look something like this:
"table_name","enum_name","enum_values","column_name","column_default","ordinal_position","data_type","udt_name","is_nullable","character_maximum_length","indexname","constraint_type","index_columns""Ingredients","","","id","","1","bigint","int8","NO","","Ingredients_pkey","PRIMARY KEY","id""Ingredients","","","name","","2","text","text","NO","","","","""Ingredients","","","unit_of_measurement","","3","text","text","NO","","","","""Ingredients","","","price","","4","text","text","NO","","","","""Ingredients","","","supplier_id","","5","bigint","int8","NO","","","",""Step 2 - Generate GraphQL schema from database schema
Next, generate an Amplify GraphQL API schema by running the following command, replacing the --engine-type value with your database engine of mysql or postgres, and the --sql-schema value with the path to the CSV file created in the previous step:
npx @aws-amplify/cli api generate-schema --engine-type mysql --sql-schema schema.csv --out schema.sql.graphqlNext, update the first argument of AmplifyGraphqlDefinition.fromFilesAndStrategy to include the schema.sql.graphql file generated in the previous step:
new AmplifyGraphqlApi(stack, 'SqlBoundApi', { apiName: 'MySqlBoundApi', definition: AmplifyGraphqlDefinition.fromFilesAndStrategy( [path.join(__dirname, 'schema.sql.graphql')], // file path { // ...strategy options } )});Step 3 - Apply authorization rules for your generated GraphQL API
Open your schema.sql.graphql file, you should see something like this. The auto-generated schema automatically changes the casing to better match common GraphQL conventions. Amplify's GraphQL API's operate on a deny-by-default principle, this means you must explicitly add @auth authorization rules in order to make this API accessible to your users. Currently only model-level authorization is supported.
input AMPLIFY { engine: String = "mysql"}

type Ingredient @refersTo(name: "Ingredients") @model {  id: Int! @refersTo(name: "ingredient_id") @primaryKey  name: String!  unitOfMeasurement: String! @refersTo(name: "unit_of_measurement")  price: Float!  supplierId: Int @refersTo(name: "supplier_id")}
In our example, we'll add a public authorization rule, meaning anyone with an API key can create, read, update, and delete records from the database. Review Customize authorization rules to see the full scope of model-level authorization capabilities.
input AMPLIFY { engine: String = "mysql"}

- type Ingredient @refersTo(name: "Ingredients") @model {+ type Ingredient+   @refersTo(name: "Ingredients")+   @model+   @auth(rules: [{ allow: public }]) {  id: Int! @refersTo(name: "ingredient_id") @primaryKey  name: String!  unitOfMeasurement: String! @refersTo(name: "unit_of_measurement")  price: Float!  supplierId: Int @refersTo(name: "supplier_id")}
Finally, remember to deploy your API to the cloud:
To deploy the API, you can use the cdk deploy command:
cdk deployNow the API has been deployed and you can start using it!
Rename & map models to tables
To rename models and fields, you can use the @refersTo directive to map the models in the GraphQL schema to the corresponding table or field by name.
By default, the Amplify CLI singularizes each model name using PascalCase and field names that are either snake_case or kebab-case will be converted to camelCase.
In the example below, the Post model in the GraphQL schema is now mapped to the posts table in the database schema. Also, the isPublished is now mapped to the published column on the posts table.
type Post @refersTo(name: "posts") @model { id: String! @primaryKey title: String! content: String! isPublished: Boolean @refersTo(name: "published") publishedDate: AWSDate @refersTo(name: "published_date")}Create relationships between models
You can use the @hasOne, @hasMany, and @belongsTo relational directives to create relationships between models. The field named in the references parameter of the relational directives must exist on the child model.
Assume that you have users, blogs, and posts tables in your database schema. The following examples demonstrate how you might create different types of relationships between them. Use them as references for creating relationships between the models in your own schema.
Has One relationship
Create a one-directional one-to-one relationship between two models using the @hasOne directive.
In the example below, a User has a single Blog.
type User @refersTo(name: "users") @model @auth(rules: [{ allow: owner }, { allow: groups, groups: ["Admin"] }]) { id: String! @primaryKey name: String! owner: String blog: Blog @hasOne(references: ["userId"])}Has Many relationship
Create a one-directional one-to-many relationship between two models using the @hasMany directive.
In the example below, a Blog has many Posts.
type Blog @model {  id: String! @primaryKey  title: String!  posts: [Post] @hasMany(references: ["blogId"])}
type Post @model {  id: String! @primaryKey  title: String!  content: String!  blogId: String! @refersTo(name: "blog_id")}
Belongs To relationship
Make a "has one" or "has many" relationship bi-directional with the @belongsTo directive.
In the example below, a Post belongs to a Blog.
type Post @model { id: String! @primaryKey title: String! content: String! blogId: String! @refersTo(name: "blog_id") blog: Blog @belongsTo(references: ["blogId"])}Apply iterative changes from the database definition
- Make any adjustments to your SQL statements such as:
CREATE TABLE posts ( id varchar(255) NOT NULL PRIMARY KEY, title varchar(255) NOT NULL, content varchar(255) NOT NULL, published tinyint(1) DEFAULT 0 NOT NULL published_date date NULL);-
Regenerate the database schema as a CSV file by following the instructions in Generate GraphQL schema from database schema.
-
Generate an updated schema by running the following command, replacing the
--engine-typevalue with your database engine ofmysqlorpostgres, and the--sql-schemavalue with the path to the CSV file created in the previous step:
npx @aws-amplify/cli api generate-schema --engine-type mysql --sql-schema schema.csv --out schema.sql.graphql- Deploy your changes to the cloud:
cdk deployHow does it work?
The Amplify uses AWS Lambda functions to enable features like querying data from your database. To work properly, these Lambda functions need access to common logic and dependencies.
Amplify provides this shared code in the form of Lambda Layers. You can think of Lambda Layers as a package of reusable runtime code that Lambda functions can reference.
When you deploy an Amplify API, it will create two Lambda functions:
SQL Lambda
This allows you to query and write data to your database from your API.
Updater Lambda
This automatically keeps the SQL Lambda up-to-date by managing its Lambda Layers.
A Lambda layer that includes all the core SQL connection logic lives within the AWS Amplify service account but is executed within your AWS account, when invoked by the SQL Lambda. This allows the Amplify service team to own the ongoing maintenance and security enhancements of the SQL connection logic.
This allows the Amplify team to maintain and enhance the SQL Layer without needing direct access to your Lambdas. If updates to the Layer are needed, the Updater Lambda will receive a signal from Amplify and automatically update the SQL Lambda with the latest Layer.
Mapping of SQL data types to GraphQL types when auto-generating GraphQL schema
| SQL | GraphQL |
|---|---|
| String | |
| char | String |
| varchar | String |
| tinytext | String |
| text | String |
| mediumtext | String |
| longtext | String |
| Geometry | |
| geometry | String |
| point | String |
| linestring | String |
| geometryCollection | String |
| Numeric | |
| smallint | Int |
| mediumint | Int |
| int | Int |
| integer | Int |
| bigint | Int |
| tinyint | Int |
| float | Float |
| double | Float |
| decimal | Float |
| dec | Float |
| numeric | Float |
| Date and Time | |
| date | AWSDate |
| datetime | AWSDateTime |
| timestamp | AWSDateTime |
| time | AWSTime |
| year | Int |
| Binary | |
| binary | String |
| varbinary | String |
| tinyblob | String |
| blob | String |
| mediumblob | String |
| longblob | String |
| Others | |
| bool | Boolean |
| boolean | Boolean |
| bit | Int |
| json | AWSJSON |
| enum | ENUM |
Supported Amplify directives for auto-generated GraphQL schema
| Name | Supported | Model Level | Field Level | Description |
|---|---|---|---|---|
@model | ✅ | ✅ | ❌ | Creates a datasource and resolver for a table. |
@auth | ✅ | ✅ | ✅ | Allows access to data based on a set of authorization methods and operations. |
@primaryKey | ✅ | ❌ | ✅ | Sets a field to be the primary key. |
@index | ✅ | ❌ | ✅ | Defines an index on a table. |
@default | ✅ | ❌ | ✅ | Sets the default value for a column. |
@hasOne | ✅ | ❌ | ✅ | Defines a one-way 1:1 relationship from a parent to child model. |
@hasMany | ✅ | ❌ | ✅ | Defines a one-way 1:M relationship between two models, the reference being on the child. |
@belongsTo | ✅ | ❌ | ✅ | Defines bi-directional relationship with the parent model. |
@manyToMany | ❌ | ❌ | ❌ | Defines a M:N relationship between two models. |
@refersTo | ✅ | ✅ | ✅ | Maps a model to a table, or a field to a column, by name. |
@mapsTo | ❌ | ❌ | ❌ | Maps a model to a DynamoDB table. |
@sql | ✅ | ❌ | ✅ | Accepts an inline SQL statement or reference to a .sql file to be executed to resolve a Custom Query or Mutation. |
Troubleshooting
Debug Mode
To return the actual SQL error instead of a generic error from GraphQL responses, an environment variable DEBUG_MODE can be set to true on the Amplify-generated SQL Lambda function. You can find this Lambda function in the AWS Lambda console with the naming convention of: <stack-name>-<api-name>-SQLLambdaFunction<hash>.
Next steps
Our recommended next steps include using the GraphQL API to mutate and query data on app clients or how to customize the authorization rules for your custom queries and mutations. Some resources that will help with this work include: