Amplify project setup
Before you begin, make sure you have the following installed:
Sign up for an AWS account
If you don't already have an AWS account, you'll need to create one in order to follow the steps outlined in this tutorial.
There are no upfront charges or any term commitments to create an AWS account and signing up gives you immediate access to the AWS Free Tier.
Install the Amplify CLI
The Amplify Command Line Interface (CLI) is a unified toolchain to create AWS cloud services for your app. Let's go ahead and install the Amplify CLI.
npm install -g @aws-amplify/clicurl -sL https://aws-amplify.github.io/amplify-cli/install | bash && $SHELLcurl -sL https://aws-amplify.github.io/amplify-cli/install-win -o install.cmd && install.cmdConfigure the Amplify CLI
To set up the Amplify CLI on your local machine, you have to configure it to connect to your AWS account.
Configure Amplify by running the following command:
amplify configureamplify configure will ask you to sign into the AWS Console.
Once you're signed in, Amplify CLI will ask you to use the AWS Identity and Access Management (IAM) to create an IAM user.
Specify the AWS Region? region: # Your preferred regionFollow the instructions athttps://docs.amplify.aws/cli/start/install/#configure-the-amplify-cli
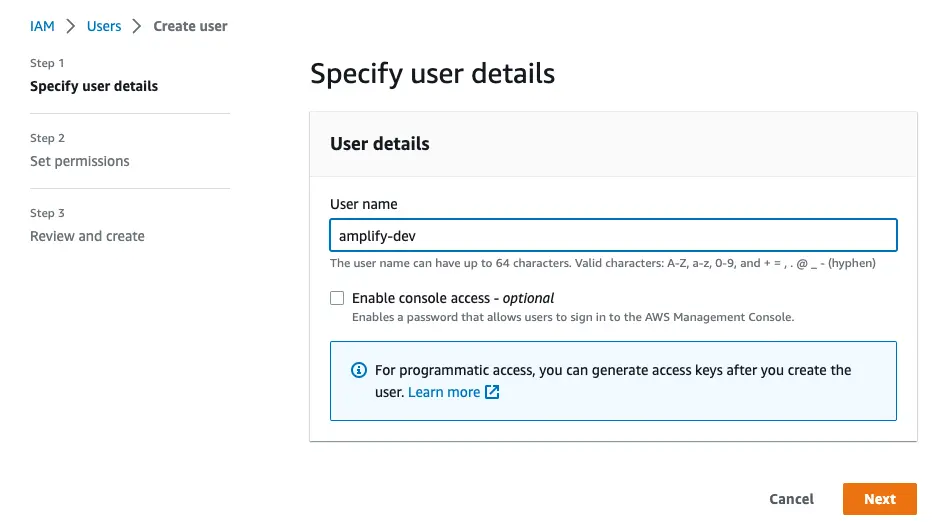
to complete the user creation in the AWS consolehttps://console.aws.amazon.com/iamv2/home#/users/createNavigate to the IAM User creation page if it's not already open.
Enter a User name and select Next. You can name the user anything but we'll call it "amplify-dev".
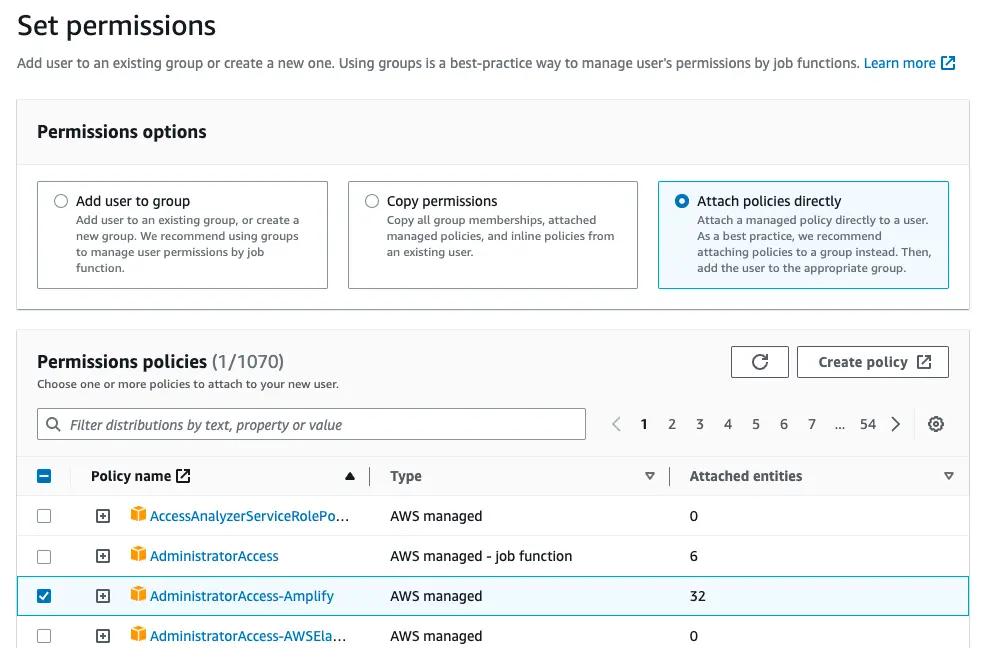
Select Attach policies directly and select AdministratorAccess-Amplify as the Permissions policy. Select Next.
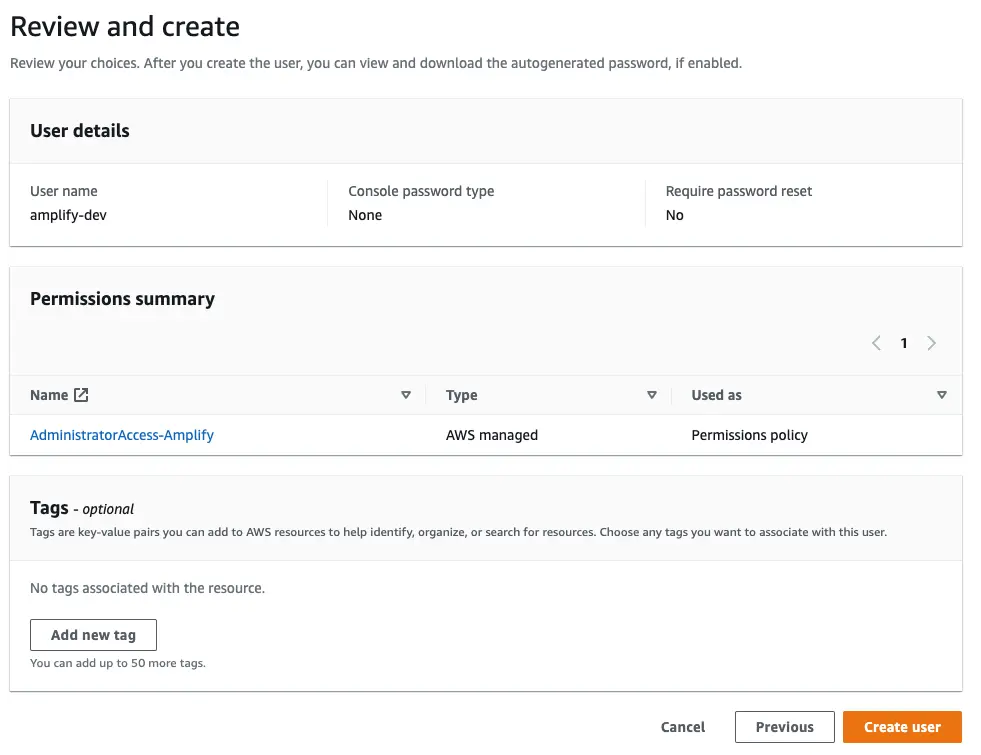
On the Review page, check that everything looks good and select Create user.
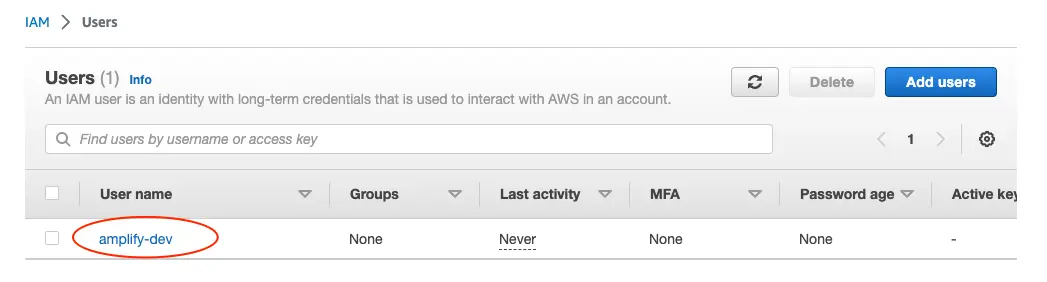
This will redirect to the users list page. Select the user you just created.
On the user details page, navigate to the Security credentials tab, scroll down to Access keys and select Create access keys.

On the next page, select Command Line Interface, acknowledge the warning, and select Next.
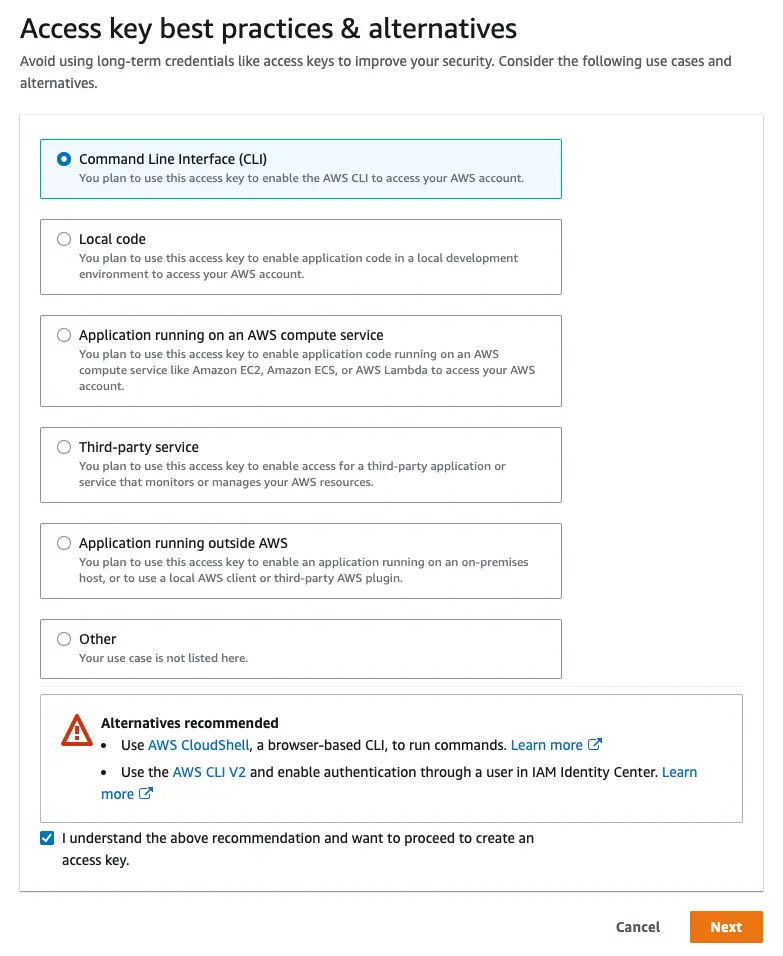
On the next page select Create access key. You'll then see a page with the access keys for the user. Use the copy icon to copy these values to your clipboard, then return to the Amplify CLI.
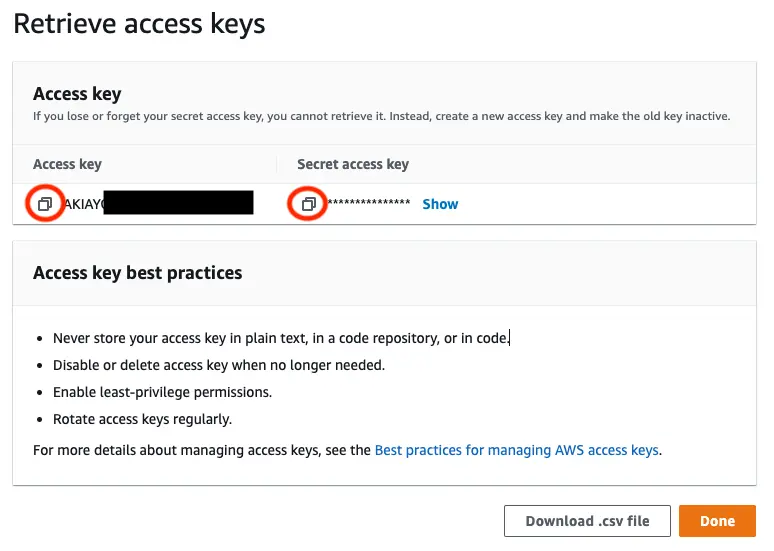
Enter the values you just copied into the corresponding CLI prompts.
Enter the access key of the newly created user:? accessKeyId:  # YOUR_ACCESS_KEY_ID? secretAccessKey:  # YOUR_SECRET_ACCESS_KEYThis would update/create the AWS Profile in your local machine? Profile Name:  # (default)
Successfully set up the new user.
Manually configure the Amplify CLI
If you are using an IAM role or IAM Identity Center (previously AWS SSO), you can configure your local machine for use with Amplify CLI by creating AWS profile entries manually rather than the amplify configure wizard.
To create an AWS profile locally using IAM Identity Center, you can use the AWS CLI wizard, aws configure sso, or write to ~/.aws/config directly:
[profile my-sso-profile]sso_session = my-ssosso_account_id = 123456789011sso_role_name = AdministratorAccess-Amplifyregion = us-west-2output = json
[sso-session my-sso]sso_region = us-east-1sso_start_url = https://my-sso-portal.awsapps.com/startsso_registration_scopes = sso:account:access
Currently, the Amplify CLI requires a workaround for use with IAM Identity Center due to an issue in how it resolves credentials.
[profile my-sso-profile]sso_session = my-ssosso_account_id = 123456789011sso_role_name = AdministratorAccess-Amplifyregion = us-west-2output = json+ credential_process = aws configure export-credentials --profile my-sso-profile[sso-session my-sso]sso_region = us-east-1sso_start_url = https://my-sso-portal.awsapps.com/startsso_registration_scopes = sso:account:accessUsing the example above, when creating a new app or pulling an existing app, specify my-sso-profile as the AWS profile you'd like to use with the Amplify app.
To create an AWS profile locally using an IAM role, assign the AdministratorAccess-Amplify permissions set to the role and set the role in your ~/.aws/config file:
[profile amplify-admin]role_arn = arn:aws:iam::123456789012:role/amplify-adminsource_profile = amplify-user
[profile amplify-user]region=us-east-1
Using the example above, when creating a new app or pulling an existing app, specify amplify-admin as the AWS profile you'd like to use with the Amplify app
Next, you'll set up your app and initialize Amplify!
Create your application
Create a New Next.js App
To set up the project, you will need to create a new Next.js app with the create-next-app tool. You'll then add Amplify and initialize a new project.
Run the following command and following the instructions to create a Next.js app.
npx create-next-app@">=13.5.0 <16.0.0" next-amplifiedThen run the following command to enter the root of your Next.js app.
cd next-amplifiedYou can now run the app in development mode by using the following command:
npm run devCreate a New Amplify Backend
Now that you have a running Next.js app, it's time to set up Amplify so that you can create the necessary backend services needed to support the app.
Open a new terminal. From the root of the project, run:
amplify initWhen you initialize Amplify you'll be prompted for some information about the app.
? Enter a name for the project (nextamplified)The following configuration will be applied:
Project information| Name: nextamplified| Environment: dev| Default editor: Visual Studio Code| App type: javascript| Javascript framework: react| Source Directory Path: src| Distribution Directory Path: build| Build Command: npm run-script build| Start Command: npm run-script start
? Initialize the project with the above configuration? YesUsing default provider  awscloudformation? Select the authentication method you want to use: AWS profile
For more information on AWS Profiles, see:https://docs.aws.amazon.com/cli/latest/userguide/cli-configure-profiles.html
? Please choose the profile you want to use default
When you initialize a new Amplify project, a few things happen:
- It creates a top level directory called
amplifythat stores your backend definition. During the tutorial you'll add capabilities such as a GraphQL API and authentication. As you add features, theamplifyfolder will grow with infrastructure-as-code templates that define your backend stack. Infrastructure-as-code is a best practice way to create a replicable backend stack. - It creates a file called
amplifyconfiguration.jsonin thesrcdirectory that holds all the configuration for the services you create with Amplify. This is how the Amplify client is able to get the necessary information about your backend services. - It modifies the
.gitignorefile, adding some generated files to the ignore list - A cloud project is created for you in the AWS Amplify Console that can be accessed by running
amplify console. The Console provides a list of backend environments, deep links to provisioned resources per Amplify category, status of recent deployments, and instructions on how to promote, clone, pull, and delete backend resources
As you add or remove categories and make updates to your backend configuration using the Amplify CLI, the configuration in amplifyconfiguration.json will update automatically.
Install Amplify libraries
Install required dependencies to your Next.js app to start using Amplify.
npm install aws-amplify@next @aws-amplify/adapter-nextjs@nextThe aws-amplify package is the main library for working with Amplify in your apps. The @aws-amplify/adapter-nextjs provides adapter functions to enable use of Amplify APIs on the server side of your Next.js app for use cases such as Server Side Rendering (SSR).
For details of using Amplify with in your Next.js app, see use Amplify with Next.js.
Use the Angular CLI to bootstrap a new Angular app:
npx -p @angular/cli ng new amplify-app
? Would you like to add Angular routing? Y? Which stylesheet format would you like to use? (your preferred stylesheet provider)
cd amplify-app
Angular 6+ does not include shims for 'global' or 'process'.
First, create src/polyfills.ts and add the following:
(window as any).global = window;(window as any).process = { env: { DEBUG: undefined },};Then, open your angular.json file, and add src/polyfills.ts to polyfills array(s) in your angular.json. These arrays are located in projects.<project-name>.architect.<task-name>.options.
"polyfills": [ "zone.js", "src/polyfills.ts"],And finally, make sure to add src/polyfills to files in your tsconfig.app.json:
{ "files": [ "src/main.ts", "src/polyfills.ts" ],}Add the following to your src/polyfills.ts file to recreate them:
(window as any).global = window;(window as any).process = { env: { DEBUG: undefined },};Create a new Amplify backend
Now that you have a running Angular app, it's time to set up Amplify for this app so that you can create the necessary backend services needed to support the app.
Open a new terminal. From the root of the project, run:
amplify initWhen you initialize Amplify you'll be prompted for some information about the app. For newer versions of Angular, you will have to change the Distribution Directory Path from dist to dist/amplify-app to match how Angular will build your project.
? Enter a name for the project: amplifyappThe following configuration will be applied:
Project information| Name: amplifyapp| Environment: dev| Default editor: Visual Studio Code| App type: javascript| Javascript framework: angular| Source Directory Path: src| Distribution Directory Path: dist| Build Command: npm run-script build| Start Command: ng serve
? Initialize the project with the above configuration? YesUsing default provider  awscloudformation? Select the authentication method you want to use: AWS profile
For more information on AWS Profiles, see:https://docs.aws.amazon.com/cli/latest/userguide/cli-configure-profiles.html
? Please choose the profile you want to use: default
When you initialize a new Amplify project, a few things happen:
- It creates a top level directory called
amplifythat stores your backend definition. During the tutorial you'll add capabilities such as authentication, GraphQL API, storage, and set up authorization rules for the API. As you add features, theamplifyfolder will grow with infrastructure-as-code templates that define your backend stack. Infrastructure-as-code is a best practice way to create a replicable backend stack. - It creates a file called
aws-exports.jsin thesrcdirectory that holds all the configuration for the services you create with Amplify. This is how the Amplify client is able to get the necessary information about your backend services. - It modifies the
.gitignorefile, adding some generated files to the ignore list. - A cloud project is created for you in the AWS Amplify Console that can be accessed by running
amplify console. The Console provides a list of backend environments, deep links to provisioned resources per Amplify category, status of recent deployments, and instructions on how to promote, clone, pull, and delete backend resources.
Install Amplify libraries
Inside the amplify-app directory, install the Amplify Angular library and run your app:
npm install --save aws-amplify@next
npm startStrictly typing aws-exports
If you have TypeScript strict mode on and see the error
Could not find a declaration file for module './aws-exports'. 'aws-exports.js' implicitly has an 'any' type.Create a aws-exports.d.ts file on the same level as aws-exports with the following content:
declare const awsmobile: Record<string, any>export default awsmobile;Create a new React App
To get started, first create a new React app, and then install and use the Amplify CLI to start adding backend capabilities to your app.
From your projects directory, run the following commands:
npx create-react-app react-amplifiedcd react-amplifiedThis creates a new React app in a directory called react-amplified and then switches into the new directory.
From the react-amplified directory, run the app by using the following command:
npm startThis runs a development server and allows you to see the output generated by the build. You can see the running app by navigating to http://localhost:3000.
Initialize a new backend
With the app running, it's time to set up Amplify and create the backend services to support the app.
Open a new terminal. From the react-amplified directory, run:
amplify initWhen you initialize Amplify you'll be prompted for some information about the app, with the option to accept recommended values:
? Enter a name for the project reactamplifiedThe following configuration will be applied:
?Project information| Name:  reactamplified| Environment: dev| Default editor: Visual Studio Code| App type: javascript| Javascript framework: react| Source Directory Path: src| Distribution Directory Path: build| Build Command: npm run-script build| Start Command: npm run-script start
? Initialize the project with the above configuration? YesUsing default provider  awscloudformation? Select the authentication method you want to use: AWS profile
...
? Please choose the profile you want to use default
Amplify CLI will infer the proper configuration based on the type of project Amplify is being initialized in where possible. Here it detected Create React App and provided the proper configuration for type of app, framework, source, distribution, build, and start options.
When you initialize a new Amplify project, a few things happen:
- It creates a top level directory called amplify that stores your backend definition. During the tutorial you'll add capabilities such as a GraphQL API and authentication. As you add features, the amplify folder will grow with infrastructure-as-code templates that define your backend stack. Infrastructure-as-code is a best practice way to create a replicable backend stack.
- It creates a file called aws-exports.js in the src directory that holds all the configuration for the services you create with Amplify. This is how the Amplify client is able to get the necessary information about your backend services.
- It modifies the .gitignore file, adding some generated files to the ignore list
- A cloud project is created for you in the AWS Amplify Console that can be accessed by running
amplify console. The Console provides a list of backend environments, deep links to provisioned resources per Amplify category, status of recent deployments, and instructions on how to promote, clone, pull, and delete backend resources
Install Amplify Libraries
The aws-amplify package is the main library for working with Amplify Libraries in your projects:
npm install aws-amplify@nextSet up frontend
Next, configure Amplify so it can interact with backend services.
Open src/index.js and add the following code below the last import:
import { Amplify } from 'aws-amplify';import awsExports from './aws-exports';Amplify.configure(awsExports);And that's all it takes to configure Amplify. As you add or remove categories and make updates to your backend configuration using the Amplify CLI, the configuration in aws-exports.js will update automatically.
Now that your React app is set up and Amplify is initialized, you can add an API in the next step.
Use the Vue Vite powered create-app to bootstrap a new Vue 3 app (selecting the defaults will work for this project):
npm init vue@3
Need to install the following packages:  create-vue@3Ok to proceed? (y) y
✔ Project name: … myamplifyproject✔ Add TypeScript? … No ✔ Add JSX Support? … No ✔ Add Vue Router for Single Page Application development? … No ✔ Add Pinia for state management? … No ✔ Add Vitest for Unit Testing? … No ✔ Add Cypress for both Unit and End-to-End testing? … No ✔ Add ESLint for code quality? … No
cd myamplifyproject
Install required modules:
npm installRun your app:
npm run devPress Ctrl + C to stop the server
Initialize a new backend
Now that you have a running Vue app, it's time to set up Amplify so that you can create the necessary backend services needed to support the app.
Open a new terminal. From the root of the project, run:
amplify initWhen you initialize Amplify you'll be prompted for some information about the app:
Your backend needs a project name to use when creating resources.
Give your backend project the name todo
? Enter a name for the project (myamplifyproject) todoYou'll then be asked to accept some recommended values:
The following configuration will be applied:
Project information| Name: todo| Environment: dev| Default editor: Visual Studio Code| App type: javascript| Javascript framework: vue| Source Directory Path: src| Distribution Directory Path: dist| Build Command: npm run-script build| Start Command: npm run-script serve
? Initialize the project with the above configuration? Yes
Where possible the CLI will infer the proper configuration based on the type of project Amplify is being initialized in. In this case it knew you are using Vue and provided the proper configuration for type of app, framework, source, distribution, build, and start options.
Next, you will need to select the authentication method you want to use to work on your project locally:
? Select the authentication method you want to use: (Use arrow keys)> AWS profile AWS access keysSelect AWS profile and then choose the profile you configured in the Prerequisites.
When you initialize a new Amplify project, a few things happen:
- It creates a top level directory called
amplifythat stores your backend definition. During the tutorial you'll add capabilities such as authentication, GraphQL API, storage, and set up authorization rules for the API. As you add features, theamplifyfolder will grow with infrastructure-as-code templates that define your backend stack. Infrastructure-as-code is a best practice way to create a replicable backend stack. - It creates a file called
aws-exports.jsin thesrcdirectory that holds all the configuration for the services you create with Amplify. This is how the Amplify client is able to get the necessary information about your backend services. - It modifies the
.gitignorefile, adding some generated files to the ignore list - A cloud project is created for you in the AWS Amplify Console that can be accessed by running
amplify console. The Console provides a list of backend environments, deep links to provisioned resources per Amplify category, status of recent deployments, and instructions on how to promote, clone, pull, and delete backend resources
Install Amplify libraries
The first step to using Amplify in the client is to install the necessary dependencies:
npm install aws-amplify@nextSet up frontend
Next, you need to configure Amplify on the client so that you can use it to interact with your backend services.
Open src/main.js and add the following code below the last import:
import { Amplify } from 'aws-amplify';import awsExports from './aws-exports';Amplify.configure(awsExports);Vue Vite Config
When working with a Vue create-app that uses Vite you must make a few additional modifications. Please follow the steps below.
1. Add the following script tag to the index.html file at the bottom of the <body> tag.
... <script> window.global = window; var exports = {}; </script></body>And that's all it takes to configure Amplify with Vue and create-app. As you add or remove categories and make updates to your backend configuration using the Amplify CLI, the configuration in aws-exports.js will update automatically.
Now that your Vue app is set up and Amplify is initialized, you're ready to add an API in the next step.