Manage MFA settings
The Auth category supports Multi-factor Authentication (MFA) for user sign-in flows. MFA is an extra layer of security used to make sure that users trying to gain access to an account are who they say they are. It requires users to provide additional information to verify their identity. Amplify Auth supports the MFA methods with Time-based-One-Time Passwords (TOTP) as well as text messages (SMS). In this guide we will review how you can set up MFA using TOTP and SMS and the tradeoffs between these methods to help you choose the right set up for your application. We’ll also review how to set up MFA to remember a device and reduce sign-in friction for your users.
Before you begin, you will need:
- The Amplify libraries installed and configured
- Optional If you are using SMS you will need a phone number provisioned with an SNS/Pinpoint
Enable multi-factor authentication
Below are the steps you can use to set up MFA using SMS or TOTP with the Amplify CLI. The Amplify libraries are designed to work with MFA even if you have set up your Amazon Cognito resources separately.
Understand your MFA options
When enabling MFA you will have two key decisions to make:
- MFA enforcement: As part of this setup you will determine how MFA is enforced. If you require MFA by setting MFA login to "ON", all your users will need to complete MFA to sign in. If you keep it "Optional", your users will have the choice whether to enable MFA or not for their account.
- MFA methods: You will also specify which MFA method you are using - TOTP (Time-based One-time Password), SMS (text message), or both. We recommend that you use TOTP-based MFA as it is more secure and you can reserve SMS for account recovery.
Learn moreCompare TOTP and SMS MFA methods
| Time-based One-time Password (TOTP) | Short Message Service (SMS) | |
|---|---|---|
| Description | Generates a short-lived numeric code for user authentication that includes a shared secret key and current time using an authenticator app. | Generates a one-time code shared via text message that is entered with other credentials for user authentication. |
| Benefits | More secure than SMS since the code is generated locally and not transmitted over a network. TOTP also works without cell service as long as the TOTP app is installed. | Easy to set up with a user-provided phone number and is familiar to users as a common authentication method. |
| Constraints | Requires an app to generate codes and adds to the initial setup of an account. Codes also expire quickly and must be used promptly after it is generated. | SMS requires cell service and can include an additional cost for the user. Although rare, SMS messages can also be intercepted. |
Enable MFA with the Amplify CLI
Run amplify add auth to create a new Cognito Auth resource, and follow the prompts below depending on how you want to integrate MFA into your flow.
Turning MFA "ON" will make it required for all users, while "Optional" will make it available to enable on a per-user basis.
SMS MFA
$ amplify add auth
? Do you want to use the default authentication and security configuration?  Manual configuration
# Answer as appropriate
? Multifactor authentication (MFA) user login options:  ON (Required for all logins, can not be enabled later)? For user login, select the MFA types:  SMS Text Message? Please specify an SMS authentication message:  Your authentication code is {####}
# Answer as appropriate
Some next steps:"amplify push" will build all your local backend resources and provision it in the cloud"amplify publish" will build all your local backend and frontend resources (if you have hosting category added) and provision it in the cloud
TOTP MFA
$ amplify add auth
? Do you want to use the default authentication and security configuration?  Manual configuration
# Answer as appropriate
? Multifactor authentication (MFA) user login options:  ON (Required for all logins, can not be enabled later)? For user login, select the MFA types:  Time-Based One-Time Password (TOTP)
# Answer as appropriate
Some next steps:"amplify push" will build all your local backend resources and provision it in the cloud"amplify publish" will build all your local backend and frontend resources (if you have hosting category added) and provision it in the cloud
Run amplify update auth and follow the prompts as guided below.
The following steps show how to enable MFA as "Optional" for users. In this mode, MFA must be enabled on a user-by-user basis, either through an Admin SDK (e.g. via a Lambda trigger as part of the sign-up process), or manually in the Cognito console.
If you'd like to make MFA required for users, you must first delete your auth resource by running amplify remove auth, then follow the New Project flow on this page.
SMS MFA
$ amplify update auth
? What do you want to do?  Walkthrough all the auth configurations
# Answer as appropriate
? Multifactor authentication (MFA) user login options:  OPTIONAL (Individual users can use MFA)? For user login, select the MFA types:  SMS Text Message? Please specify an SMS authentication message:  Your authentication code is {####}
# Answer as appropriate
Some next steps:"amplify push" will build all your local backend resources and provision it in the cloud"amplify publish" will build all your local backend and frontend resources (if you have hosting category added) and provision it in the cloud
TOTP MFA
$ amplify update auth
? What do you want to do?  Walkthrough all the auth configurations
# Answer as appropriate
? Multifactor authentication (MFA) user login options:  OPTIONAL (Individual users can use MFA)? For user login, select the MFA types:  Time-Based One-Time Password (TOTP)
# Answer as appropriate
Some next steps:"amplify push" will build all your local backend resources and provision it in the cloud"amplify publish" will build all your local backend and frontend resources (if you have hosting category added) and provision it in the cloud
After you enable MFA you will also need to include MFA setup when users sign up. This will change depending on if you enable SMS, TOTP or both.
Set up MFA with SMS
Once you have setup SMS as your second layer of authentication with MFA as shown above, your users will get an authentication code via a text message to complete sign-in after they sign in with their username and password.
If you do not have one already, you will need to configure an IAM role to use with Amazon Simple Notification Service (Amazon SNS) to manage SMS messages. You will then add this role under the "Messaging" tab for your user pool in the Amazon Cognito console. For additional information see the Amazon Cognito SMS text message MFA documentation.
Enable SMS MFA during sign-up
You will need to pass phone_number as a user attribute to enable SMS MFA for your users during sign-up. However, if the primary sign-in mechanism for your Cognito resource is phone_number (without enabling username), then you do not need to pass it as an attribute.
import { Auth } from 'aws-amplify';
async function signIn() { try { const user = await Auth.signUp({ username, password, attributes: { phone_number: '+15558675309' // Replace with a valid phone number } }); } catch (err) { console.log(error); }}import { Auth } from 'aws-amplify';
async function signIn() { try { const user = await Auth.signUp({ username, password, attributes: { phone_number: '+15558675309' // Replace with a valid phone number } }); } catch (err) { console.log(error); }}By default, you have to verify a user account after they sign up using the confirmSignUp API, which will send a one-time password to the user's phone number or email, depending on your Amazon Cognito configuration.
import { Auth } from 'aws-amplify';
async function confirmSignUp() { try { await Auth.confirmSignUp(username, code); } catch (error) { console.log('error confirming sign up', error); }}import { Auth } from 'aws-amplify';
async function confirmSignUp() { try { await Auth.confirmSignUp(username, code); } catch (error) { console.log('error confirming sign up', error); }}Manage SMS MFA during sign-in
After a user signs in, if they have MFA enabled for their account, a challenge will be returned that needs to call the confirmSignIn API where the user provides their confirmation code sent to their phone number. Amplify will then verify with Cognito that the SMS code is valid and complete the sign-in process by returning access, ID, and refresh tokens that are all handled by Amplify internally. Once the user completes the SMS text message flow their phone number is marked as verified in your user pool.
In the example below you will see that because MFA is "ON" or enabled as an option for the user, you must call confirmSignIn with the OTP sent to their phone. After a user has been signed in, you can call setPreferredMFA to record the MFA type as enabled for the user and set it as preferred so that subsequent logins default to using this MFA type.
import { Auth } from 'aws-amplify';
type ConfirmSignInWithMFAParameters = {  username: string;  password: string;};
type MFAType = 'SMS_MFA';
async function signInWithMFA({  username,  password}: ConfirmSignInWithMFAParameters) {  try {    const user = await Auth.signIn(username, password);    if (      user.challengeName === 'SMS_MFA' ||      user.challengeName === 'SOFTWARE_TOKEN_MFA'    ) {      // You need to get the code from the UI inputs      // and then trigger the following function with a button click.      const code: string = await getCodeFromUserInput();      const mfaType: MFAType = await getMFATypeFromUserInput();      // If MFA is enabled, sign-in should be confirmed with the confirmation code:      const loggedUser = await Auth.confirmSignIn(        user, // Return object from Auth.signIn()        code, // Confirmation code        mfaType // MFA Type e.g. SMS_MFA, SOFTWARE_TOKEN_MFA      );      console.log(loggedUser);    } else {      // The user directly signs in:      console.log(user);    }  } catch (error) {    console.log(`error signing in`, error);  }}
async function getCodeFromUserInput(): Promise<string> { // fetch code using a user form input}async function getMFATypeFromUserInput(): Promise<MFAType> { // fetch MFA type from user form input}import { Auth } from 'aws-amplify';
async function signInWithMFA() { try { const user = await Auth.signIn(username, password); if ( user.challengeName === 'SMS_MFA' || user.challengeName === 'SOFTWARE_TOKEN_MFA' ) { // You need to get the code from the UI inputs // and then trigger the following function with a button click. const code = getCodeFromUserInput(); const mfaType = getMFATypeFromUserInput(); // If MFA is enabled, sign-in should be confirmed with the confirmation code const loggedUser = await Auth.confirmSignIn( user, // Return object from Auth.signIn() code, // Confirmation code mfaType // MFA Type e.g. SMS_MFA, SOFTWARE_TOKEN_MFA ); console.log(loggedUser); } else { // The user directly signs in console.log(user); } } catch (error) { console.log(`error signing in`, error); }}Set up MFA with TOTP
You can use Time-based One-Time Password (TOTP) for multi-factor authentication (MFA) in your web or mobile applications. The Amplify Auth category includes support for TOTP setup and verification using authenticator apps, offering an integrated solution and enhanced security for your users. These apps, such as Google Authenticator or Microsoft Authenticator, have the TOTP algorithm built-in and work by using a shared secret key and the current time to generate short-lived, six digit passwords.
Enable TOTP for your users
If you initiate a user sign-in with the signIn API where your user is required to set up TOTP as an MFA method, the API call will return setupTOTP as a challenge and next step to handle in your app. You will get that challenge if the following conditions are met:
- MFA is marked as "Required" in Cognito User Pool.
- TOTP is enabled in the Cognito User Pool
- The user does not have TOTP MFA set up already.
You can set up TOTP for a user in your app with the setupTOTP API. As part of this workflow you can also specify how users see the code retrieved from the authenticator app (e.g. numeric code or QR code), confirm the initial setup with the authenticator app, set TOTP as the preferred MFA method, and pass the TOTP code with the MFA type using the confirmSignIn API:
import { CognitoUserSession } from 'amazon-cognito-identity-js';import { Auth } from 'aws-amplify';
type SetupTOTPAuthParameters = {  user: string;  challengeAnswer: string;  mfaType?: 'SMS_MFA' | 'SOFTWARE_TOKEN_MFA';};
async function setupTOTPAuth({  user,  challengeAnswer,  mfaType}: SetupTOTPAuthParameters) {  // To set up TOTP, first you need to get a `authorization code` from Amazon Cognito.  // `user` is the current Authenticated user:  const secretCode = await Auth.setupTOTP(user);
  // You can directly display the `code` to the user or convert it to a QR code to be scanned.  // For example, use following code sample to render a QR code with `qrcode.react` component:  //      import QRCodeCanvas from 'qrcode.react';  //      const str = "otpauth://totp/AWSCognito:"+ username + "?secret=" + secretCode + "&issuer=" + issuer;  //      <QRCodeCanvas value={str}/>
  // ...
  // Then you will have your TOTP account in your TOTP-generating app (like Google Authenticator)  // use the generated one-time password to verify the setup.  try {    const cognitoUserSession: CognitoUserSession = await Auth.verifyTotpToken(      user,      challengeAnswer    );    // Don't forget to set TOTP as the preferred MFA method.    await Auth.setPreferredMFA(user, 'TOTP');  } catch (error) {    // Token is not verified  }
  // ...
// Finally, when sign-in with MFA is enabled, use the `confirmSignIn` API // to pass the TOTP code and MFA type. const OTPCode = '123456'; // Code retrieved from authenticator app. await Auth.confirmSignIn(user, OTPCode, mfaType); // Optional, MFA Type e.g. SMS_MFA || SOFTWARE_TOKEN_MFA}import { Auth } from 'aws-amplify';
async function setupTOTPAuth(user, challengeAnswer, mfaType) { // To set up TOTP, first you need to get a `authorization code` from Amazon Cognito. // `user` is the current Authenticated user: const OTPCode = '123456'; // Code retrieved from authenticator app.
// You can directly display the `code` to the user or convert it to a QR code to be scanned. // For example, use following code sample to render a QR code with `qrcode.react` component: // import QRCodeCanvas from 'qrcode.react'; // const str = "otpauth://totp/AWSCognito:"+ username + "?secret=" + code + "&issuer=" + issuer; // <QRCodeCanvas value={str}/>
// ...
// Then you will have your TOTP account in your TOTP-generating app (like Google Authenticator) // use the generated one-time password to verify the setup. try { const cognitoUserSession = await Auth.verifyTotpToken( user, challengeAnswer ); // Don't forget to set TOTP as the preferred MFA method. await Auth.setPreferredMFA(user, 'TOTP'); } catch (error) { // Token is not verified }
// ...
// Finally, when sign-in with MFA is enabled, use the `confirmSignIn` API // to pass the TOTP code and MFA type. await Auth.confirmSignIn(user, code, mfaType); // Optional, MFA Type e.g. SMS_MFA || SOFTWARE_TOKEN_MFA}Once the authenticator app is set up, the user can generate a TOTP code and provide it to the library to complete the sign in process.
Learn moreEnable TOTP after a user is signed in
TOTP MFA can be set up after a user has signed in. This can be done when the following conditions are met:
- MFA is marked as "Optional" or "Required" in the Cognito User Pool
- TOTP is marked as an enabled MFA method in Cognito user pool
TOTP can be set up by calling the setupTOTP and verifyTotpToken APIs in the Auth category.
Invoke the setupTOTP API to generate a SetupTOTPAuthParameters object which should be used to configure an authenticator app like Microsoft Authenticator or Google Authenticator. For more advanced use cases, SetupTOTPAuthParameters also contains a secretCode which can be used to either generate a QR code or be manually entered into an authenticator app. Once the authenticator app is set up, the user must generate a TOTP code and provide it to the library. Pass the code to verifyTotpToken to complete the TOTP setup process.
Recover from a lost TOTP device
In a scenario where MFA is marked as "Required" in the Cognito User Pool and another MFA method is not set up, the administrator would need to first initiate an AdminUpdateUserAttributes call and update the user’s phone number attribute. Once this is complete, the administrator can continue changing the MFA preference to SMS as suggested above.
Set up a user's preferred MFA method
Since both SMS MFA and TOTP MFA methods are supported by Amazon Cognito, you can provide the option for your users to choose their second authentication factor or opt out. When both are available you will need to also save their preference for future sessions with the setupMFAType API:
import { Auth } from 'aws-amplify';
type PreferredMFAType = 'TOTP' | 'SMS' | 'NOMFA';
async function setupMFAType(preferredMFA: PreferredMFAType) {  try {    const user = await Auth.currentAuthenticatedUser();    const data = await Auth.setPreferredMFA(user, preferredMFA);    console.log(data);  } catch (error) {    console.log('error setting up MFA type', error);  }}
// Select TOTP as preferred.setupMFAType('TOTP');
// Select SMS as preferred.setupMFAType('SMS');
// Select no MFA.setupMFAType('NOMFA');import { Auth } from 'aws-amplify';
async function setupMFAType(preferredMFA) { try { const user = await Auth.currentAuthenticatedUser(); const data = await Auth.setPreferredMFA(user, preferredMFA); console.log(data); } catch (error) { console.log('error setting up MFA type', error); }}
// Select TOTP as preferred.setupMFAType('TOTP');
// Select SMS as preferred.setupMFAType('SMS');
// Select no MFA.setupMFAType('NOMFA');Retrieve current preferred MFA method
Once the preferred MFA method is set for your user you will then want to use the getPreferredMFAType method to call this preference for future sign-in confirmations:
import { Auth } from 'aws-amplify';
async function getPreferredMFAType() { try { // Will retrieve the current MFA type from cache // `bypassCache` is optional and by default is false. // If set to true, it will get the MFA type from server-side // instead of from local cache. const user = await Auth.currentAuthenticatedUser(); const data = await Auth.getPreferredMFA(user, { bypassCache: false }); console.log('Current preferred MFA type is: ' + data); } catch (err) { console.log(err); }}import { Auth } from 'aws-amplify';
async function getPreferredMFAType() { try { // Will retrieve the current MFA type from cache // `bypassCache` is optional and by default is false. // If set to true, it will get the MFA type from server-side // instead of from local cache. const user = await Auth.currentAuthenticatedUser(); const data = await Auth.getPreferredMFA(user, { bypassCache: false }); console.log('Current preferred MFA type is: ' + data); } catch (err) { console.log(err); }}You can now enable multi-factor authentication and specify your second authentication method with TOTP or SMS. Your users can set their preferred method and you can retrieve this for them when they sign in. You can now look to add features like remembering a device to reduce friction in the sign-in workflow.
Remember a device
Remembering a device is useful in conjunction with MFA because it allows the second factor requirement to be automatically met when your user signs in on that device and reduces friction in their sign-in experience.
Configure device tracking
You can enable the remembered device functionality in the Cognito User Pool console. To begin, go to your project directory and issue the command:
amplify auth consoleSelect the following option to open the Cognito User Pool console:
? Which Console User PoolWhen the console opens, scroll down to the "Device Tracking" section and select the "Edit" button. This will render the following page allowing you to configure your preference for remembering a user's device.
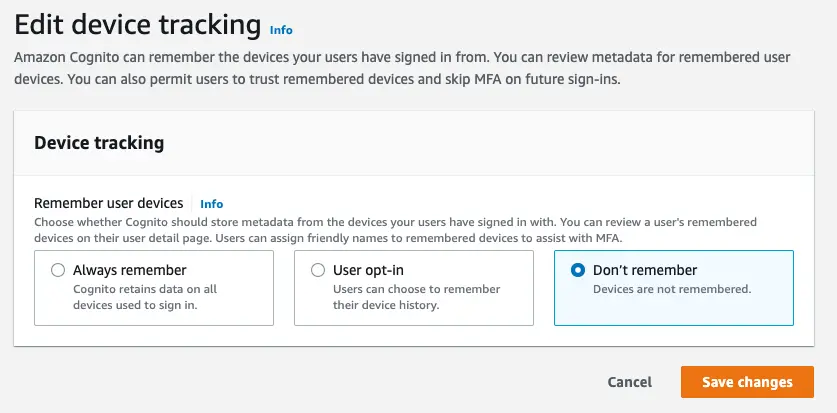
Choose either "Always remember" to remember a user's device by default or "User Opt-in" to give the user the ability to choose.
When MFA is enabled you will have the option to suppress the second factor during multi-factor authentication. Choose "Yes" if you want a remembered device to be used as a second factor mechanism.

When you have made your selection(s), click "Save changes". You are now ready to start updating your code to manage remembered devices.
Learn moreUnderstand key terms used for tracking devices
There are differences to keep in mind when working with remembered, forgotten, and tracked devices.
- Tracked: Every time the user signs in with a new device, the client is given the device key at the end of a successful authentication event. We use this device key to generate a salt and password verifier which is used to call the
ConfirmDeviceAPI. At this point, the device is considered to be "tracked". Once the device is in a tracked state, you can use the Amazon Cognito console to see the time it started to be tracked, last authentication time, and other information about that device. - Remembered: Remembered devices are also tracked. During user authentication, the device key and secret pair assigned to a remembered device is used to authenticate the device to verify that it is the same device that the user previously used to sign in.
- Not Remembered: A not-remembered device is a tracked device where Cognito has been configured to require users to "Opt-in" to remember a device but the user has chosen not to remember the device. This use case is for users signing into their application from a device that they don't own.
- Forgotten: In the event that you no longer want to remember or track devices, you can use the
Auth.forgetDevice()API to remove devices from being both remembered and tracked.
Remember devices
You can remember devices using the following:
import { Auth } from 'aws-amplify';
async function rememberDevice() { try { const result = await Auth.rememberDevice(); console.log(result); } catch (error) { console.log('Error remembering device', error); }}import { Auth } from 'aws-amplify';
async function rememberDevice() { try { const result = await Auth.rememberDevice(); console.log(result); } catch (error) { console.log('Error remembering device', error); }}Forget devices
You can also forget devices but note that forgotten devices are neither remembered nor tracked.
import { Auth } from 'aws-amplify';
async function forgetDevice() { try { await Auth.forgetDevice(); } catch (error) { console.log('Error forgetting device', error); }}import { Auth } from 'aws-amplify';
async function forgetDevice() { try { await Auth.forgetDevice(); } catch (error) { console.log('Error forgetting device', error); }}Fetch devices
You can fetch a list of remembered devices by using the following:
import { Auth } from 'aws-amplify';
async function fetchDevices() { try { const result = await Auth.fetchDevices(); console.log(result); } catch (err) { console.log('Error fetching devices', err); }}import { Auth } from 'aws-amplify';
async function fetchDevices() { try { const result = await Auth.fetchDevices(); console.log(result); } catch (err) { console.log('Error fetching devices', err); }}You can now set up devices to be remembered, forgotten, and fetched.
Conclusion
Congratulations! You finished the Manage MFA settings guide. In this guide, you set up and configured MFA for your users and provided them options on remembering their MFA preferences and devices.
Next steps
Now that you completed setting up multi-factor authentication you may also want to add additional customization. We recommend you learn more about: