Identify text
Set up the backend
If you haven't already done so, run amplify init inside your project and then amplify add auth (we recommend selecting the default configuration).
Run amplify add predictions and select Identify. Then use the following answers:
? What would you like to identify? (Use arrow keys)❯ Identify Text   Identify Entities   Identify Labels   Learn More
? Would you also like to identify documents? Yes? Who should have access? Auth and Guest users
Now run amplify push which will generate your aws-exports.js and create resources in the cloud. You can now either add this to your backend or skip and add more features to your app.
Services used: Amazon Rekognition (default for plain text) and Amazon Textract (default for documents)
Working with the API
Detect text in an input image. Input can be sent directly from the browser or an Amazon S3 key from project bucket.
Predictions.identify({ text: { source: { file } }}).then(response => console.log({ response })).catch(err => console.log({ err }));Identify image stored in Amazon S3
Predictions.identify({ text: { source: { key: pathToPhoto, level?: 'public | private | protected', //optional, default is the configured on Storage category } }}).then((response) => console.log({ response })).catch(err => console.log({ err }));The following options are independent of which
sourceis specified. For demonstration purposes we will reference afilebut it can be an S3 Key as well.Predictions.identify({text : {...}})can detect unstructured textPLAIN, structured text from tablesTABLEor text from formsFORM.
Identify plain text
For detecting plain text, you can see the whole detected text, the lines detected, the position of each line of text, and each word.
Predictions.identify({ text: { source: { file }, format: "PLAIN", }}).then(response => { const { text: { fullText, // String lines, // Array of String ordered from top to bottom linesDetailed: [ { /* array of text, // String boundingBox: { width, // ratio of overall image width height, // ratio of overall image height left, // left coordinate as a ratio of overall image width top // top coordinate as a ratio of overall image height }, polygon // Array of { x, y } coordinates as a ratio of overall image width and height */ } ], words // Array of objects that contains { text, boundingBox, polygon} } } = response}).catch(err => console.log({ err }));Identify structured forms
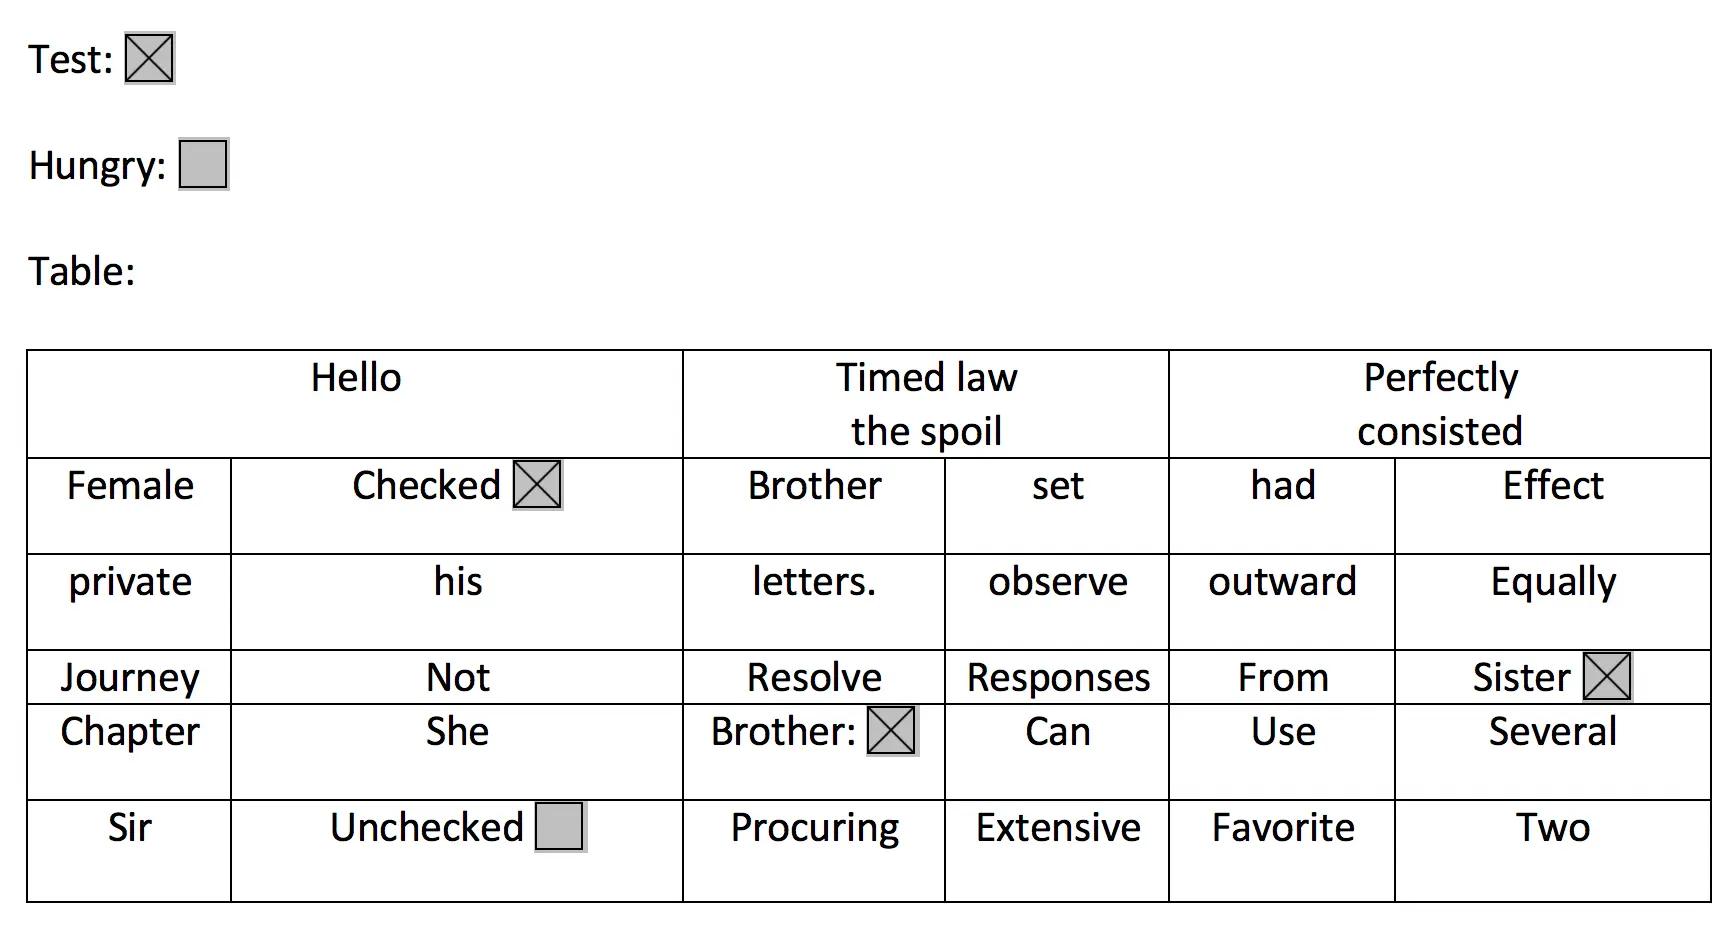
For detecting structured forms (documents, tables, etc.) from an image, keyValues will return a string of the entity found in the image as well as metadata such as selected checkboxes or the relative location in the image using a boundingBox.
Predictions.identify({ text: { source: { file }, format: "FORM", }}).then(response => { const { text: { // same as PLAIN + keyValues // Array of { key (String), value: { text (String), selected (boolean)}, polygon, boundingBox } } } = response}).catch(err => console.log({ err }));For example the below image would return keyValues with "Test" or "Checked" as a key, and true since they are selected. The location of these elements would be returned in the boundingBox value.
Identify structured tables
For detecting structured tables from an image
Predictions.identify({ text: { source: { file }, format: "TABLE", }}).then(response => { const { text: { // same as PLAIN + tables : [ { size: { rows, columns }, table // Matrix Array[ Array ] of size rows // each element of the array contains { text, boundingBox, polygon, selected, rowSpan, columnSpan} } ] } } = response}).catch(err => console.log({ err }));For detecting tables and forms on the image just select format "ALL"
Predictions.identify({ text: { source: { file }, format: "ALL", }}).then(response => { const { text: { // same as PLAIN + FORM + TABLE } } = response}).catch(err => console.log({ err }));Identify Entities from a photo
Setup your backend with the following:
If you haven't already done so, run amplify init inside your project and then amplify add auth (we recommend selecting the default configuration).
Run amplify add predictions and select Identify. Then use the following answers:
? What would you like to identify?   Identify Text ❯ Identify Entities   Identify Labels   Learn More
? Would you like use the default configuration? Default Configuration
? Who should have access? Auth and Guest users
Now run amplify push which will generate your aws-exports.js and create resources in the cloud. You can now either add this to your backend or skip and add more features to your app.
Services used: Amazon Rekognition
Advanced configuration
You can enhance your application's ability to identify entities by performing indexing against a pre-defined collection of images and providing them to Amazon Rekognition. This can be done in one of two ways:
- Administrators provide images to be indexed from an S3 bucket
- Application users upload files to an S3 bucket which are indexed
Amplify configures Lambda Triggers to automatically perform this indexing when the files are uploaded. As Rekognition does not store any faces, but rather the facial features into a vector which are stored in the backend, these images can be deleted after indexing if you choose to do so. However note that by default the Lambda Triggers will remove the index if you delete an image so you will need to modify their behavior if you desire this functionality.
To add this functionality into your application choose advanced when prompted in the Identify flow (if you already enabled Identify Entities you will need to run amplify update predictions):
? What would you like to identify? Identify Entities? Would you like use the default configuration? Advanced Configuration? Would you like to enable celebrity detection? Yes? Would you like to identify entities from a collection of images? Yes? How many entities would you like to identify 50? Would you like to allow users to add images to this collection? Yes? Who should have access? Auth and Guest users? The CLI would be provisioning an S3 bucket to store these images please provide bucket name: mybucketNote that if you already have an S3 bucket in your project from running amplify add storage it would be reused. To upload images from the CLI for administrator indexing, you can run amplify predictions console and select Identify which will open the S3 bucket location in the AWS console for you to upload your images.
For application users, when they upload images with Storage.put() they will specify a prefix which the Lambda functions perform indexing like so:
Storage.put('test.jpg', file, { level: 'protected', customPrefix: { protected: 'protected/predictions/index-faces/', }});In the sample React application code below, you will see that to use this functionality you will need to set collection:true when calling Predictions.identify() and remove celebrityDetection: true. The flow is that you will first upload an image to S3 with the PredictionsUpload function (which is connected to a button in the app) and after a few seconds you can send this same image to Predictions.identify() and it will check if that image has been indexed in the Collection.