Amplify project setup
Before you begin, make sure you have the following installed:
-
Install Xcode version 11.4 or later.
-
(Optional) Install CocoaPods
Amplify can be installed through the Swift Package Manager, which is integrated into Xcode, or you can install it through CocoaPods.
Configure the Amplify CLI
To set up the Amplify CLI on your local machine, you have to configure it to connect to your AWS account.
Configure Amplify by running the following command:
amplify configureamplify configure will ask you to sign into the AWS Console.
Once you're signed in, Amplify CLI will ask you to use the AWS Identity and Access Management (IAM) to create an IAM user.
Specify the AWS Region? region: # Your preferred regionFollow the instructions athttps://docs.amplify.aws/cli/start/install/#configure-the-amplify-cli
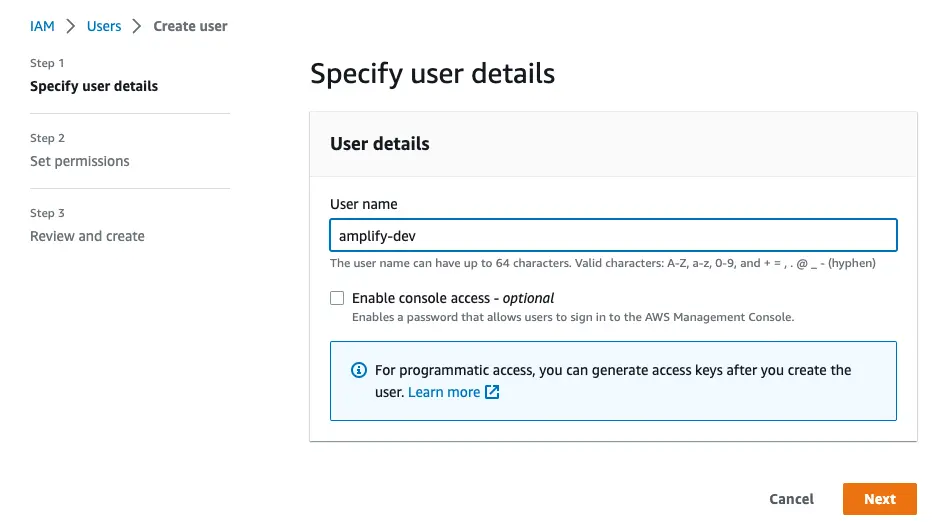
to complete the user creation in the AWS consolehttps://console.aws.amazon.com/iamv2/home#/users/createNavigate to the IAM User creation page if it's not already open.
Enter a User name and select Next. You can name the user anything but we'll call it "amplify-dev".
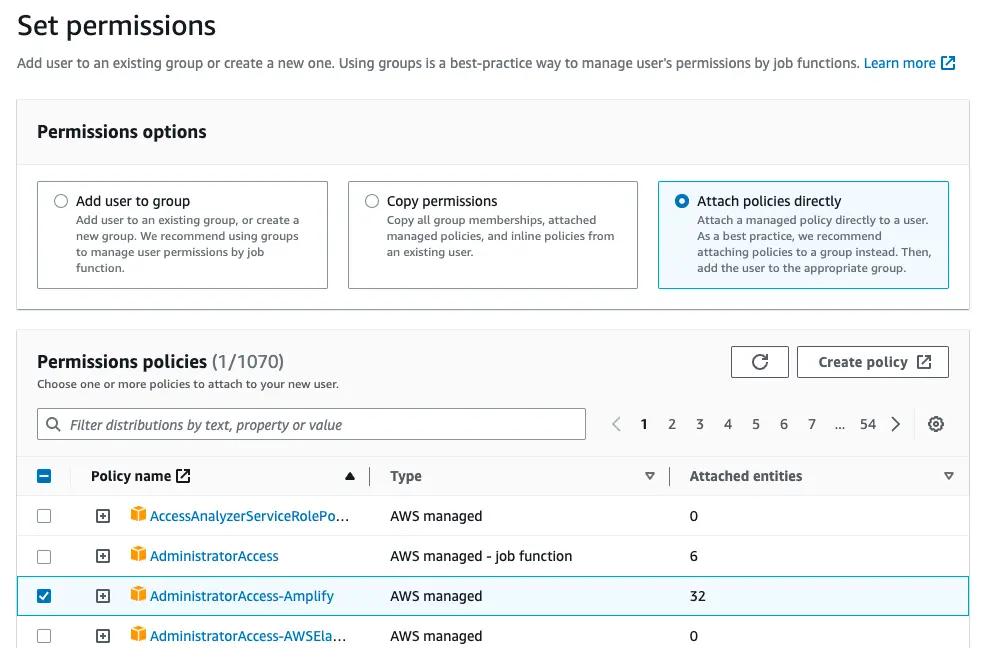
Select Attach policies directly and select AdministratorAccess-Amplify as the Permissions policy. Select Next.
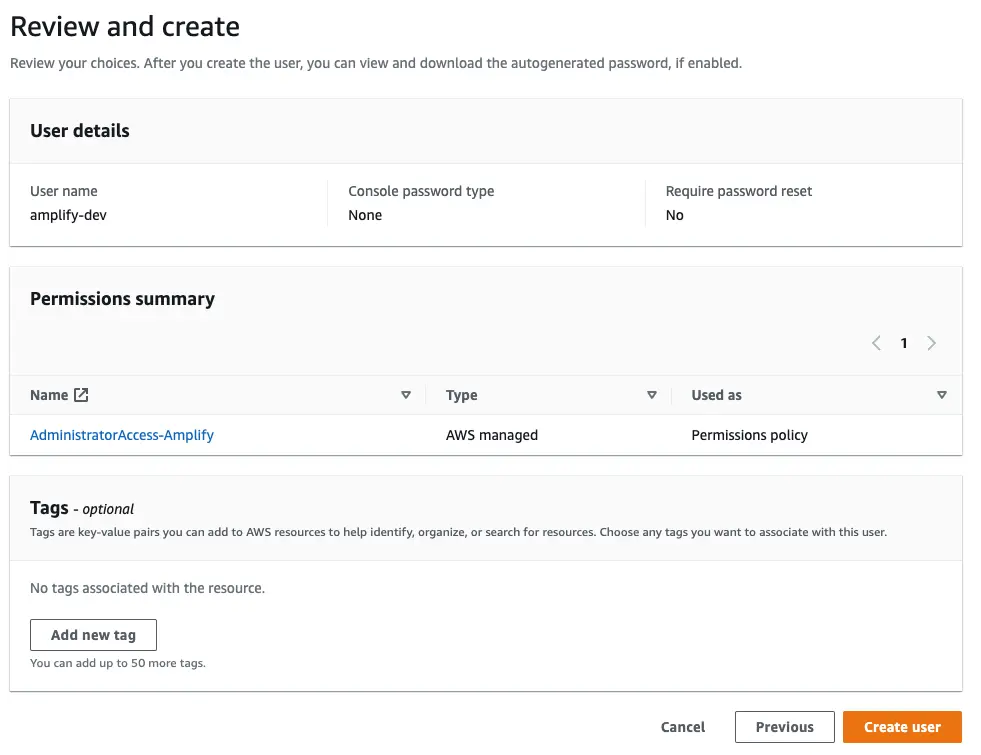
On the Review page, check that everything looks good and select Create user.
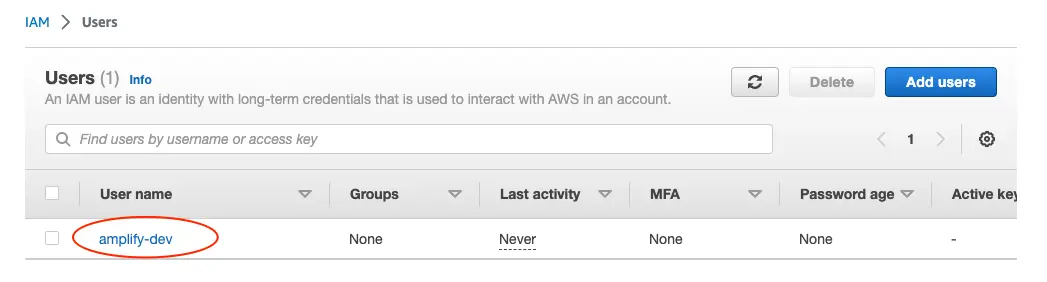
This will redirect to the users list page. Select the user you just created.
On the user details page, navigate to the Security credentials tab, scroll down to Access keys and select Create access keys.

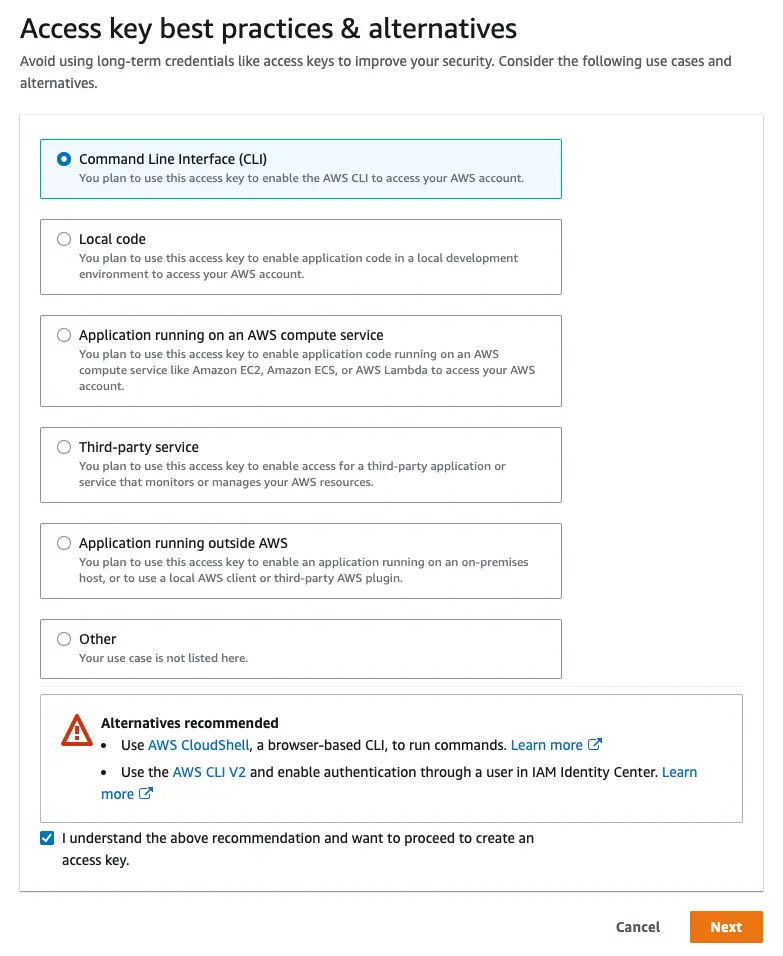
On the next page, select Command Line Interface, acknowledge the warning, and select Next.
On the next page select Create access key. You'll then see a page with the access keys for the user. Use the copy icon to copy these values to your clipboard, then return to the Amplify CLI.
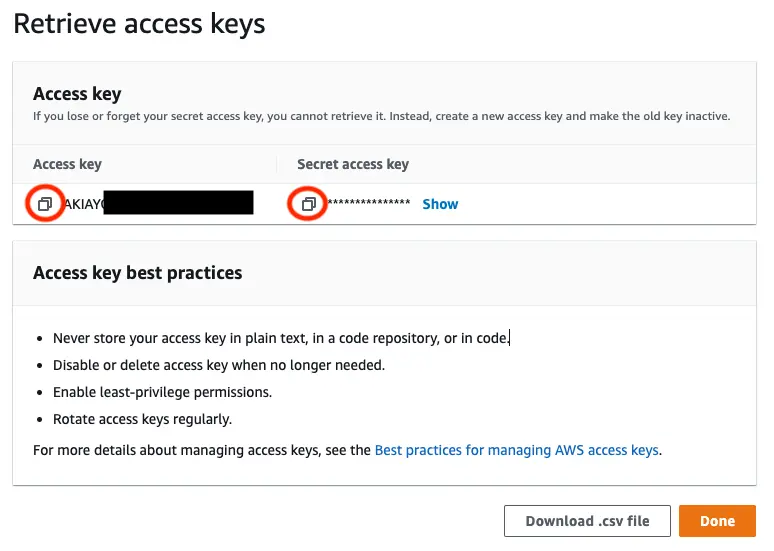
Enter the values you just copied into the corresponding CLI prompts.
Enter the access key of the newly created user:? accessKeyId:  # YOUR_ACCESS_KEY_ID? secretAccessKey:  # YOUR_SECRET_ACCESS_KEYThis would update/create the AWS Profile in your local machine? Profile Name:  # (default)
Successfully set up the new user.
Manually configure the Amplify CLI
If you are using an IAM role or IAM Identity Center (previously AWS SSO), you can configure your local machine for use with Amplify CLI by creating AWS profile entries manually rather than the amplify configure wizard.
To create an AWS profile locally using IAM Identity Center, you can use the AWS CLI wizard, aws configure sso, or write to ~/.aws/config directly:
[profile my-sso-profile]sso_session = my-ssosso_account_id = 123456789011sso_role_name = AdministratorAccess-Amplifyregion = us-west-2output = json
[sso-session my-sso]sso_region = us-east-1sso_start_url = https://my-sso-portal.awsapps.com/startsso_registration_scopes = sso:account:access
Currently, the Amplify CLI requires a workaround for use with IAM Identity Center due to an issue in how it resolves credentials.
[profile my-sso-profile]sso_session = my-ssosso_account_id = 123456789011sso_role_name = AdministratorAccess-Amplifyregion = us-west-2output = json+ credential_process = aws configure export-credentials --profile my-sso-profile[sso-session my-sso]sso_region = us-east-1sso_start_url = https://my-sso-portal.awsapps.com/startsso_registration_scopes = sso:account:accessUsing the example above, when creating a new app or pulling an existing app, specify my-sso-profile as the AWS profile you'd like to use with the Amplify app.
To create an AWS profile locally using an IAM role, assign the AdministratorAccess-Amplify permissions set to the role and set the role in your ~/.aws/config file:
[profile amplify-admin]role_arn = arn:aws:iam::123456789012:role/amplify-adminsource_profile = amplify-user
[profile amplify-user]region=us-east-1
Using the example above, when creating a new app or pulling an existing app, specify amplify-admin as the AWS profile you'd like to use with the Amplify app
Next, you'll set up the app and initialize Amplify!
Create your application
For this section you will set up a skeleton project so that Amplify categories can be added to it.
1. Create a new project
Open Xcode. From the menu bar, select "File -> New -> Project..."
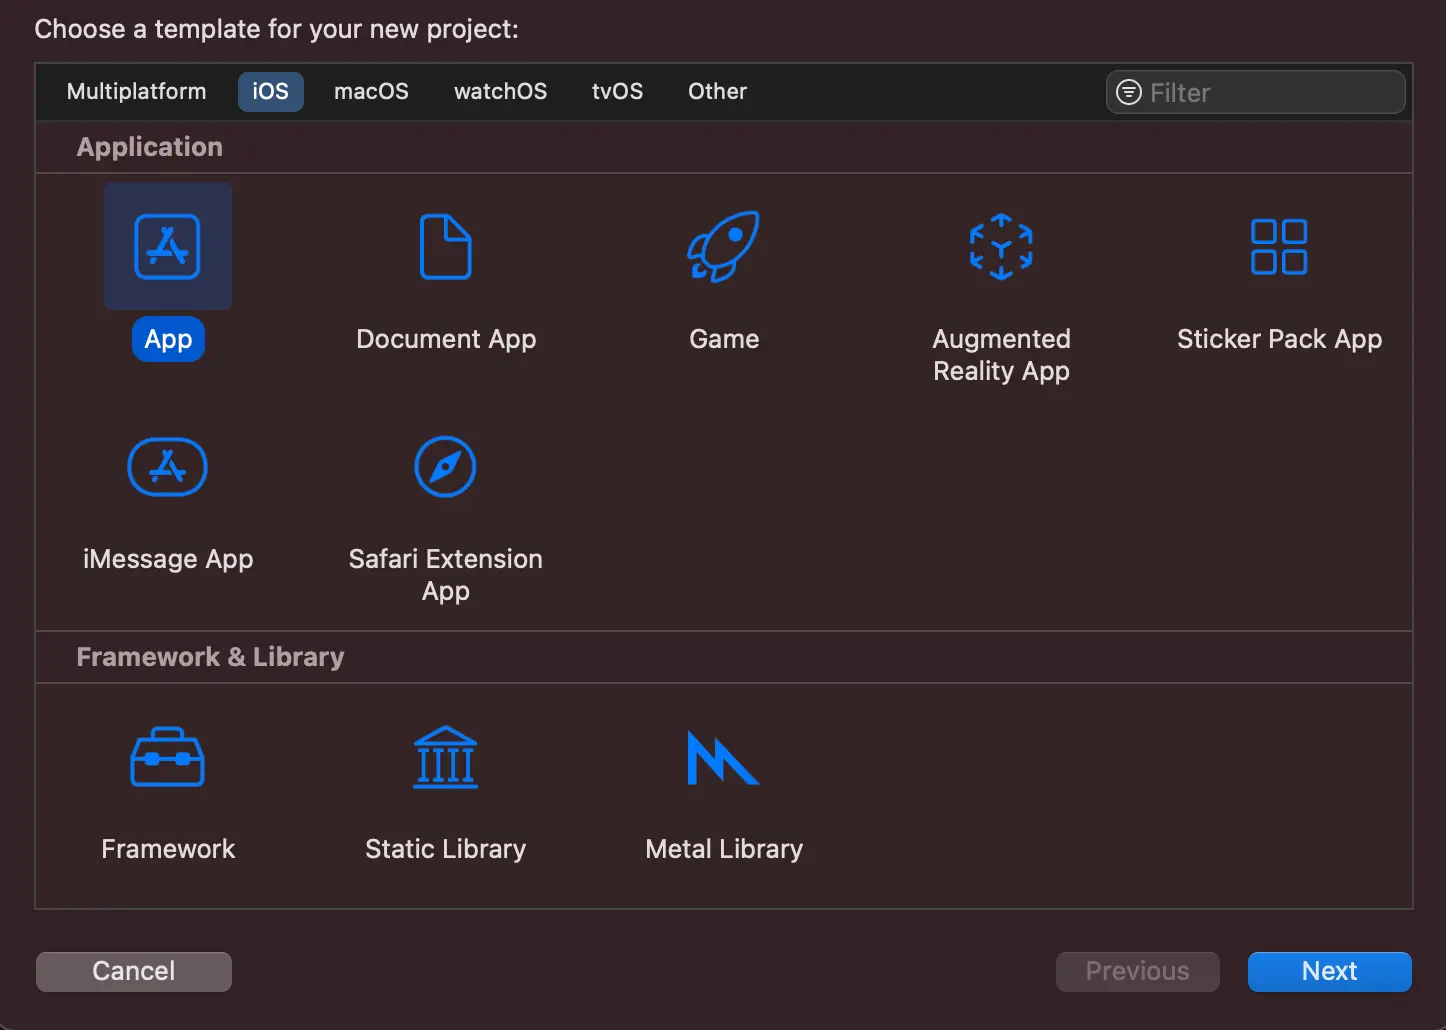
Select iOS tab, choose Application type as App and then click on Next.
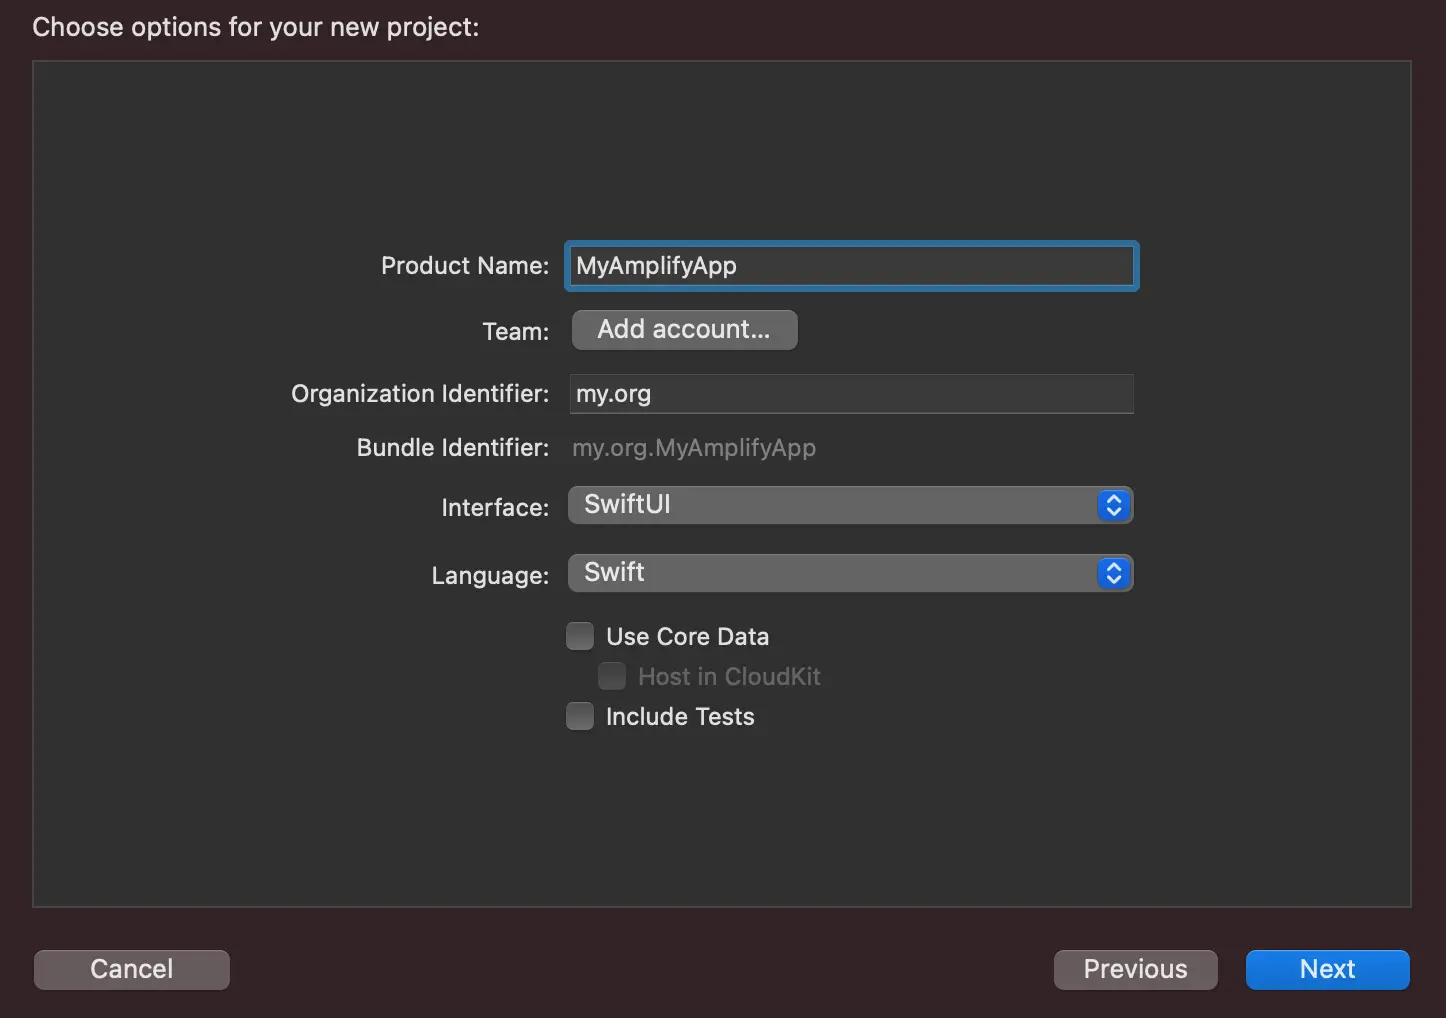
Fill in the following for your project:
- Product Name: MyAmplifyApp
- Interface: SwiftUI
- Language: Swift
- Tap
Next
After tapping Next, select where you would like to save your project, then tap Create. In this example, you will choose: ~/Developer
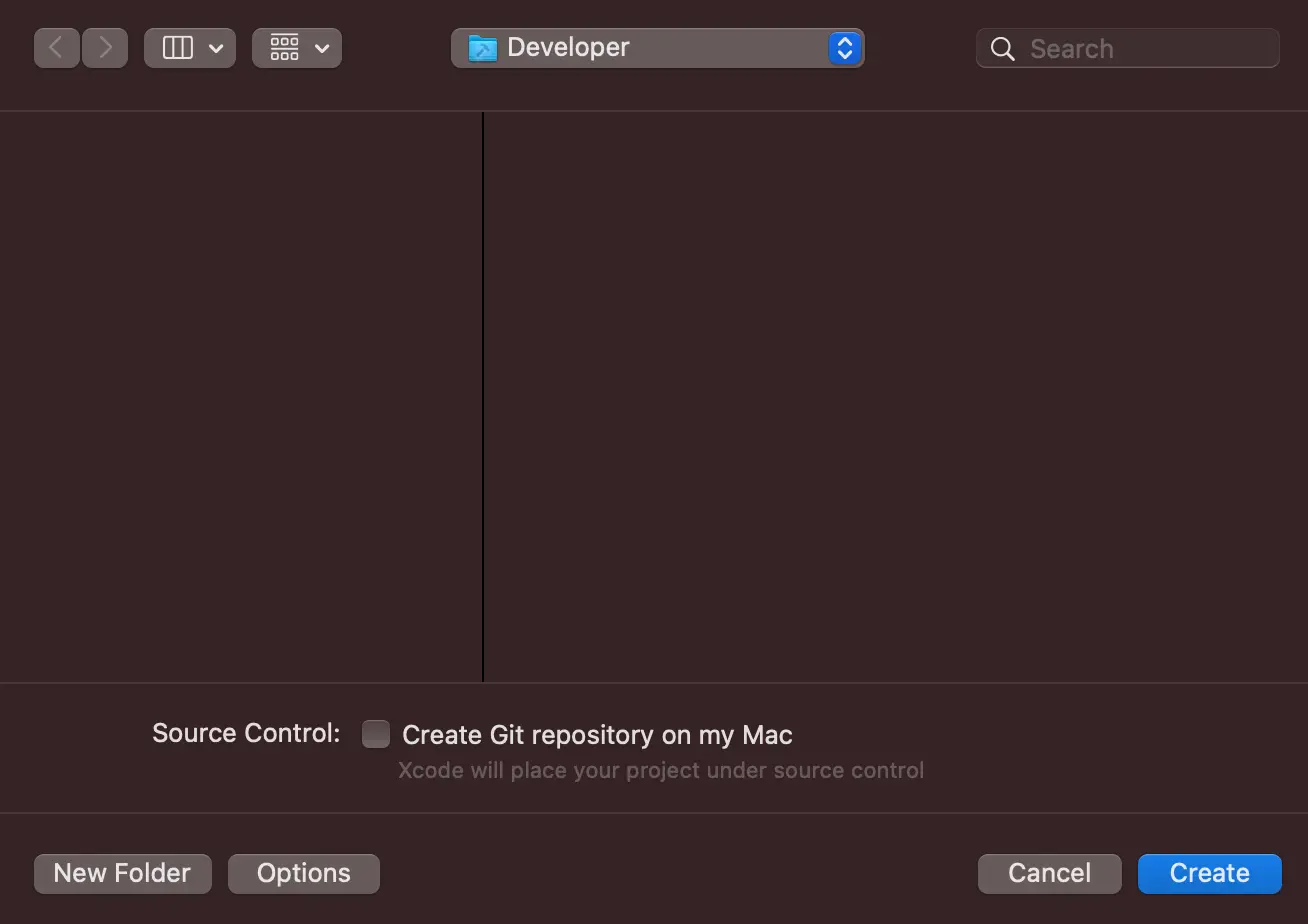
You should now have an empty iOS project without Amplify.
2. Install Amplify Libraries
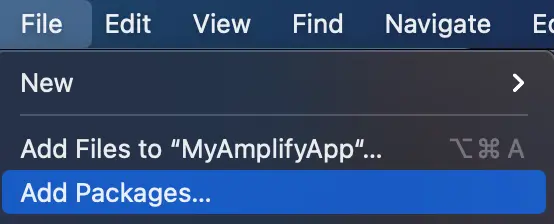
To start adding the Amplify Libraries to your iOS project, open your project in Xcode and select File > Add Packages...
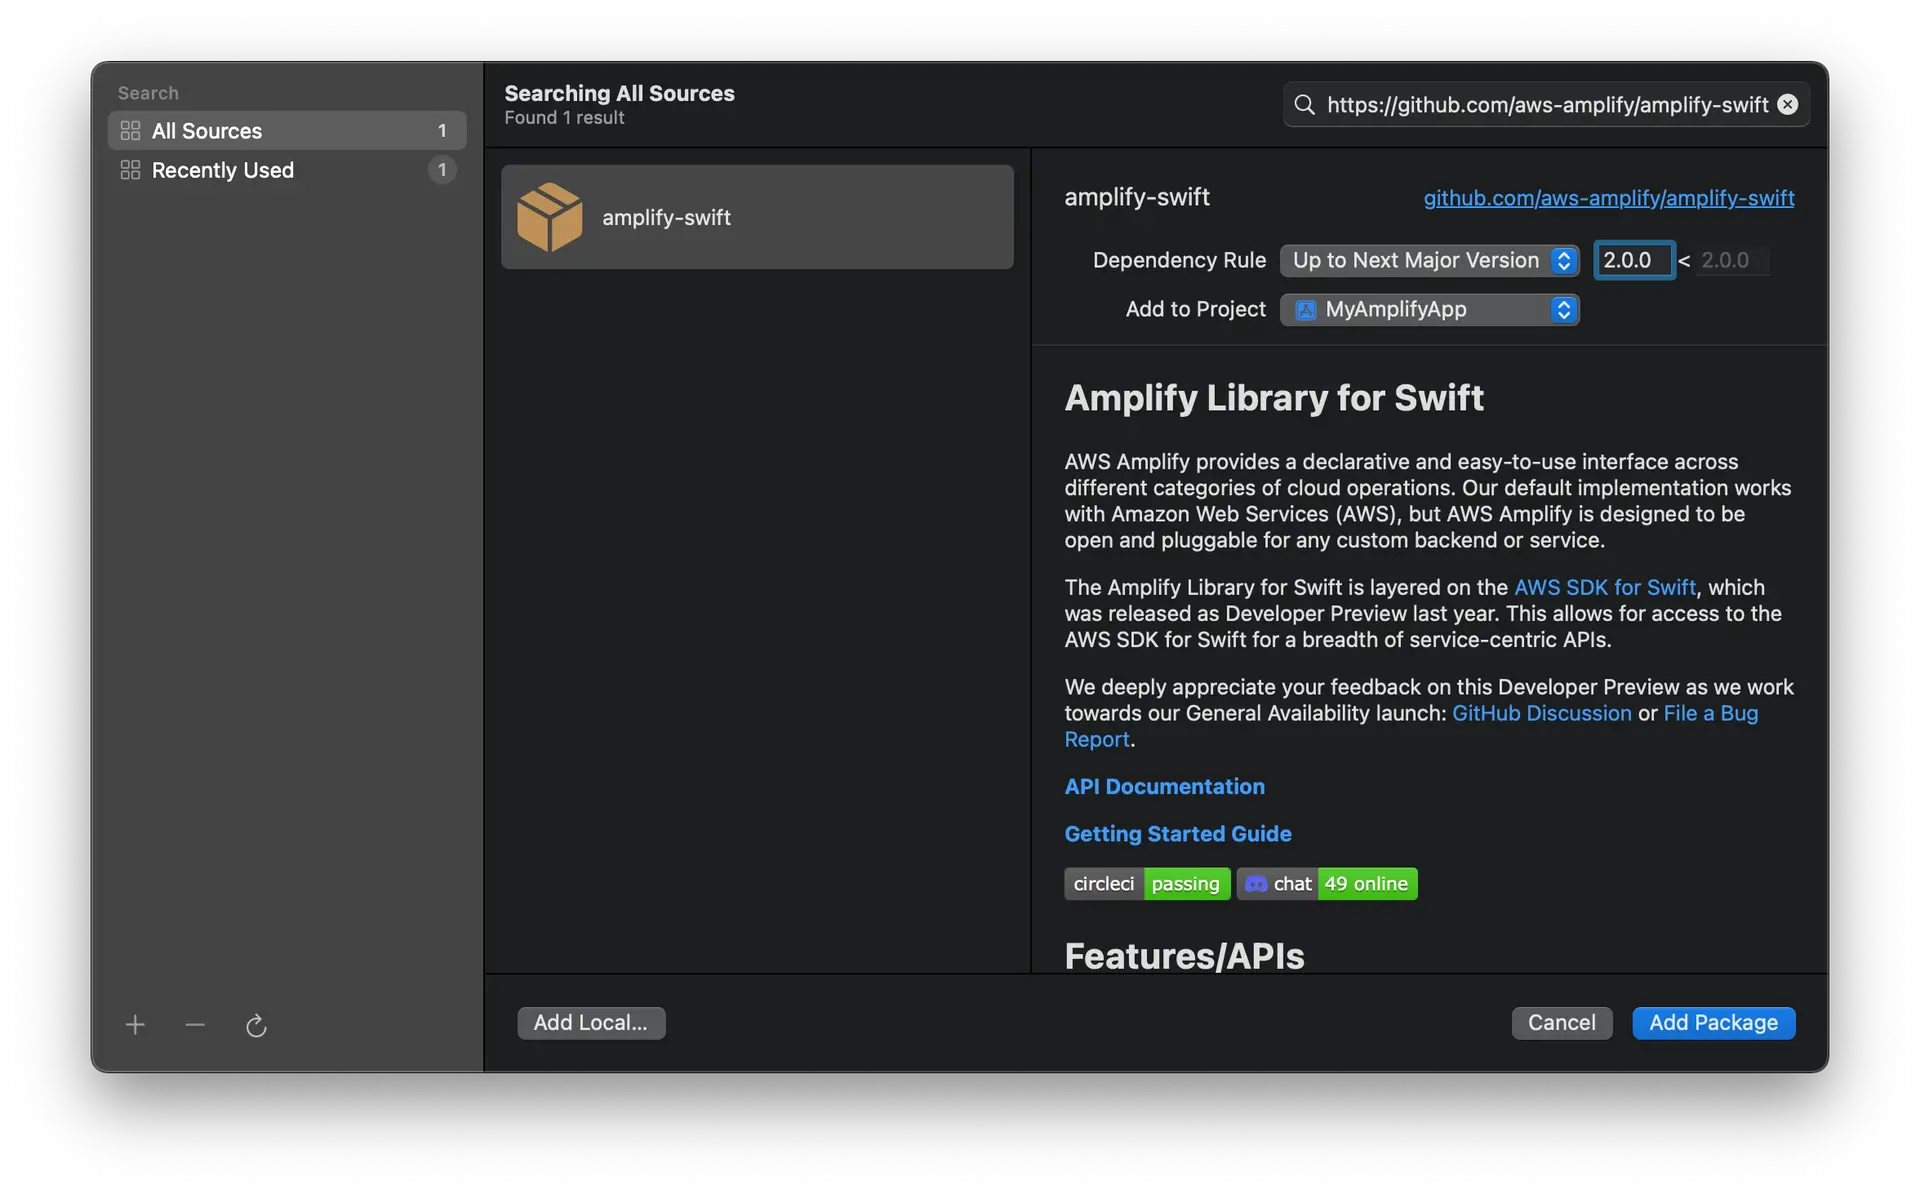
Enter the Amplify iOS GitHub repo URL (https://github.com/aws-amplify/amplify-swift) into the search bar and hit Enter. Wait for the result to load.
You'll see the Amplify iOS repository rules for which version of Amplify you want Swift Package Manager to install. Choose the dependency rule Up to Next Major Version, as it will use the latest compatible version of the dependency that can be detected from the main branch, then click Add Package.
Lastly, choose which of the libraries you want added to your project. Always select the Amplify library. The "Plugin" to install depends on which categories you are using:
-
API: AWSAPIPlugin
-
Analytics: AWSPinpointAnalyticsPlugin
-
Auth: AWSCognitoAuthPlugin
-
DataStore: AWSDataStorePlugin
-
Geo: AWSLocationGeoPlugin
-
Storage: AWSS3StoragePlugin
Note: AWSPredictionsPlugin is not currently supported through Swift Package Manager due to different minimum iOS version requirements. Support for this will eventually be added.
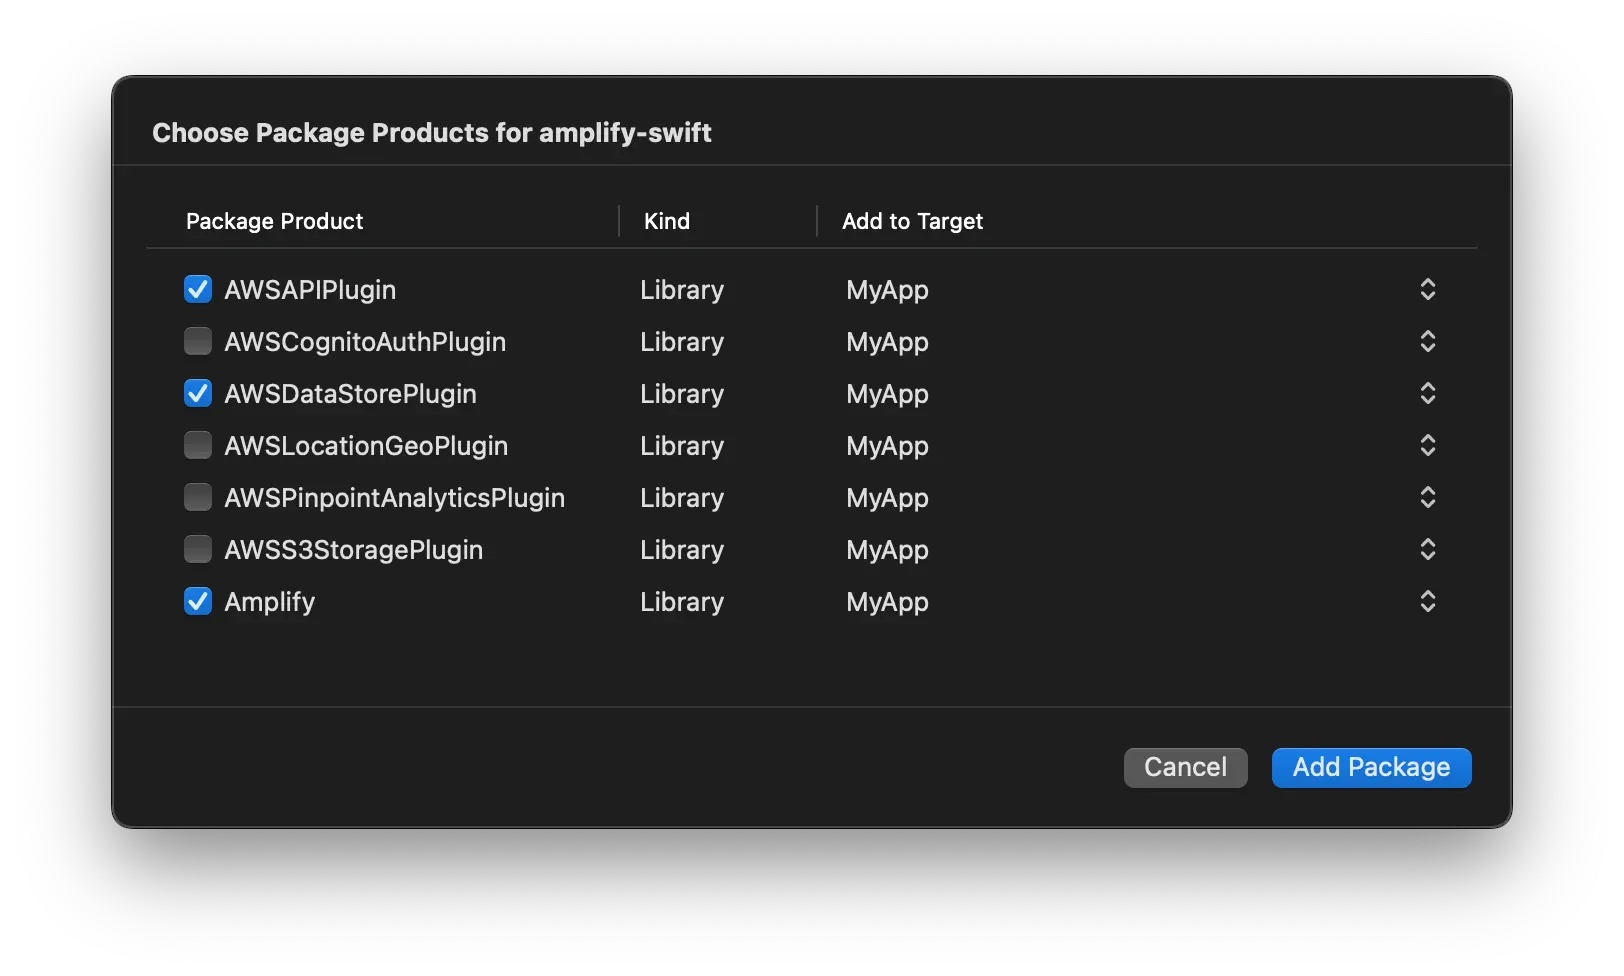
Select all that are appropriate, then click Add Package.
You can always go back and modify which SPM packages are included in your project by opening the Package Dependencies tab for your project: Click on the Project file in the Xcode navigator, then click on your project's icon, then select the Package Dependencies tab.
Before starting this step, please make sure you close Xcode.
Open a terminal and change directories to your project. For example, if you created your project in the folder ~/Developer, you can:
cd ~/Developer/MyAmplifyAppIn order to initialize your project with the CocoaPods package manager, execute the command:
pod initAfter doing this, you should see a newly created file called Podfile. This file is used to describe what packages your project depends on.
Update the file to include the Amplify pod:
target 'MyAmplifyApp' do use_frameworks! pod 'Amplify'endTo download and install the Amplify pod into your project, execute the command:
pod install --repo-updateAfter doing this, you should now see file called MyAmplifyApp.xcworkspace. You are required to use this file from now on instead of the .xcodeproj file. To open your workspace, execute the command:
xed .This should open the newly generated MyAmplifyApp.xcworkspace in Xcode.
3. Provision the backend with Amplify CLI
To start provisioning resources in the backend, change directories to your project directory and run amplify init:
cd ~/Developer/MyAmplifyApp/amplify initEnter the following when prompted:
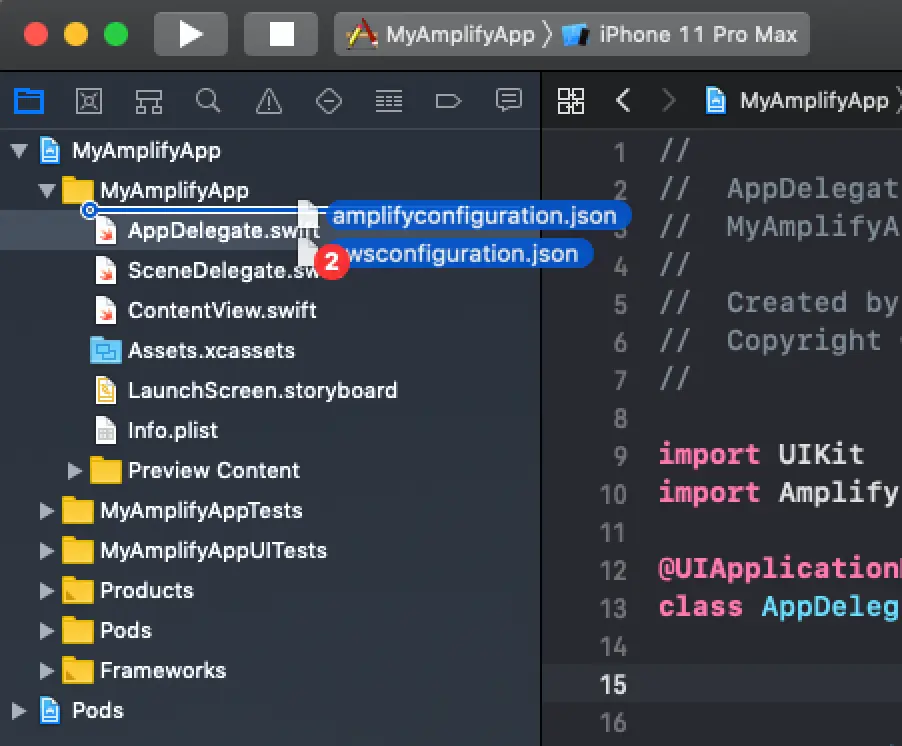
? Enter a name for the project MyAmplifyApp? Enter a name for the environment dev? Choose your default editor: Visual Studio Code? Choose the type of app that you're building ios? Do you want to use an AWS profile? Yes? Please choose the profile you want to use defaultUpon successfully running amplify init, you should see two new created files in your project directory: amplifyconfiguration.json and awsconfiguration.json. These two files must be manually added to your project so that they are bundled with your application. This is required so that Amplify libraries know how to reach your provisioned backend resources.
To add these configuration files to your project, open finder within your project and drag both amplifyconfiguration.json and awsconfiguration.json to the Xcode window, under your project's folder as seen in this screenshot:
- Enable Copy items if needed if not already enabled
- For “Added folders”, have Create groups selected.
- For “Add to targets”, make sure the app target (MyAmplifyApp) is checked.
Click Finish to add these files to your project as shown in this screenshot:

Now you can build (Cmd+b) and run (Cmd+r) your application.
4. Initialize Amplify in the application
Open AppDelegate.swift or MyAmplifyApp.swift and add import Amplify at the top of the file:
import AmplifyUpdate the following function to verify that Amplify can be compiled into your project:
func application( _ application: UIApplication, didFinishLaunchingWithOptions launchOptions: [UIApplication.LaunchOptionsKey: Any]?) -> Bool { do { try Amplify.configure() } catch { print("An error occurred setting up Amplify: \(error)") } return true}Note: If your app conforms to the App protocol, you can use your own AppDelegate class. Implement an AppDelegate and point Swift UI's UIApplicationDelegateAdaptor property wrapper to it, as below.
class AppDelegate: NSObject, UIApplicationDelegate {    func application(        _ application: UIApplication,        didFinishLaunchingWithOptions launchOptions: [UIApplication.LaunchOptionsKey : Any]? = nil    ) -> Bool {        do {            try Amplify.configure()        } catch {            print("An error occurred setting up Amplify: \(error)")        }        return true    }}@mainstruct MyAmplifyApp: App {    @UIApplicationDelegateAdaptor(AppDelegate.self) var appDelegate
    var body: some Scene {        WindowGroup {            ContentView()        }    }}
Build your project (Cmd+b), then you have successfully added the Amplify library to your project and you should be able to run the application.
Optionally, if you'd like to see additional log messages of what amplify is doing during configuration, you can turn on verbose logging before calling Amplify.configure():
do { Amplify.Logging.logLevel = .verbose // Configure Amplify as usual... try Amplify.configure() // ...Re-running the application with verbose logging on, you will see the following messages:
[Amplify] Configuring[Amplify] Configuration: nilNext steps
Congratulations! You've created a skeleton app and are ready to start adding Amplify categories to your application. The following are some categories that you can start to build into your application:
- Analytics - for logging metrics and understanding your users
- API (GraphQL) - for adding a GraphQL endpoint to your app
- API (REST) - for adding a REST endpoint to your app
- Authentication - for managing your users
- DataStore - for making it easier to program for a distributed data store for offline and online scenarios
- Geo - to use location data and map UI components.
- Predictions - to detect text, images, and more!
- Storage - store complex objects like pictures and videos to the cloud.
Further customization
Use the Combine framework with Amplify
The default Amplify library for iOS supports iOS 11 and higher, and ships with APIs that return results on Result callbacks, as in:
Amplify.DataStore.save(Post(title: "My Post", content: "My content", ...), completion: { result in switch result { case .success: print("Post saved") case .failure(let dataStoreError): print("An error occurred saving the post: \(dataStoreError)") }})If your project declares platform support of iOS 13 or higher, Amplify also provides APIs that expose Combine Publishers, which allows you to use familiar Combine patterns, as in:
Amplify.DataStore.save(Post(title: "My Post", content: "My content")) .sink { completion in if case .failure(let dataStoreError) = completion { print("An error occurred saving the post: \(dataStoreError)") } } receiveValue: { value in print("Post saved: \(value)") }While this doesn't save much for a single invocation, it provides great readability benefits when chaining asynchronous calls, since you can use standard Combine operators and publishers to compose complex functionality into readable chunks:
subscription = Publishers.Zip( Amplify.DataStore.save(Person(name: "Rey")), Amplify.DataStore.save(Person(name: "Kylo"))).flatMap { hero, villain in Amplify.DataStore.save(EpicBattle(hero: hero, villain: villain))}.flatMap { battle in Publishers.Zip( Amplify.DataStore.save( Outcome(of: battle) ), Amplify.DataStore.save( Checkpoint() ) )}.sink { completion in if case .failure(let dataStoreError) = completion { print("An error occurred in a preceding operation: \(dataStoreError)") }}receiveValue: { _ in print("Everything completed successfully")}Compared to nesting these dependent calls in callbacks, this provides a much more readable pattern.
NOTE: Remember that Combine publishers do not retain sink subscriptions, so you must maintain a reference to the subscription in your code, such as in an instance variable of the enclosing type:
struct MyAppCode {    var subscription AnyCancellable?
    ...
    func doSomething() {        // Subscription is retained by the `self.subscription` instance        // variable, so the `sink` code will be executed        subscription = Amplify.DataStore.save(Person(name: "Rey"))            .sink(...)    }}
Installation
There is no additional work needed to enable Combine support. Projects that declare a deployment target of iOS 13.0 or higher will automatically see the appropriate method signatures and properties, depending on the Category and API you are calling.
API comparison
Amplify strives to provide an intuitive interface for APIs that expose Combine functionality by overloading the no-Combine API signature, minus the result callbacks. Thus, Amplify.DataStore.save(_:where:completion:) has an equivalent Combine-supporting API of Amplify.DataStore.save(_:where:). In most cases, the Result callback Success and Failure types in standard Amplify APIs translate exactly to the Output and Failure types of publishers returned from Combine-supporting APIs.
The way to get to a Combine publisher for a given API varies depending on whether the asynchronous work can be cancelled or not:
-
APIs that do not return an operation simply return an
AnyPublisherdirectly from the API call:let publisher = Amplify.DataStore.save(myPost) -
Most APIs that do return an operation expose a
resultPublisherproperty on the returned operationlet publisher = Amplify.Predictions.convert(textToSpeech: text, options: options).resultPublisher
Special cases
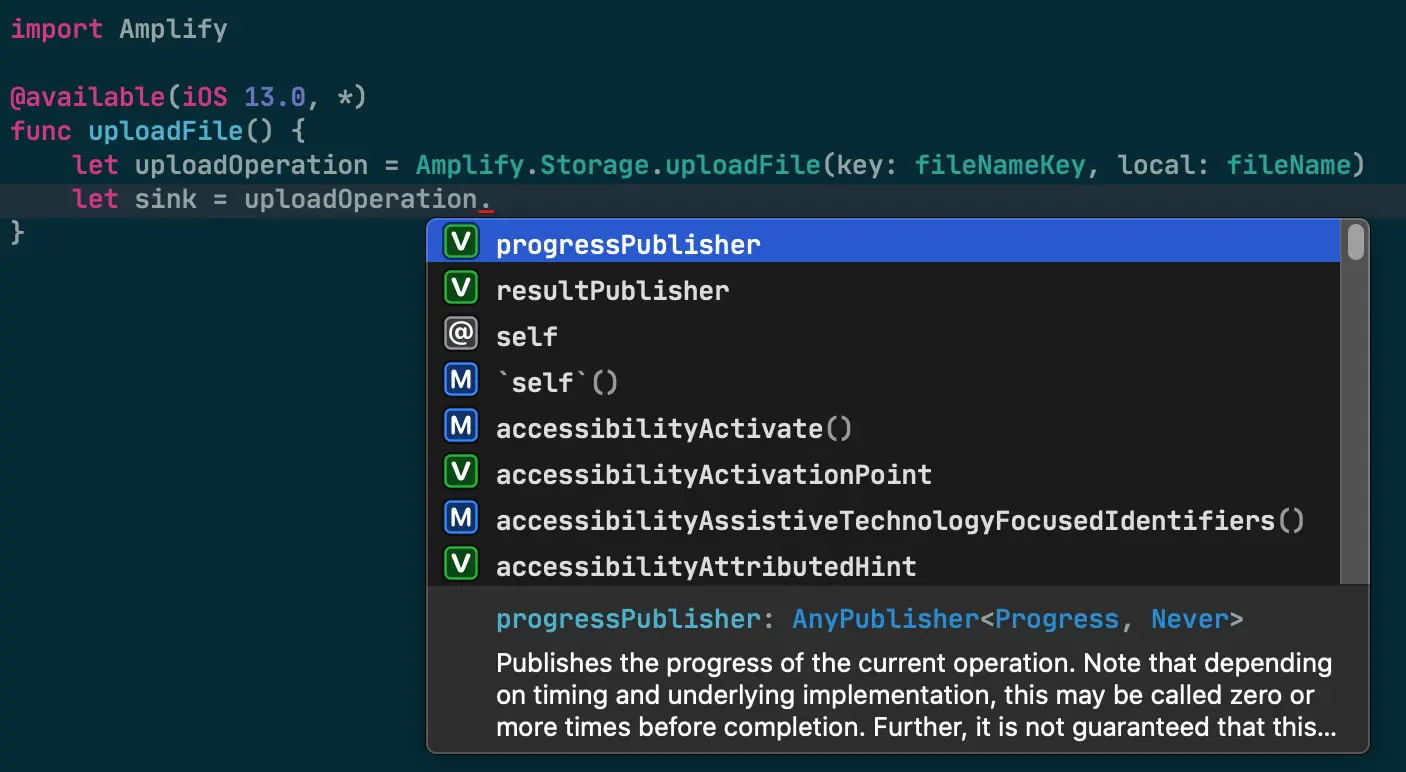
Not all APIs map neatly to the resultPublisher pattern. While this asymmetry increases the mental overhead of learning to use Amplify with Combine, the ease of use at the call site should make up for the additional learning curve. In addition, Xcode will show the available publisher properties, making it easier to discover which publisher you need:
API.subscribe()
The API.subscribe() method exposes a subscriptionDataPublisher for the stream of subscription data, and a connectionStatePublisher for the status of the underlying connection. Many apps will only need to use the subscriptionDataPublisher, since a closed GraphQL subscription will be reported as a completion on that publisher. The connectionStatePublisher exists for apps that need to inspect when the connection initially begins, even if data has not yet been received by that subscription.
Hub.publisher(for:)
The Amplify Hub category exposes only one Combine-related API: Hub.publisher(for:), which returns a publisher for all events on a given channel. You can then apply the standard Combine filter operator to inspect only those events you care about.
Storage upload & download operations
Storage upload and download APIs report both completion and overall operation progress. In addition to the typical resultPublisher that reports the overall status of the operation, Storage upload and download APIs also have a progressPublisher that reports incremental progress when available.
Cancelling operations
Most Amplify APIs return a use-case specific Operation that you may use to cancel an in-process operation. On iOS 13 and above, those Operations contain publishers to report values back to the app.
Cancelling a subscription to a publisher simply releases that publisher, but does not affect the work in the underlying operation. For example, say you start a file upload on a view in your app:
import Combine
class MyView: UIView {
// Declare instance properties to retain the operation and subscription cancellablesvar uploadOperation: StorageUploadFileOperation?var resultSink: AnyCancellable?var progressSink: AnyCancellable?
// Then when you start the operation, assign those instance propertiesfunc uploadFile() {    uploadOperation = Amplify.Storage.uploadFile(key: fileNameKey, local: filename)
    resultSink = uploadOperation        .resultPublisher        .sink(            receiveCompletion: { completion in                if case .failure(let storageError) = completion {                    handleUploadError(storageError)                }            }, receiveValue: { print("File successfully uploaded: \($0)") }        )
    progressSink = uploadOperation        .progressPublisher        .sink{ print("\($0.fractionCompleted * 100)% completed") }}
After you call uploadFile() as above, your containing class retains a reference to the operation that is actually performing the upload, as well as Combine AnyCancellables that can be used to stop receiving result and progress events.
To cancel the upload (for example, in response to the user pressing a Cancel button), you simply call cancel() on the upload operation:
func cancelUpload() { // Automatically sends a completion to `resultPublisher` and `progressPublisher` uploadOperation.cancel()}If you navigate away from MyView, the uploadOperation, resultSink, and progressSink instance variables will be released, and you will no longer receive progress or result updates on those sinks, but Amplify will continue to process the upload operation.
Use existing AWS resources
An application’s backend is built with cloud resources such as AWS AppSync GraphQL APIs, Amazon S3 storage, and Amazon Cognito authentication. The Amplify CLI simplifies the provisioning of new backend resources across these different categories. However, you can alternatively use the Amplify libraries to add or re-use existing AWS resources that you provisioned without the CLI. The Amplify libraries support configuration through the amplifyconfiguration.json file which defines all the regions and service endpoints for your backend AWS resources.
Add an existing AWS resource to an iOS application
Before you can add an existing AWS resource to an iOS application, the application must have the Amplify libraries installed. For detailed instructions, see Install Amplify Libraries.
1. Manually create the Amplify configuration file for your iOS project
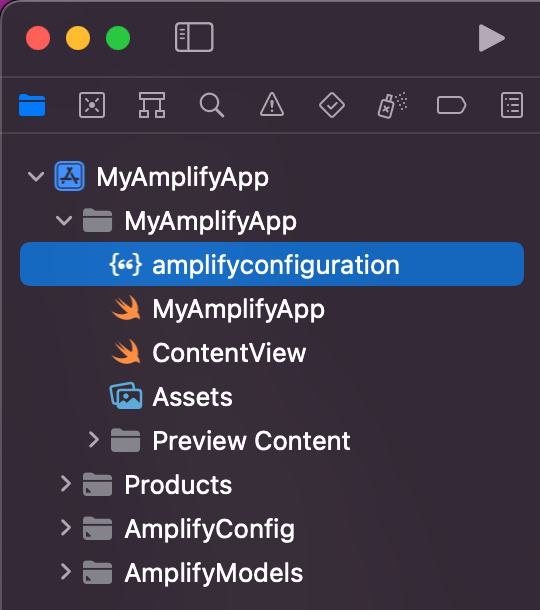
Create a file named amplifyconfiguration.json in your project’s main directory. At this point the contents of your amplifyconfiguration.json file can be an empty object, {}.
For example, if the name of your project is MyAmplifyApp, you will create the configuration file in your main application directory, MyAmplifyApp/amplifyconfiguration.json, as follows:
2. Initialize Amplify in the application
To initialize Amplify in your iOS application, open the AppDelegate.swift file and add import Amplify at the top of the file.
import AmplifyUpdate the application function in the AppDelegate.swift file to verify that Amplify can be compiled into your project. The application function’s code should be the following:
func application( _ application: UIApplication, didFinishLaunchingWithOptions launchOptions: [UIApplication.LaunchOptionsKey: Any]?) -> Bool { do { try Amplify.configure() } catch { print("An error occurred setting up Amplify: \(error)") } return true}3. Edit the configuration file to use an existing AWS resource
Now you’re ready to customize your application’s amplifyconfiguration.json file to specify an existing AWS resource to use.
Note that before you can add an AWS resource to your application, the application must have the Amplify libraries installed. If you need to perform this step, see Install Amplify Libraries.
Select a category from the following list to view an example amplifyconfiguration.json file you can use as a template to author your own amplifyconfiguration.json file:
- See the Analytics category to use existing AWS Pinpoint resources.
- See the API (GraphQL) category to use existing AWS AppSync resources.
- See the API (REST) category to use existing Amazon API Gateway and AWS Lambda resources.
- See the Authentication category to use existing Amazon Cognito resources.
- See the Storage category to use existing Amazon S3 resources.