Using AWS IoT with Amplify
The new Amplify Library for Swift (also known as v2) is implemented using the new AWS SDK for Swift, which does not support AWS IoT .
Follow this guide if you are looking to:
- Use AWS IoT for your Swift project using v2 of the Amplify Library for Swift
- Migrate to v2 of the Amplify Library for Swift and you currently have an AWS IoT implementation in your project.
You can achieve it by using CocoaPods to pull the AWSIoT pod, and by manually providing the necessary credentials.
Prerequisites
You will need:
- CocoaPods installed in your computer.
- An application that is configured with the Auth category of the latest Amplify Library for Swift.
Installation
In a Terminal window, navigate to your application's root folder and run the following command:
pod initOpen the resulting Podfile file and add the AWSIoT pod to your target
platform :ios, '13.0'
target :'YOUR-APP-NAME' do  use_frameworks!
  pod  'AWSIoT'end
Go back to the Terminal and run:
pod installNow you can use the .xcworkspace file to open your application, and you should be able to successfully build and run it.
Configuration
In order to configure AWSIoTDataManager, you need to provide an instance that conforms to AWSCredentialsProvider.
Since your application is using Amplify Auth, you can use it to provide the credentials. Just create a new CredentialsProxy.swift file with the following content:
import Amplifyimport AWSCognitoAuthPluginimport AWSCoreimport AWSPluginsCoreimport Foundation
/// Convenience implementation of the aws-sdk-ios `AWSCredentialsProvider` protocol backed/// by Amplify's Cognito-based Auth plugin.////// - Tag: CredentialsProxyclass CredentialsProxy: NSObject {
    /// - Tag: CredentialsProxyError    enum Error: Swift.Error {        case missingCredentialsProvider        case missingCognitoCredentials    }
    private let auth: AuthCategoryBehavior
    /// - Tag: CredentialsProxy.init    init(auth: AuthCategoryBehavior = Amplify.Auth) {        self.auth = auth    }
    private func fetchCredentials() async throws -> AWSCore.AWSCredentials {        let session = try await auth.fetchAuthSession(options: nil)        guard let provider = session as? AuthAWSCredentialsProvider else {            throw Error.missingCredentialsProvider        }
        let credentials = try provider.getAWSCredentials().get()        guard let cognitoCredentials = credentials as? AuthAWSCognitoCredentials else {            throw Error.missingCognitoCredentials        }
        return AWSCredentials(            accessKey: cognitoCredentials.accessKeyId,            secretKey: cognitoCredentials.secretAccessKey,            sessionKey: cognitoCredentials.sessionToken,            expiration: cognitoCredentials.expiration        )    }}
extension CredentialsProxy: AWSCore.AWSCredentialsProvider {
    func credentials() -> AWSTask<AWSCore.AWSCredentials> {        let source = AWSTaskCompletionSource<AWSCore.AWSCredentials>()        Task {            do {                let credentials = try await fetchCredentials()                source.set(result: credentials)            } catch {                source.set(error: error)            }        }        return source.task    }
    func invalidateCachedTemporaryCredentials() {}}
Add the corresponding import to the files in which you wish you use AWS IoT:
import AWSIoTYou can then use a new CredentialsProxy instance as the credentials provider when creating your configuration with your unique client ID and endpoint:
let iotEndPoint = AWSEndpoint(    urlString: "wss://xxxxxxxxxxxxx-ats.iot.<YOUR-AWS-REGION>.amazonaws.com/mqtt")
let iotDataConfiguration = AWSServiceConfiguration(    region: AWSRegionType.<YOUR-AWS-REGION>,    endpoint: iotEndPoint,    credentialsProvider: CredentialsProxy())
AWSIoTDataManager.register(with: iotDataConfiguration!, forKey: "MyAWSIoTDataManager")let iotDataManager = AWSIoTDataManager(forKey: "MyAWSIoTDataManager")Create IAM policies for AWS IoT
To use PubSub with AWS IoT, you will need to create the necessary IAM policies in the AWS IoT Console, and attach them to your Amazon Cognito Identity.
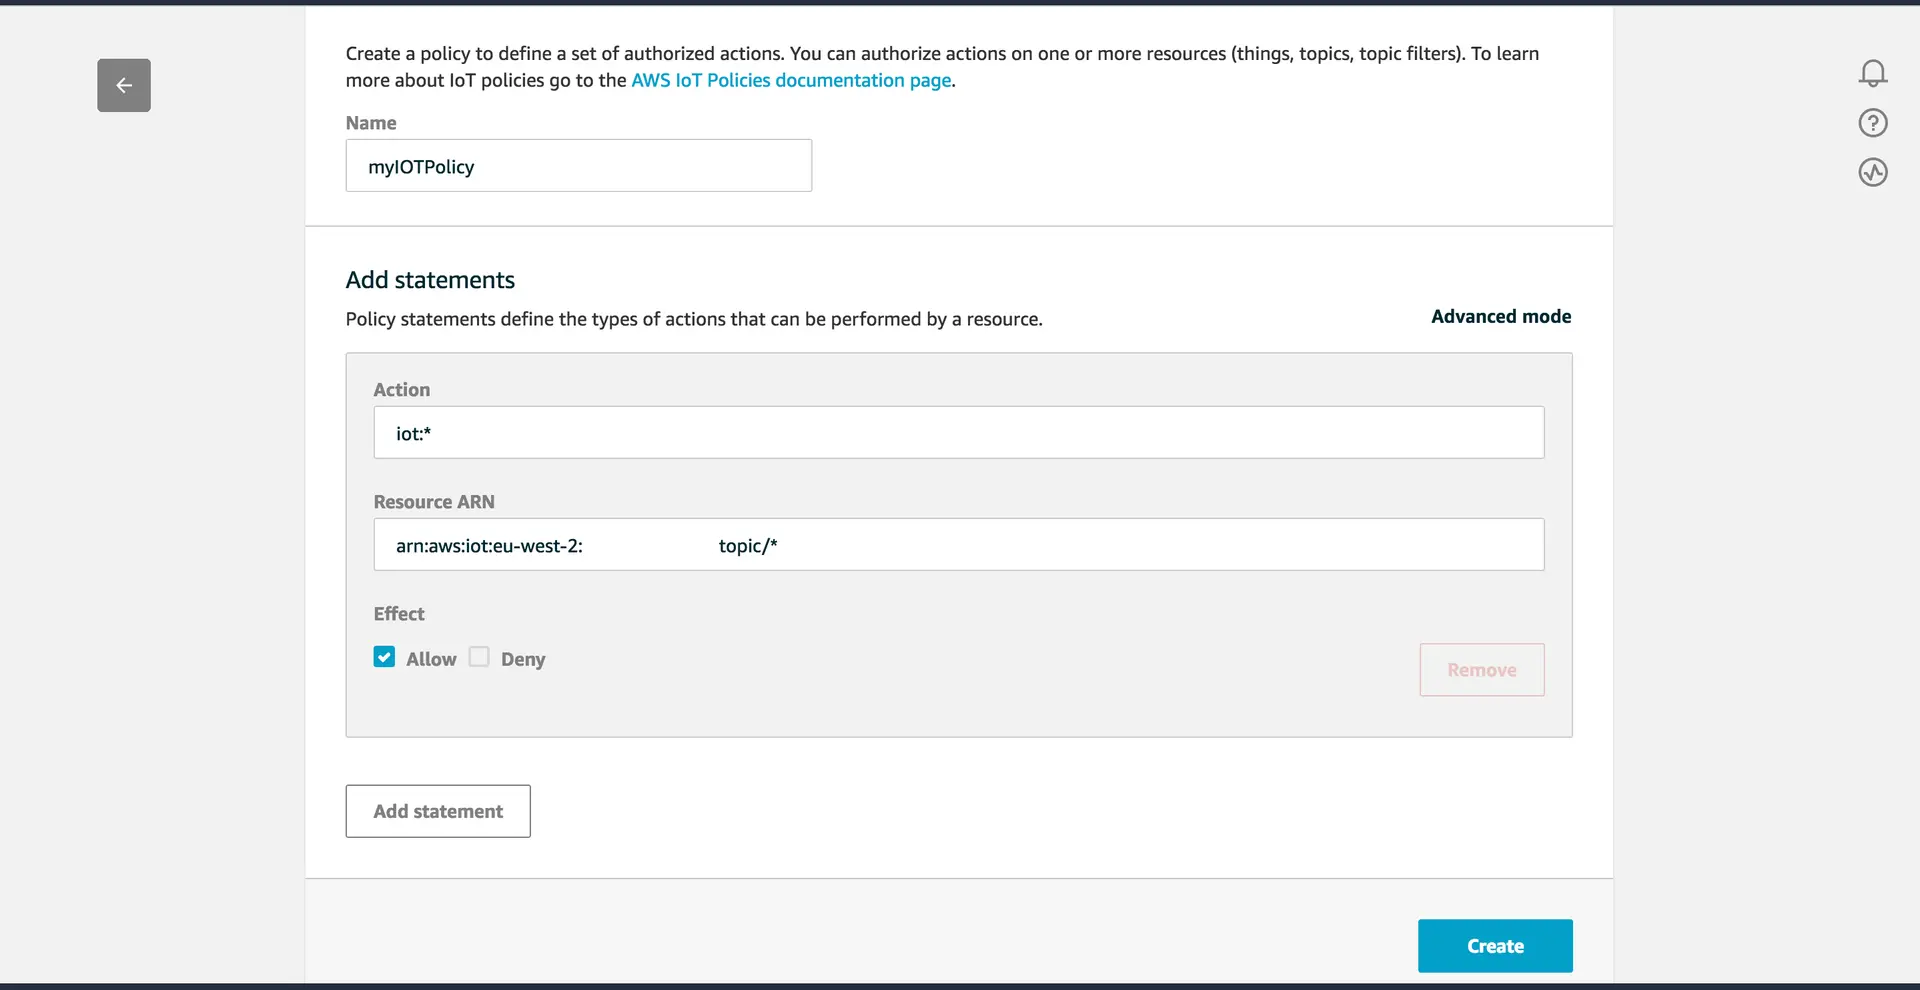
Go to IoT Core and choose Secure from the left navigation pane, and then Policies from the dropdown menu. Next, click Create. The following myIOTPolicy policy will allow full access to all the topics.
Attach your policy to your Amazon Cognito Identity
To attach the policy to your Cognito Identity, begin by retrieving the Cognito Identity Id from Amplify Auth.
Add the following import statements:
import Amplifyimport AWSPluginsCoreThen you can retrieve the ID using Amplify.Auth.fetchAuthSession()
let session = try await Amplify.Auth.fetchAuthSession()if let identityProvider = session as? AuthCognitoIdentityProvider { let identityId = try identityProvider.getIdentityId().get() print("Identity ID: \(identityId)")}Finally, you need to attach the myIOTPolicy policy to the user's Cognito Identity Id with the following AWS CLI command:
aws iot attach-principal-policy --policy-name 'myIOTPolicy' --principal '<YOUR_COGNITO_IDENTITY_ID>'