Migrate an existing Gen 1 Environment to Gen 2
Migrating a Gen 1 environment to Gen 2 involves changes to the underlying CloudFormation infrastructure of your application. While the migration tool automates much of the heavy lifting, it requires your confirmation at every step — understanding what is happening and why is essential for a smooth migration. We recommend reading through the concepts and general topics below before starting the step-by-step guide.
Overview
Throughout this guide, we refer to two types of resources that are handled differently during migration. These map to the underlying CloudFormation resources that make up your backend:
- Stateless resources don't store any user data — these include AppSync GraphQL APIs, API Gateway REST APIs, Lambda functions, IAM roles, etc.
- Stateful resources store user data — these include S3 buckets, DynamoDB tables, Cognito User Pools, Cognito Identity Pools, etc.
Migration Approach (Blue/Green)
Migrating your backend to Gen2 is done in a (partial) blue/green deployment approach:
- Generate the necessary Gen2 definition files based on your deployed Gen1 environment.
- Deploy the Gen 2 code to create a new environment (in Gen 2 these are referred to as branches). This environment runs alongside your Gen 1 environment until it eventually becomes your production environment and the Gen 1 environment is decommissioned.
- Thoroughly test the new Gen 2 environment to confirm it behaves correctly. This is a critical step — the refactor that follows is difficult to reverse, so you want high confidence before proceeding.
- Refactor your underlying CloudFormation stacks such that any Gen1 stateful resource will be managed by the new Gen2 deployment.
Migration is driven by a new gen2-migration subcommand in the Gen 1 CLI. It walks you through a series of steps that produce a new Gen 2 environment (called a branch) alongside your existing Gen 1 environment. The new branch gets fresh copies of your stateless resources (APIs, functions, roles, etc.) while your stateful resources (user pools, S3 buckets, DynamoDB tables, etc.) are transferred over so no data is lost. The following diagram describes the workflow:
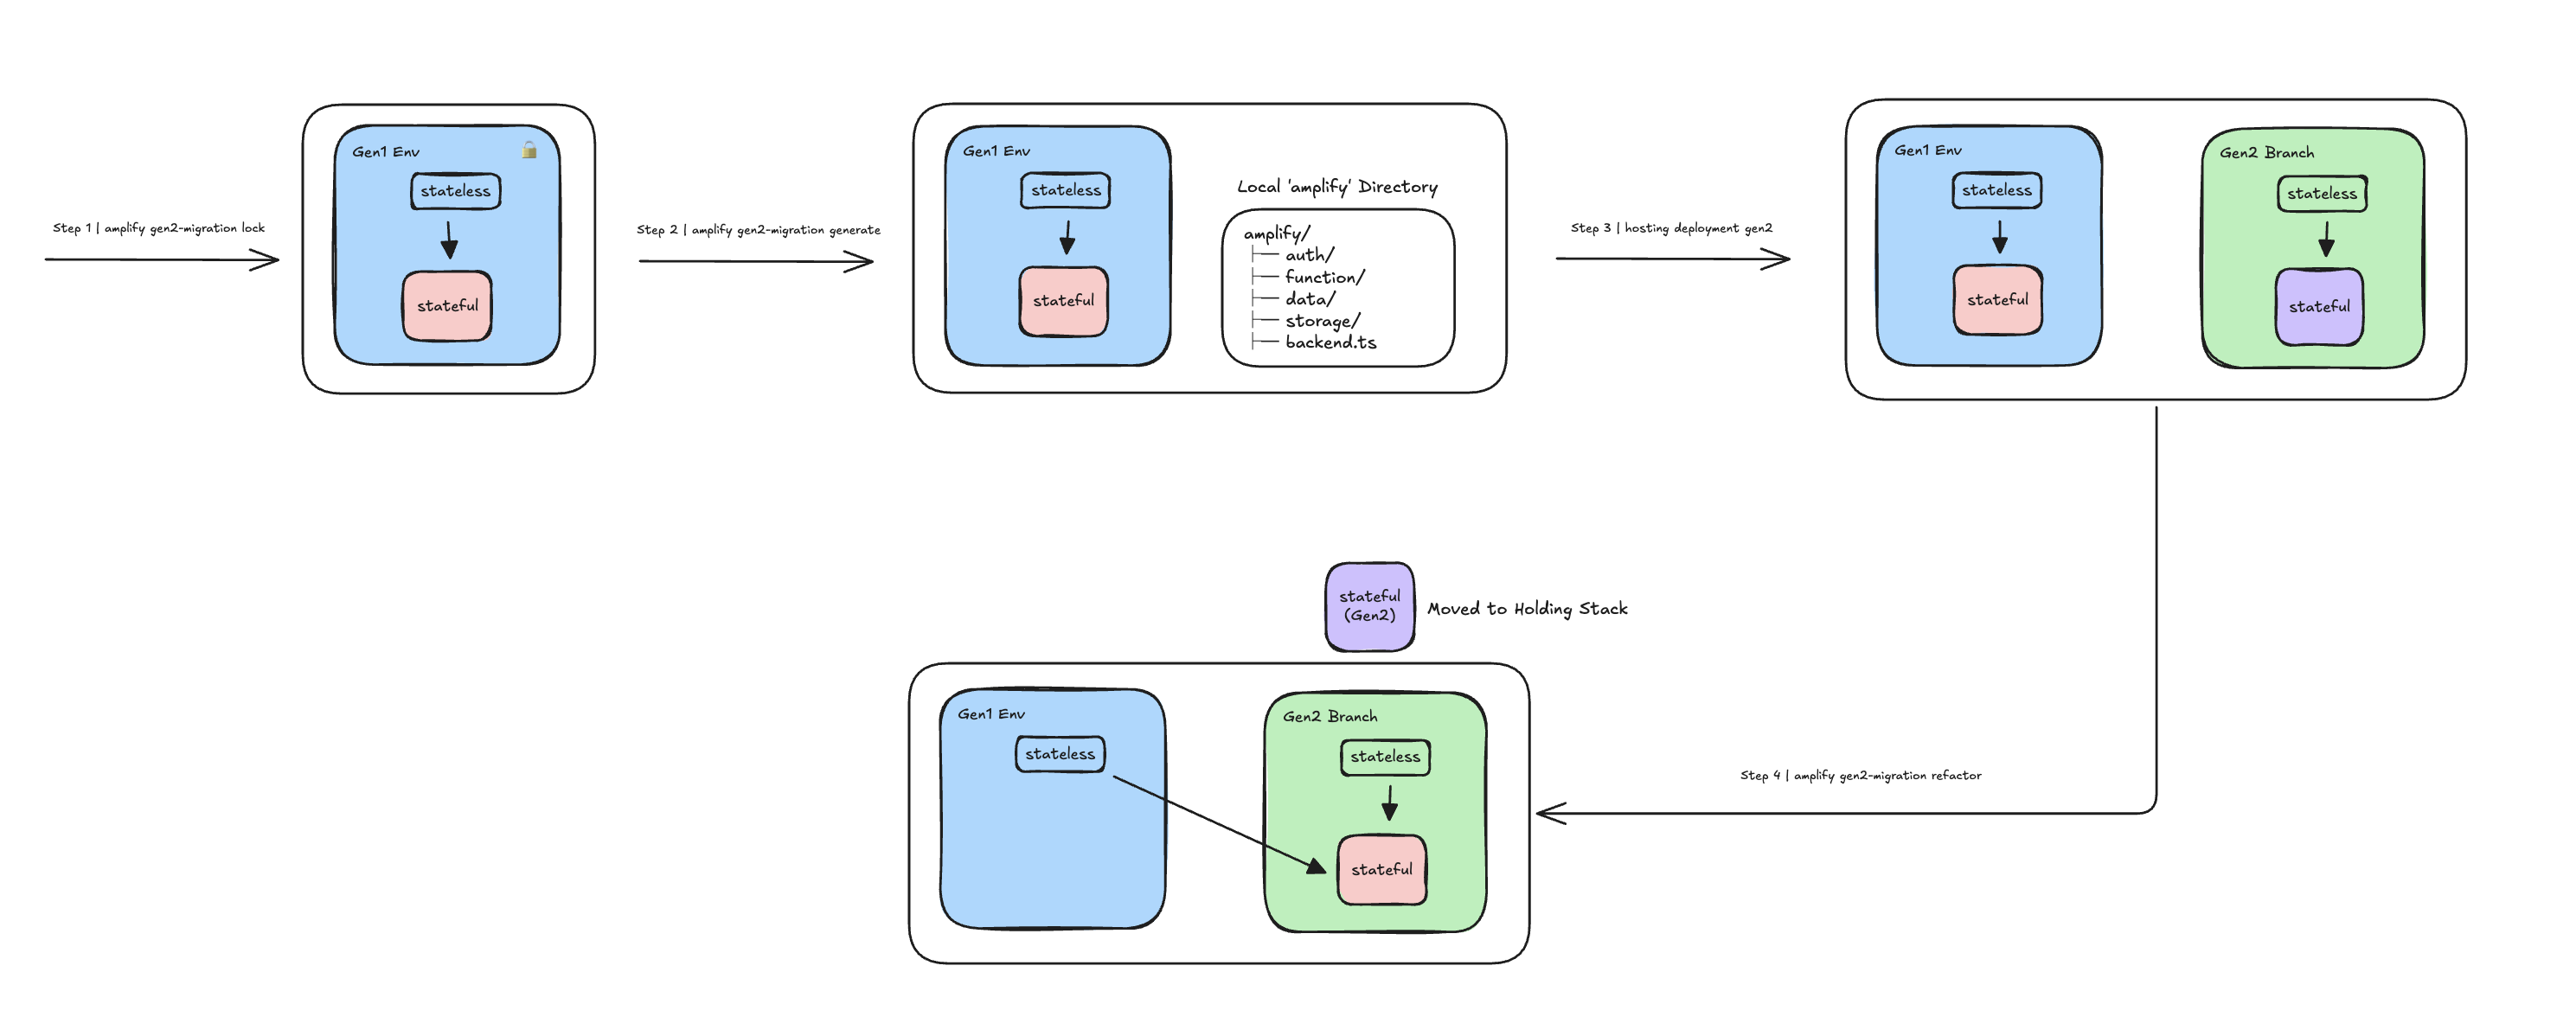
During migration, both environments run side by side so you can validate the Gen 2 environment before switching over. Once you are confident it is working correctly, the Gen 2 environment becomes your primary one and the Gen 1 environment can be decommissioned. After refactoring, the Gen 1 environment is locked and all future updates should be pushed to the Gen 2 code.
Generating the Gen2 Application
The migration tool introspects your Gen 1 CloudFormation stacks and Amplify configuration files to produce the equivalent Gen 2 TypeScript backend definitions in the amplify/ directory.
Features that are natively supported in Gen 2 are code-generated using the native Gen 2 APIs (e.g. defineAuth, defineData, defineStorage). Features that are not natively supported are code-generated as CDK constructs and escape hatches.
Stateful resources (user pools, S3 buckets, etc.) are also code-generated, meaning new empty instances will be deployed in the Gen 2 environment. The refactor step will later replace these empty resources with your actual Gen 1 resources.
The generated code can be deployed using either the Amplify Hosting service (via branch deployments) or the Gen 2 CLI (npx ampx sandbox / npx ampx pipeline-deploy).
Preserving and Sharing Data
To preserve your existing data, the migration tool uses the CloudFormation Stack Refactor APIs to move your Gen 1 stateful resources (Cognito User Pool, Identity Pool, S3 bucket, etc.) into the Gen 2 CloudFormation stacks. The empty placeholder resources that were created during the generate phase are replaced with your actual Gen 1 resources, preserving all existing user accounts and data.
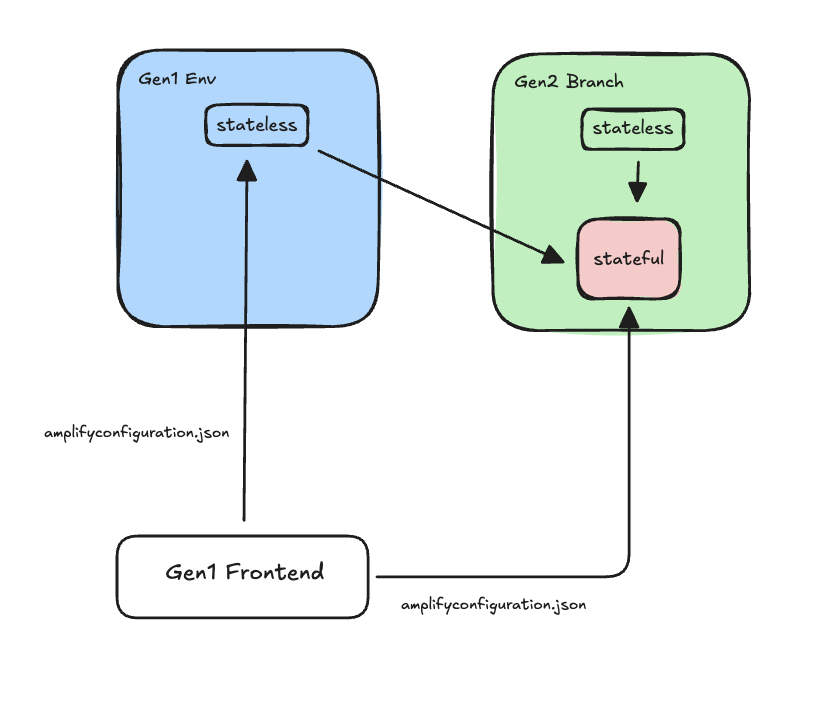
Stateless resources (APIs, functions, IAM roles, etc.) are not moved — the Gen 2 environment already has its own new instances of these. Your Gen 1 stateless resources remain in place so that any Gen 1 frontends continue to function until you switch them over. After refactoring, both your Gen 1 and Gen 2 environments access the same underlying data — changes made through either environment are immediately visible to the other.
Impacts on Frontend
Gen 1 frontends communicate with backend resources via the amplifyconfiguration.json file. All values in this file (AppSync endpoint URLs, User Pool IDs, etc.) remain valid throughout the entire migration process, so Gen 1 frontends continue to work without any change.
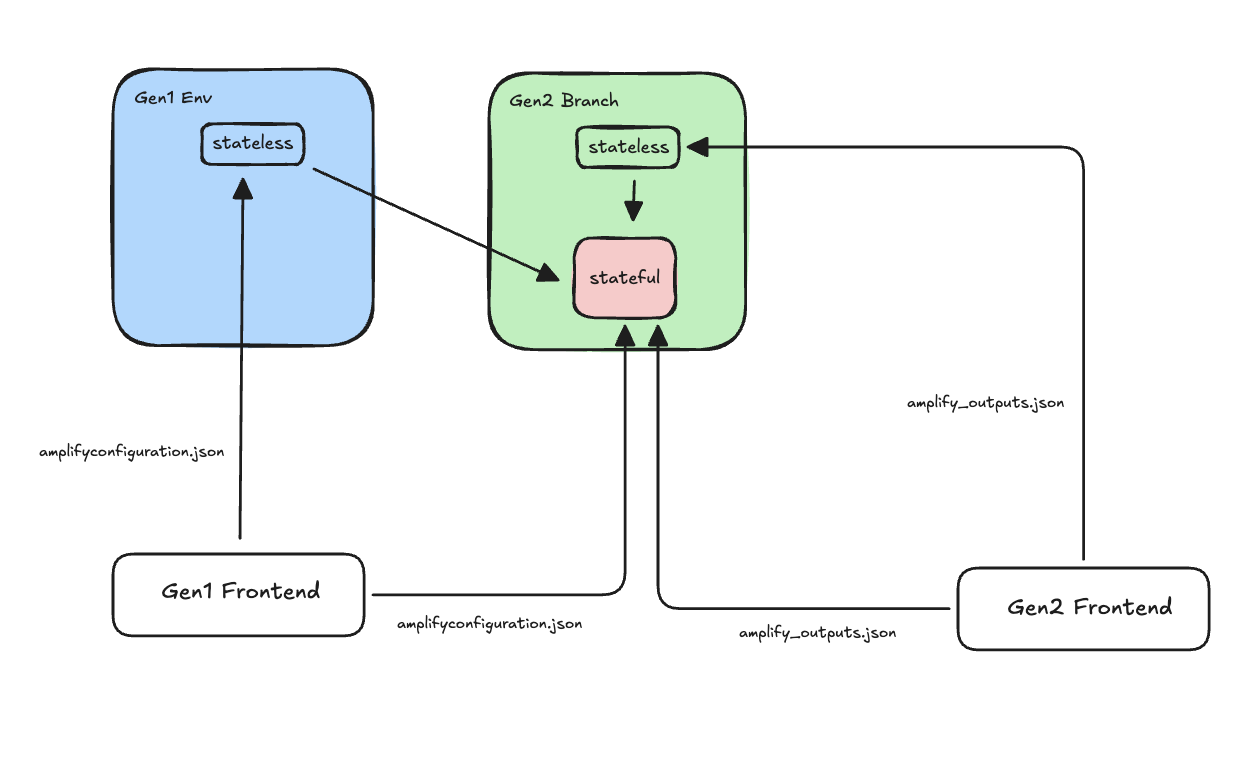
Once you are satisfied the Gen 2 application works correctly, publish a new version of your frontend that connects to the Gen 2 stateless resources. In Gen 2, the configuration file has a different structure and is called amplify_outputs.json:
import amplifyconfig from '../amplify_outputs.json';Amplify.configure(amplifyconfig);Amplify client libraries detect the different structure and adjust automatically.
Feature Coverage
Before starting the migration, carefully review the Backend Categories section of the Feature Parity page. It will help you understand whether your environment can be fully migrated, what manual work may be required for partially supported or unsupported features, and check whether your resources are compatible.
Prerequisites
DataStore
If your API has conflict resolution enabled (DataStore), you must disable it before proceeding with the Gen 2 migration. See the Migrate from DataStore guide for instructions.
GraphQL types protected by the iam auth provider
If you have models protected by IAM:
type Todo @model @auth(rules: [{ allow: private, provider: iam }]) { id: ID! name: String! description: String}After refactor, the identity pool's AuthRole is updated to point to the Gen 2 role. Since this role is external to the Gen 1 AppSync API, it is denied access by default. Your Gen 2 environment will work correctly, but your Gen 1 environment will lose IAM access to the API.
To work around this, configure a custom admin role on the Gen 1 API that matches the Gen 2 AuthRole naming pattern. Add amplify/api/<api-name>/custom-roles.json:
{ "adminRoleNames": ["amplify-${appId}"]}Where ${appId} is the Amplify application ID. Gen 2 auth role names are prefixed with this, so the pattern allows access from any Gen 2 environment (branch). Once added, redeploy by running amplify push.
Amplify CLI Version
The migration tool relies on CloudFormation template structures and metadata produced by the most recent CLI major version. Deploy your Gen 1 environment with v14 before migrating:
npm install -g @aws-amplify/cli@14amplify pushAWS Credentials
The migration tool requires the following API actions in addition to the standard Amplify CLI permissions. Add the following policy to your IAM role:
{ "Version": "2012-10-17", "Statement": [ { "Effect": "Allow", "Action": [ "cloudformation:CreateStackRefactor", "cloudformation:DescribeStackRefactor", "cloudformation:ExecuteStackRefactor", "cloudformation:GetStackPolicy", "cloudformation:SetStackPolicy", "cloudformation:DeleteChangeSet" ], "Resource": "arn:aws:cloudformation:*:*:stack/amplify-*" }, { "Effect": "Allow", "Action": [ "s3:GetBucketVersioning", "s3:GetEncryptionConfiguration" ], "Resource": "*" }, { "Effect": "Allow", "Action": [ "cloudformation:GetResource" ], "Resource": "*" } ]}CDK Readiness
Since Gen 2 uses CDK under the hood, your account and region must be bootstrapped with CDK for the Gen 2 deployment to succeed.
Frontend
Upgrade the following before starting migration:
- Upgrade to
aws-amplify@^6.16.2or later. If you are on v5, see the v5 to v6 migration guide. - If your app uses
@aws-amplify/ui-react, upgrade to^6.
Toolchain
- Node.js:
aws-cdk-librequires Node.js >= 20. Ensure your local environment and CI/CD pipeline are running Node.js 20 or later. - TypeScript: Gen 2 generated code uses modern TypeScript features. Upgrade to
^5.0.0.
Step-By-Step Migration
For clarity, the instructions below follow these conventions:
- Your Gen 1 environment is stored in the
mainbranch of a Git repository. - Your Gen 1 environment is called
main. - Deployment instructions refer to Amplify Hosting (branch deployments), but this is not required. You can use any deployment method described in the Hosting section.
First, install an Amplify CLI version that includes the migration tool and pull a fresh copy of your Gen 1 environment:
npm install -g @aws-amplify/cli@^14.4.0amplify pull --appId <app-id> --envName mainVerify your local project is in sync with the deployed environment:
amplify status # Should report no changesgit diff # Should show no changesStep 0: Clone
Before migrating a live environment, start with a cloned environment to validate the process end-to-end. Follow every step in this guide carefully, review the feature coverage and prerequisites sections to ensure your environment is ready. Understanding the scope of automation and any required manual steps ahead of time will help facilitate a smooth migration.
Use amplify env add to create a clone of your Gen 1 environment and deploy it:
# Environment names must be lowercase letters only and up to 10 charactersamplify env addamplify pushAfter deployment, verify that the cloned environment is behaving as expected and matches the behavior of your original environment before proceeding.
Run through the entire migration flow on this clone first. This lets you validate each step, catch configuration issues, and build confidence in the process. Once you are satisfied with the results, repeat the migration on your primary environment.
Step 1: Assess
Before starting the migration, evaluate whether your Gen 1 environment is ready:
amplify gen2-migration assessThis command is read-only. It discovers all resources in your Gen 1 environment and produces a report showing migration support for each resource across the generate and refactor steps. If a resource or feature is not supported for generate, the tool skips it and you can manually add the configuration to the generated Gen 2 code. If not supported for refactor, the tool skips it and you will need to manually move or migrate data from those resources.
Example assessment
Running assess on an app with auth, a GraphQL API with an override, storage, and a Lambda function with custom IAM policies produces a report like this:
Assessment For Migrating "my-app" (env: main)
Resources
┌───────────┬─────────────────────────┬────────────────┬──────────┬──────────┐│ Category  │ Service                 │ Resource       │ Generate │ Refactor │├───────────┼─────────────────────────┼────────────────┼──────────┼──────────┤│ auth      │ Cognito                 │ myappAuth      │ ✔        │ ✔        ││ auth      │ Cognito-UserPool-Groups │ userPoolGroups │ ✔        │ ✔        ││ api       │ AppSync                 │ myappApi       │ ✔        │ —        ││ storage   │ S3                      │ myappBucket    │ ✔        │ ✔        ││ function  │ Lambda                  │ processOrder   │ ✔        │ ✔        │└───────────┴─────────────────────────┴────────────────┴──────────┴──────────┘
Advanced Features
┌─────────────────┬────────────────────────────────────────────┬────────────────────────────────────────────┬──────────┐│ Name            │ Path                                       │ Generate                                   │ Refactor │├─────────────────┼────────────────────────────────────────────┼────────────────────────────────────────────┼──────────┤│ overrides       │ api/myappApi/override.ts                   │ ✘ requires adding code after generate      │ —        ││ custom-policies │ function/processOrder/custom-policies.json │ ✘ requires adding code after generate      │ —        │└─────────────────┴────────────────────────────────────────────┴────────────────────────────────────────────┴──────────┘
In this example, all resources are supported, but two features are flagged:
- The GraphQL API has an
override.tsfile — the migration tool cannot automatically translate overrides, so you'll need to manually apply those customizations to the generated Gen 2 CDK code. - The Lambda function has custom IAM policies — these need to be manually added to the function's resource definition in the Gen 2 code.
Both features show — for refactor because they only require code generation.
Support indicators: ✔ Supported (executed) · ✘ Unsupported (skipped) · — Not needed for this step (skipped)
Step 2: Lock
Validations
| Validation | Description |
|---|---|
| Environment Status | Verifies the root CloudFormation stack is in a stable state (UPDATE_COMPLETE or CREATE_COMPLETE). |
| Drift | Detects drift between your local project and the deployed CloudFormation stacks. |
During the migration period your Gen 1 environment should not undergo any changes. Disable any automatic pipelines that deploy to your Gen 1 environment, then lock it by running:
amplify gen2-migration lockThe lock step also sets a Retain deletion policy on all stateful resources in your Gen 1 stacks to protect them during migration.
Custom stateful resource types
The migration tool maintains a default list of CloudFormation resource types it considers stateful (e.g. AWS::Cognito::UserPool, AWS::S3::Bucket, AWS::DynamoDB::Table). During the lock step, only resources matching these types receive the Retain deletion policy.
If your application includes custom resources that contain stateful CloudFormation types not in the default list, you can provide them using the --additional-stateful-resource-types option. Create a JSON file with an array of CloudFormation resource type strings:
[ "AWS::Elasticsearch::Domain", "AWS::RDS::DBInstance"]Then pass the file path to the lock command:
amplify gen2-migration lock --additional-stateful-resource-types ./my-stateful-types.jsonThe types you provide are merged with the built-in defaults. This ensures the tool correctly identifies and protects your custom stateful resources.
Once validated, the following restrictive IAM policy is attached to the root stack:
{ "Statement": [{ "Effect": "Deny", "Action": "Update:*", "Principal": "*", "Resource": "*" }] }To unlock the environment, run:
amplify gen2-migration lock --rollbackStep 3: Generate
Validations
| Validation | Description |
|---|---|
| Lock Status | Verifies the Gen 1 environment is locked (deny-all stack policy is in place). |
| Working Directory | Verifies the git working directory has no uncommitted changes. |
| Assessment | Runs the resource and feature assessment for the generate step and fails if any entry is unsupported. |
Generate your Gen 2 definition files:
git checkout -b gen2-mainamplify gen2-migration generateThis command introspects your deployed Gen 1 CloudFormation stacks and generates the equivalent Gen 2 TypeScript backend definition files, overriding your local ./amplify directory. The generated code is a starting point — some features require manual edits before deploying (see below).
Custom stateful resource types
The migration tool maintains a default list of CloudFormation resource types it considers stateful (e.g. AWS::Cognito::UserPool, AWS::S3::Bucket, AWS::DynamoDB::Table). During code generation, the tool uses this list to produce a Retain deletion policy in the Gen 2 CDK code for these resources, ensuring they don't override the deletion policy of the Gen 1 resources after refactoring.
If your application includes custom resources that contain stateful CloudFormation types not in the default list, you can provide them using the --additional-stateful-resource-types option. Create a JSON file with an array of CloudFormation resource type strings:
[ "AWS::Elasticsearch::Domain", "AWS::RDS::DBInstance"]Then pass the file path to the generate command:
amplify gen2-migration generate --additional-stateful-resource-types ./my-stateful-types.jsonThe types you provide are merged with the built-in defaults. This ensures the generated Gen 2 code includes retention policies for your custom stateful resources.
Once successful, clean up and reinstall dependencies to avoid stale resolution artifacts from the Gen 1 dependency tree:
rm -rf node_modules package-lock.jsonnpm installnpm install --package-lock-onlyStep 4: Post-Generate
The generated code is a starting point but may not be immediately deployable. Some features require manual adjustments due to differences in how Gen 1 and Gen 2 handle configuration, module formats, or default behaviors. Review and apply the following edits before deploying.
Frontend
If your frontend consumes amplifyconfiguration.json, update the import:
- import amplifyconfig from './amplifyconfiguration.json';+ import amplifyconfig from '../amplify_outputs.json';If your frontend code accesses the amplifyconfiguration.json structure directly (e.g. reading specific keys like aws_user_pools_id or aws_appsync_graphqlEndpoint) instead of relying on the aws-amplify client libraries to extract configuration, you will need to adapt that code. Gen 2 produces an amplify_outputs.json file with a different structure. Code that parses the configuration file manually will break.
If you use the standard Amplify.configure(...) call and access resources through the Amplify client libraries, no changes are needed — the libraries handle both formats transparently.
REST API — The migration tool generates the full REST API CDK construct automatically. Update your frontend code to point to the new Gen 2 API name:
- apiName: '<gen1-rest-api-name>',+ apiName: '<gen2-rest-api-name>',In addition, follow these instructions to reconfigure your Amplify instance based on the outputs structure of Gen2.
Kinesis — If your frontend sends analytics events to a Kinesis stream, update the stream name to point to the new Gen 2 stream:
- streamName: '<gen1-stream-name>',+ streamName: '<gen2-stream-name>',Data
Edit ./amplify/data/resource.ts:
- branchName: "main"+ branchName: "gen2-main"This instructs the hosting service to reuse (import) the DynamoDB tables instead of recreating them.
In Gen 1, unprotected @model types are considered public and assigned @aws_api_key. In Gen 2, they are considered private and assigned @aws_iam. To preserve the same behavior, explicitly add the @auth directive:
type Todo @model @auth(rules: [{ allow: public }]) { id: ID! name: String! description: String}Functions
ESM compatibility — Port Lambda function code from CommonJS to ESM:
- exports.handler = async (event) => {+ export async function handler(event) {Gen 2 adds Lambda shims that conflict with CommonJS syntax.
Secrets — If your function uses secret values, recreate the secret in the Amplify console (Hosting → Secrets → Manage Secrets → Add new):
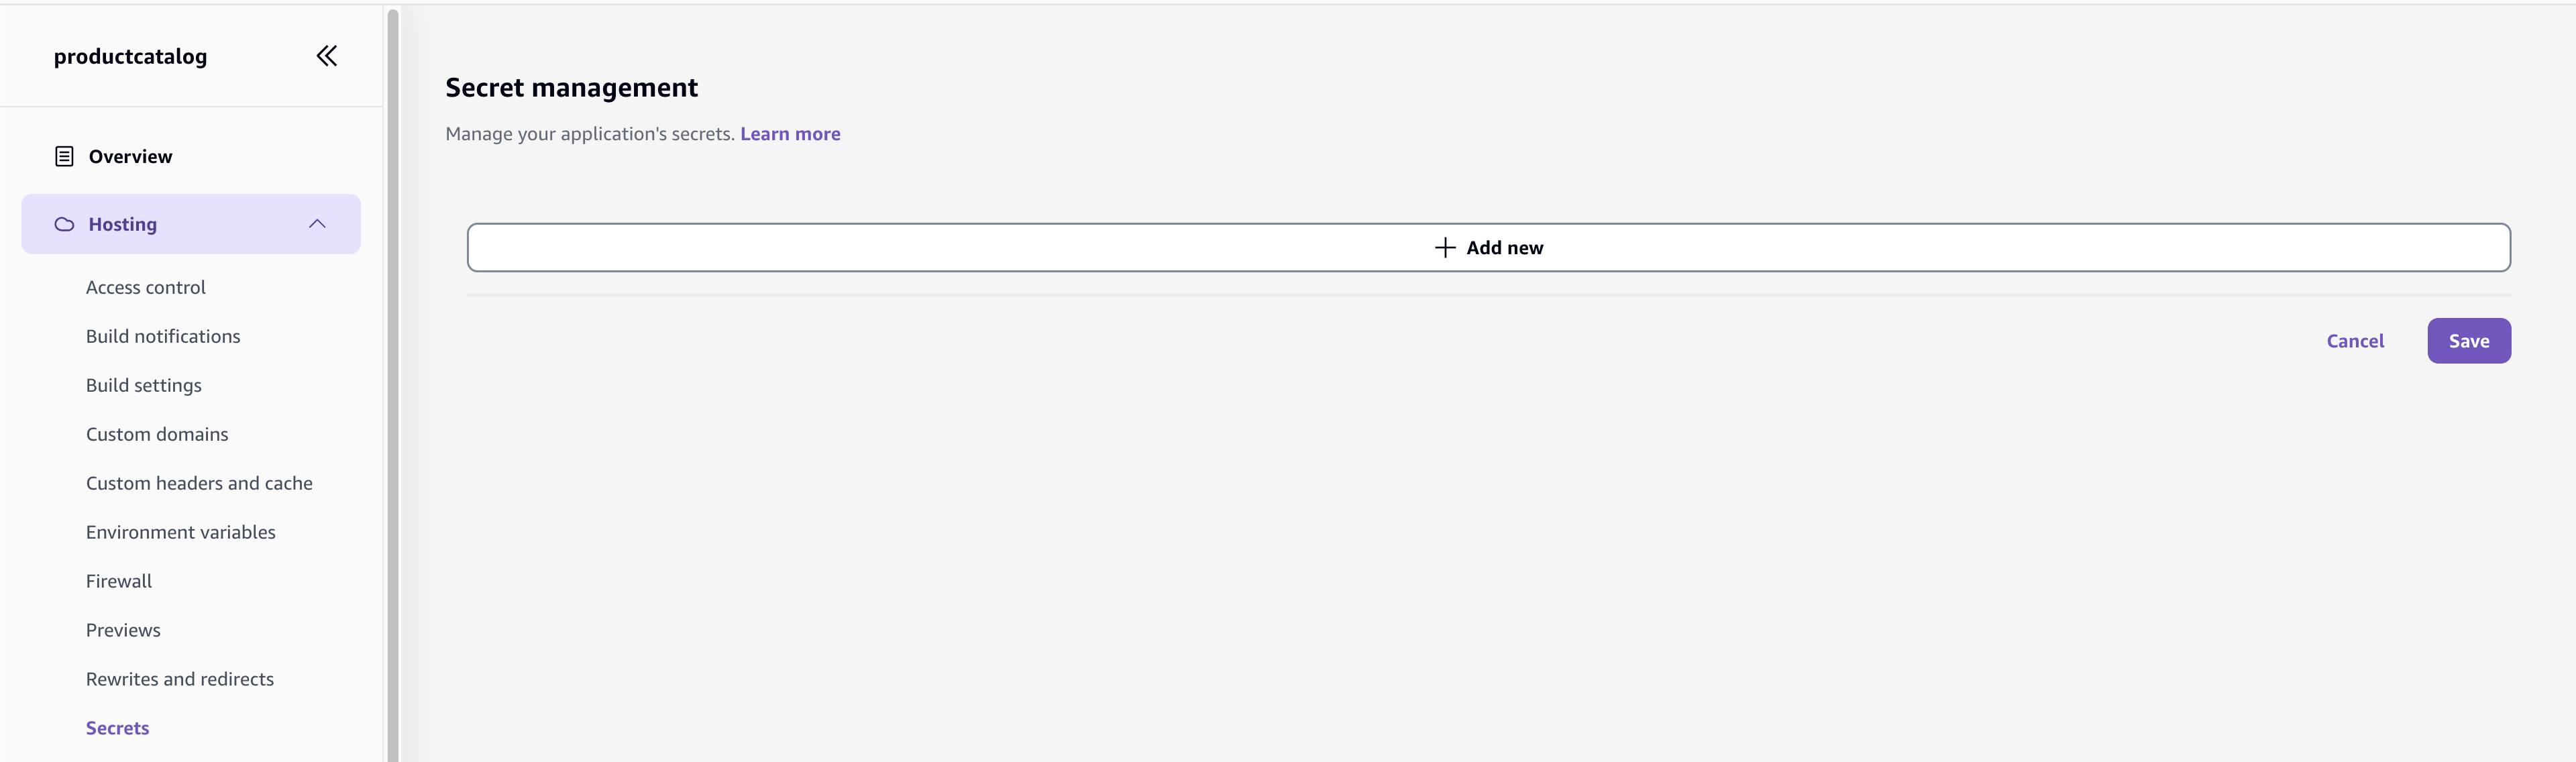
Then update the function definition:
- import { defineFunction } from "@aws-amplify/backend";+ import { defineFunction, secret } from "@aws-amplify/backend";- MY_SECRET: "/amplify/<hash>/main/AMPLIFY_<function-name>_MY_SECRET"+ MY_SECRET: secret("MY_SECRET")Then, in your function code, use process.env.MY_SECRET to obtain the secret value.
Auth
External Identity Providers
If your Gen 1 app uses social sign-in (Facebook, Google), the generated callbackUrls and logoutUrls in ./amplify/auth/resource.ts are inherited from Gen 1 and reference the Gen 1 Amplify Hosting URLs only. The Gen 2 hosting URL must be added before the Hosted UI will accept sign-ins from the Gen 2 frontend.
The generator emits a comment above each URL list as a reminder. Add the Gen 2 URL to both locations:
callbackUrls: [ 'https://main.<gen1-appId>.amplifyapp.com/',+ 'https://gen2-main.<gen2-appId>.amplifyapp.com/', ],The top-level externalProviders.callbackUrls/logoutUrls configure the web client used by the frontend. The oAuth.callbackUrls/logoutUrls inside applyEscapeHatches configure a separate native app client — update both if present.
The corresponding redirect URIs in the external provider's developer console must also be updated, after the Gen 2 environment is deployed (see Configure external identity providers below).
Step 5: Deploy
Push the generated Gen 2 code to your repository:
git add .git commit -m "feat: migrate to gen2"git push origin gen2-mainThe migration tool generates an amplify.yml buildspec file compatible with Gen 2 hosting commands, enabling Amplify Hosting to build and deploy your Gen 2 backend automatically on every push.
Log in to the AWS Amplify console and connect the new branch to your existing application. Navigate to App Settings → Branch Settings and select Add Branch:

Select the gen2-main branch and start the deployment. The Amplify Hosting service will detect the amplify.yml buildspec generated in the previous step and deploy the Gen 2 backend automatically.

Wait for the deployment to complete before proceeding to the next step.
Testing with sandbox
You can deploy using sandbox to test the Gen 2 application in full isolation from your Gen 1 environment:
npx ampx sandbox --onceBy default, sandbox creates its own DynamoDB tables and does not share Gen 1 model data. To share them, set branchName to "sandbox" in ./amplify/data/resource.ts.
Configure external identity providers
If your app uses social sign-in, the Gen 2 deployment creates a new Cognito User Pool Domain distinct from the Gen 1 one. The external provider's developer console must be updated to accept redirects from the new domain before Hosted UI sign-in will work on the Gen 2 frontend.
Open the Cognito console, select the user pool owned by your Gen 2 branch, and note the domain under App integration → Domain.
Then, add the domain to each external provider's console following the standard External identity providers guide. You do not need to replace the existing Gen 1 entries — add the Gen 2 domain alongside them so both environments work during the transition.
Step 6: Functional Tests (CRITICAL)
After deployment, verify that the Gen 2 environment is working as expected by testing all aspects of your frontend application. This includes:
- User sign-up, sign-in, and sign-out flows
- Data operations — creating, reading, updating, and deleting entities
- File uploads and downloads via Storage
- API calls (GraphQL and REST)
- Any custom business logic handled by Lambda functions
If any functionality does not work as expected, review and adjust the generated Gen 2 code accordingly. The migration tool provides a starting point, but some configurations may require manual refinement to match your application's specific behavior.
Remember that with the exception of DynamoDB model tables (which are shared), the Gen 2 environment has its own stateful resources separate from Gen 1.
Step 7: Refactor
Validations
| Validation | Description |
|---|---|
| Lock Status | Verifies the Gen 1 environment is locked (deny-all stack policy is in place). |
| Assessment | Runs the resource and feature assessment for the refactor step and fails if any entry is unsupported. |
Refactoring is the process of moving your Gen 1 stateful resources (Cognito User Pool, S3 bucket, etc.) into the Gen 2 CloudFormation stacks using the CloudFormation Refactor APIs. After this step, both your Gen 1 and Gen 2 applications share the same underlying data and user accounts — your Gen 1 environment will no longer be updatable.
Holding stacks
During the forward refactor, the tool needs to move Gen 1 stateful resources into the Gen 2 CloudFormation stacks. However, the Gen 2 stacks already contain their own resources (created during the Deploy step). CloudFormation cannot have two physical resources mapped to the same logical ID in a single stack, so the existing Gen 2 resources must be moved out of the way first.
To solve this, the tool creates temporary holding stacks — lightweight CloudFormation stacks that act as an intermediate destination for the Gen 2 resources. The forward refactor workflow proceeds in two phases per category:
- Move Gen 2 resources → holding stack. The existing Gen 2 stateful resources (e.g. the User Pool, Identity Pool, or S3 bucket that were created during deploy) are transferred to a holding stack via the CloudFormation StackRefactor API. This is a metadata-only operation — the physical resources are not recreated or modified.
- Move Gen 1 resources → Gen 2 stack. With the Gen 2 stack now clear of conflicting resources, the Gen 1 stateful resources are transferred in.
Holding stacks are named after the Gen 2 category stack they correspond to, with a -holding suffix (e.g. amplify-d123-gen2main-branch-abc-auth-holding).
Holding stacks are intentionally kept after a successful forward refactor. They enable rollback — if you run refactor --rollback, the tool moves Gen 1 resources back to the Gen 1 stacks and then restores the holding stack resources back into Gen 2, returning everything to its pre-refactor state.
First, find the name of the Gen 2 root CloudFormation stack in the AWS CloudFormation console. Look for a stack with the pattern: amplify-<appId>-gen2main-branch-<suffix>.

Then, run the refactor:
git checkout mainamplify pull --appId <appId> --envName mainamplify gen2-migration refactor --to <gen2-root-stack-name>Custom stateful resource types
The migration tool maintains a default list of CloudFormation resource types it considers stateful (e.g. AWS::Cognito::UserPool, AWS::S3::Bucket, AWS::DynamoDB::Table). During refactoring, only resources matching these types are moved from your Gen 1 stacks into Gen 2.
If your application includes custom resources that contain stateful CloudFormation types not in the default list, you can provide them using the --additional-stateful-resource-types option — the same file you used in the lock step. Create a JSON file with an array of CloudFormation resource type strings:
[ "AWS::Elasticsearch::Domain", "AWS::RDS::DBInstance"]Then pass the file path to the refactor command:
amplify gen2-migration refactor --to <gen2-root-stack-name> --additional-stateful-resource-types ./my-stateful-types.jsonThe types you provide are merged with the built-in defaults. This ensures the tool correctly identifies and transfers your custom stateful resources during the refactoring step.
If the refactor fails or produces undesired results, roll it back:
amplify gen2-migration refactor --to <gen2-root-stack-name> --rollbackIf you had already completed Step 8: Post-Refactor before rolling back, re-comment postRefactor(); in ./amplify/backend.ts on the gen2-main branch and push. The function targets resources that the Gen 2 stack no longer owns after rollback and will fail at synth otherwise.
After rolling back, you will need to unlock the Gen 1 environment and redeploy it to restore normal operation:
amplify gen2-migration lock --rollbackamplify push --forceStep 8: Post-Refactor (CRITICAL)
The refactor step creates a drift between the deployed Gen 2 CloudFormation template and your local application code. This drift must be reconciled by a deployment. Additionally, the frontend configuration file (amplify_outputs.json) relies on stack output values that need to be updated to reflect the newly transferred resources — this also requires a deployment.
git checkout gen2-mainEdit ./amplify/backend.ts:
- // postRefactor();+ postRefactor();If your application contains a Kinesis stream, update the frontend to point back to the original Gen 1 stream name (which is now managed by the Gen 2 stack):
- streamName: '<gen2-stream-name>',+ streamName: '<gen1-stream-name>',Step 9: Deploy
Push the changes and wait for the deployment to finish:
git add .git commit -m "fix: post refactor"git push origin gen2-mainDecommissioning Gen 1
After migration, the Gen 1 environment is no longer a valid Amplify environment — its stateful resources have been refactored into the Gen 2 stacks and internal references have been resolved.
The Gen 1 CloudFormation stacks may still contain resources (such as auth triggers custom resource) that reference the refactored resources now owned by Gen 2. Deleting these stacks through normal means would trigger resource cleanup, which could disrupt your migrated environment.
To decommission the Gen 1 stacks:
- Verify that no users or applications are still accessing the Gen 1 stateless resources by inspecting CloudWatch traffic metrics or your organizational tracking systems.
- Apply the
Retaindeletion policy to resources in the Gen 1 nested CloudFormation stacks. This prevents CloudFormation from deleting the retained resources when the root stack is removed. Note that theretaincommand only applies to resources in the nested stacks — resources in the root stack itself are not retained.
amplify gen2-migration retain- Delete the Gen 1 root CloudFormation stack. Resources in the nested stacks will be retained (orphaned) thanks to the deletion policy applied in the previous step. Resources in the root stack itself will be deleted normally.
- Manually delete individual orphaned resources that are no longer needed (e.g. AppSync APIs, Lambda functions, IAM roles) — verifying each one is safe to remove.
Troubleshooting
Known Issues
See open migration issues on GitHub.
Node.js Dependencies Installation
Gen 1 Lambda functions may have dependencies declared in their package.json files. During generate, these are merged into the root package.json and can conflict with one another. If your Gen 2 deployment fails due to installation errors, inspect the root package.json and resolve conflicts manually.
Circular CloudFormation Dependencies
Gen 1 apps where functions access multiple other resources (e.g. a query handler that also needs access to the data API, or an auth trigger that depends on storage) can produce circular dependencies between CloudFormation nested stacks when deployed as Gen 2. See Troubleshoot circular dependency issues for resolution steps.