GraphQL API
AWS AppSync helps you build data-driven apps with real-time and offline capabilities. The AppSync Android SDK enables you to integrate your app with the AWS AppSync service and is based off of the Apollo project found here. The SDK supports multiple authorization models, handles subscription handshake protocols for real-time updates to data, and has built-in capabilities for offline support that makes it easy to integrate into your app.
You can integrate with AWS AppSync using the following steps:
- Setup the API endpoint and authentication information in the client side configuration.
- Generate Java code from the API schema.
- Write app code to run queries, mutations and subscriptions.
The Amplify CLI provides support for AppSync that make this process easy. Using the CLI, you can configure an AWS AppSync API, download required client side configuration files, and generate client side code within minutes by running a few simple commands on the command line.
Configuration
The AWS SDKs support configuration through a centralized file called awsconfiguration.json that defines your AWS regions and service endpoints. You obtain this file in one of two ways, depending on whether you are creating your AppSync API in the AppSync console or using the Amplify CLI.
-
If you are creating your API in the console, navigate to the
Getting Startedpage, and follow the steps in theIntegrate with your appsection. Theawsconfiguration.jsonfile you download is already populated for your specific API. Place the file in the./app/src/main/res/rawdirectory of your Android Studio project for code generation. -
If you are creating your API with the Amplify CLI (using
amplify add api), theawsconfiguration.jsonfile is automatically downloaded and updated each time you runamplify pushto update your cloud resources. The file is placed in the./app/src/main/res/rawdirectory of your Android Studio project.
Code Generation
To execute GraphQL operations in Android you need to run a code generation process, which requires both the GraphQL schema and the statements (for example, queries, mutations, or subscriptions) that your client defines. The Amplify CLI toolchain makes this easy for you by automatically pulling down your schema and generating default GraphQL queries, mutations, and subscriptions before kicking off the code generation process using Gradle. If your client requirements change, you can alter these GraphQL statements and kick off a Gradle build again to regenerate the types.
AppSync APIs Created in the Console
After installing the Amplify CLI open a terminal, go to your Android Studio project root, and then run the following:
amplify initamplify add codegen --apiId XXXXXXThe XXXXXX is the unique AppSync API identifier that you can find in the console in the root of your API's integration page. When you run this command you can accept the defaults, which create a ./src/main.graphql folder structure with your statements. When you add the required Gradle dependencies later, the generated packages are automatically added to your project.
Note: It is not necessary to run the command amplify codegen after adding an API, as code generation is done by the Gradle build process. However, if you subsequently update your API in the AppSync Console, you will need to re-run amplify codegen to update the local schema.json and .graphql with the modified schema.
AppSync APIs Created Using the CLI
Navigate in your terminal to an Android Studio project directory and run the following:
amplify init ## Select Android as your platformamplify add api ## Select GraphQL, API key, "Single object with fields Todo application"Select GraphQL when prompted for service type:
? Please select from one of the below mentioned services (Use arrow keys)❯ GraphQL RESTThe add api flow above will ask you some questions, such as if you already have an annotated GraphQL schema. If this is your first time using the CLI select No and let it guide you through the default project "Single object with fields (e.g., “Todo” with ID, name, description)" as it will be used in the code examples below. Later on, you can always change it.
Name your GraphQL endpoint and select authorization type:
? Please select from one of the below mentioned services GraphQL? Provide API name: myTodosApi? Choose an authorization type for the API (Use arrow keys)❯ API key Amazon Cognito User PoolWhen you update your backend with push command, you can go to AWS AppSync Console and see that a new API is added under APIs menu item:
amplify pushThe amplify push process will prompt you to enter the codegen process and walk through configuration options. Accept the defaults and it will create a ./src/main.graphql folder structure with your documents. You also will have an awsconfiguration.json file that the AppSync client will use for initialization. At any time you can open the AWS console for your new API directly by running the following command:
amplify console apiWhen prompted, select GraphQL. This will open the AWS AppSync console for you to run Queries, Mutations, or Subscriptions at the server and see the changes in your client app.
Import SDK and Config
To use AppSync in your Android studio project, modify the project's build.gradle by adding the Maven plugin repositories, and the AppSync Gradle plugin to dependencies.
buildscript {    repositories {        maven {            url "https://plugins.gradle.org/m2/"        }        // ...    }
    dependencies {        classpath 'com.amazonaws:aws-android-sdk-appsync-gradle-plugin:3.4.0'        // ...    }    // ...}
allprojects {    repositories {        maven {            url "https://plugins.gradle.org/m2/"        }        // ...    }    // ...}
Next, in the build.gradle (Module :app) file, add in a plugin of apply plugin: 'com.amazonaws.appsync' and a dependency of implementation 'com.amazonaws:aws-android-sdk-appsync:3.4.0'. For example:
plugins { id 'com.android.application' id 'com.amazonaws.appsync' // REQUIRED}android { // Typical items}dependencies { // REQUIRED: Typical dependencies implementation 'com.amazonaws:aws-android-sdk-appsync:3.4.0'}Finally, update your AndroidManifest.xml with updates to <uses-permissions> for network calls and offline state.
<uses-permission android:name="android.permission.INTERNET"/>    <uses-permission android:name="android.permission.ACCESS_NETWORK_STATE"/>    <uses-permission android:name="android.permission.WAKE_LOCK" />    <uses-permission android:name="android.permission.READ_PHONE_STATE" />    <uses-permission android:name="android.permission.WRITE_EXTERNAL_STORAGE"/>    <uses-permission android:name="android.permission.READ_EXTERNAL_STORAGE"/>
            <!--other code-->
        <application            android:allowBackup="true"            android:icon="@mipmap/ic_launcher"            android:label="@string/app_name"            android:roundIcon="@mipmap/ic_launcher_round"            android:supportsRtl="true"            android:theme="@style/AppTheme">
            <!--other code-->        </application>
Build your Project
Do not skip this step! Run gradlew build, or build your application via Android Studio. This will trigger the AppSync Gradle plugin that you added above to generate Java classes in your build folder based off of your schema files. These classes will be needed before proceeding to the steps below.
Client Initialization
Inside your application code, such as the onCreate() lifecycle method of your activity class, you can initialize the AppSync client using an instance of AWSConfiguration() in the AWSAppSyncClient builder like the following:
private AWSAppSyncClient mAWSAppSyncClient;
@Overrideprotected void onCreate(Bundle savedInstanceState) {    super.onCreate(savedInstanceState);    setContentView(R.layout.activity_main);    mAWSAppSyncClient = AWSAppSyncClient.builder()            .context(getApplicationContext())            .awsConfiguration(new AWSConfiguration(getApplicationContext()))            // If you are using complex objects (S3) then uncomment            //.s3ObjectManager(new S3ObjectManagerImplementation(new AmazonS3Client(AWSMobileClient.getInstance())))            .build();}
AWSConfiguration() reads configuration information in the awsconfiguration.json file. By default, the information in the Default section of the json file is used.
Run a Query
Now that the client is configured, you can run a GraphQL query. The syntax of the callback is GraphQLCall.Callback<{NAME}Query.Data> where {NAME} comes from the GraphQL statements that amplify codegen created after you ran a Gradle build. You invoke this from an instance of the AppSync client with a similar syntax of .query({NAME}Query.builder().build()). For example, if you have a ListTodos query, your code will look like the following:
public void query(){    mAWSAppSyncClient.query(ListTodosQuery.builder().build())            .responseFetcher(AppSyncResponseFetchers.CACHE_AND_NETWORK)            .enqueue(todosCallback);}
private GraphQLCall.Callback<ListTodosQuery.Data> todosCallback = new GraphQLCall.Callback<ListTodosQuery.Data>() {    @Override    public void onResponse(@Nonnull Response<ListTodosQuery.Data> response) {        Log.i("Results", response.data().listTodos().items().toString());    }
    @Override    public void onFailure(@Nonnull ApolloException e) {        Log.e("ERROR", e.toString());    }};
Optionally, you can change the cache policy on AppSyncResponseFetchers, but we recommend leaving CACHE_AND_NETWORK because it pulls results from the local cache first before retrieving data over the network. This gives a snappy UX and offline support.
Run a Mutation
To add data you need to run a GraphQL mutation. The syntax of the callback is GraphQLCall.Callback<{NAME}Mutation.Data> where {NAME} comes from the GraphQL statements that amplify codegen created after a Gradle build. However, most GraphQL schemas organize mutations with an input type for maintainability, which is what the Amplify CLI does as well. Therefore you'll pass this as a parameter called input created with a second builder. You invoke this from an instance of the AppSync client with a similar syntax of .mutate({NAME}Mutation.builder().input({Name}Input).build()) like the following:
public void mutation(){    CreateTodoInput createTodoInput = CreateTodoInput.builder()        .name("Use AppSync")        .description("Realtime and Offline")        .build();
    mAWSAppSyncClient.mutate(CreateTodoMutation.builder().input(createTodoInput).build())        .enqueue(mutationCallback);}
private GraphQLCall.Callback<CreateTodoMutation.Data> mutationCallback = new GraphQLCall.Callback<CreateTodoMutation.Data>() {    @Override    public void onResponse(@Nonnull Response<CreateTodoMutation.Data> response) {        Log.i("Results", "Added Todo");    }
    @Override    public void onFailure(@Nonnull ApolloException e) {        Log.e("Error", e.toString());    }};
Subscribe to Data
Finally, it's time to set up a subscription to real-time data. The callback is just AppSyncSubscriptionCall.Callback and you invoke it with a client .subscribe() call and pass in a builder with syntax of {NAME}Subscription.builder() where {NAME} comes from the GraphQL statements that amplify codegen and Gradle build created. Note that the AppSync console and Amplify GraphQL transformer have a common nomenclature that puts the word On in front of a subscription as in the following example:
private AppSyncSubscriptionCall<OnCreateTodoSubscription.Data> subscriptionWatcher;
private void subscribe() {    OnCreateTodoSubscription subscription = OnCreateTodoSubscription.builder().build();    subscriptionWatcher = mAWSAppSyncClient.subscribe(subscription);    subscriptionWatcher.execute(subCallback);}
private AppSyncSubscriptionCall.Callback<OnCreateTodoSubscription.Data> subCallback = new AppSyncSubscriptionCall.Callback<OnCreateTodoSubscription.Data>() {    @Override    public void onResponse(@Nonnull Response<OnCreateTodoSubscription.Data> response) {        Log.i("Subscription", response.data().toString());    }
    @Override    public void onFailure(@Nonnull ApolloException e) {        Log.e("Subscription", e.toString());    }
    @Override    public void onCompleted() {        Log.i("Subscription", "Subscription completed");    }};
Subscriptions can also take input types like mutations, in which case they will be subscribing to particular events based on the input.
Background Tasks
All GraphQL operations in the Android client are automatically run as asynchronous tasks and can be safely called from any thread. If you have a need to run GraphQL operations from a background thread you can do it with a Runnable() like the example below:
final CountDownLatch mCountDownLatch = new CountDownLatch(1);
new Thread(new Runnable() {    @Override    public void run() {        Looper.prepare();
        //Prepare GraphQL operation...        AddPostMutation addPostMutation = AddPostMutation.builder().input(createPostInput).build();
        awsAppSyncClient            .mutate(addPostMutation)            .enqueue(new GraphQLCall.Callback<AddPostMutation.Data>() {                @Override                public void onResponse(@Nonnull final Response<AddPostMutation.Data> response) {                    addPostMutationResponse = response;                    mCountDownLatch.countDown();                    if (Looper.myLooper() != null) {                        Looper.myLooper().quit();                    }                }
                @Override                public void onFailure(@Nonnull final ApolloException e) {                    e.printStackTrace();                    //Set to null to indicate failure                    addPostMutationResponse = null;                    mCountDownLatch.countDown();                    if (Looper.myLooper() != null) {                        Looper.myLooper().quit();                    }                }            });
        Looper.loop();
    }}).start();
try {    mCountDownLatch.await(60, TimeUnit.SECONDS);} catch (InterruptedException iex) {    iex.printStackTrace();}
Client Architecture
The AppSync client supports offline scenarios with a programming model that provides a "write through cache". This allows you to both render data in the UI when offline as well as add/update through an "optimistic response". The below diagram shows how the AppSync client interfaces with the network GraphQL calls, it's offline mutation queue, the Apollo cache, and your application code.
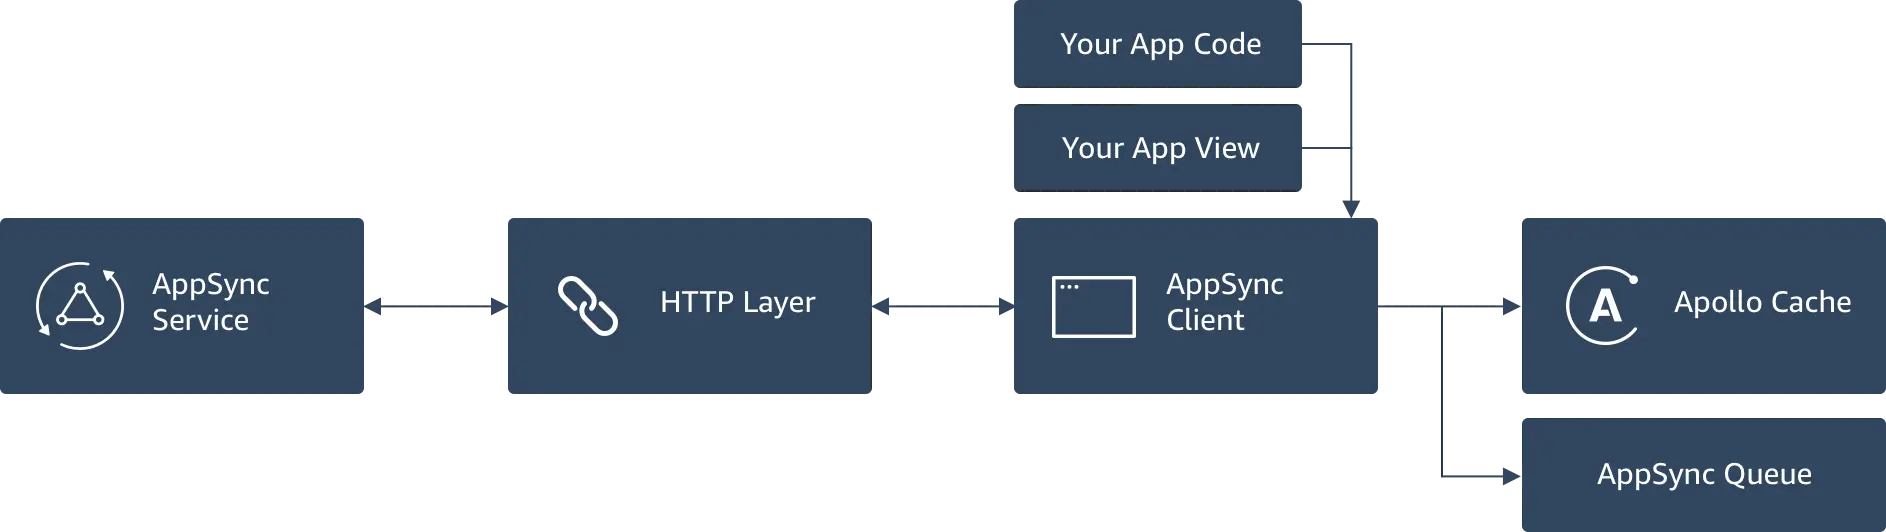
Your application code will interact with the AppSync client to perform GraphQL queries, mutations, or subscriptions. The AppSync client automatically performs the correct authorization methods when interfacing with the HTTP layer adding API Keys, tokens, or signing requests depending on how you have configured your setup. When you do a mutation, such as adding a new item (like a blog post) in your app the AppSync client adds this to a local queue (persisted to disk with SQLite) when the app is offline. When network connectivity is restored the mutations are sent to AppSync in serial allowing you to process the responses one by one.
Any data returned by a query is automatically written to the Apollo Cache (e.g. “Store”) that is persisted to disk via SQLite. The cache is structured as a key value store using a reference structure. There is a base “Root Query” where each subsequent query resides and then references their individual item results. You specify the reference key (normally “id”) in your application code. An example of the cache that has stored results from a “listPosts” query and “getPost(id:1)” query is below.
| Key | Value |
|---|---|
| ROOT_QUERY | [ROOT_QUERY.listPosts, ROOT_QUERY.getPost(id:1)] |
| ROOT_QUERY.listPosts | {0, 1, ...,N} |
| Post:0 | {author:"Nadia", content:"ABC"} |
| Post:1 | {author:"Shaggy", content:"DEF"} |
| ... | ... |
| Post:N | {author:"Pancho", content:"XYZ"} |
| ROOT_QUERY.getPost(id:1) | ref: $Post:1 |
Notice that the cache keys are normalized where the getPost(id:1) query references the same element that is part of the listPosts query. This happens automatically on Android by using id as a common cache key to uniquely identify the objects. You can choose to change the cache key with the .resolver() method when creating the AWSAppSyncClient:
AWSAppSyncClient.builder()    .context(context)    .awsConfiguration(awsConfiguration)    .resolver(new CacheKeyResolver() {        @Nonnull        @Override        public CacheKey fromFieldRecordSet(@Nonnull ResponseField field, @Nonnull Map<String, Object> recordSet) {            return (CacheKey) recordSet.get("myKey");   //Use "mykey" instead as your cache key        }
        @Nonnull        @Override        public CacheKey fromFieldArguments(@Nonnull ResponseField field, @Nonnull Operation.Variables variables) {            return (CacheKey) field.resolveArgument("id", variables);        }    }).build();
If you are performing a mutation, you can write an “optimistic response” anytime to this cache even if you are offline. You use the AppSync client to connect by passing in the query to update, reading the items off the cache. This normally returns a single item or list of items, depending on the GraphQL response type of the query to update. At this point you would add to the list, remove, or update it as appropriate and write back the response to the store persisting it to disk. When you reconnect to the network any responses from the service will overwrite the changes as the authoritative response.
Offline Mutations
As outlined in the architecture section, all query results are automatically persisted to disc with the AppSync client. For updating data through mutations when offline you will need to use an "optimistic response" by writing directly to the store. This is done by querying the store directly with client.query().responseFetcher() and passing in AppSyncResponseFetchers.CACHE_ONLY to pull the records for a specific query that you wish to update.
For example, the below code shows how you would update the CreateTodoMutation mutation from earlier by creating a optimisticWrite(CreateTodoInput createTodoInput) helper method that has the same input. This adds an item to the cache by first adding query results to a local array with items.addAll(response.data().listTodos().items()) followed by the individual update using items.add(). You commit the record with client.getStore().write(). This example uses a locally generated unique identifier which might be enough for your app, however if the AppSync response returns a different value for ID (which many times is the case as best practice is generation of IDs at the service layer) then you will need to replace the value locally when a response is received. This can be done in the onResponse() method of the top level mutation callback by again querying the store, removing the item and calling client.getStore().write().
private void optimisticWrite(CreateTodoInput CreateTodoInput){    final CreateTodoMutation.CreateTodo expected =            new CreateTodoMutation.CreateTodo(                    "Pet",                          //GraphQL Type name                    UUID.randomUUID().toString(),                    createTodoInput.name(),                    createTodoInput.description());
    final AWSAppSyncClient client = ClientFactory.appSyncClient();    final ListTodosQuery listTodosQuery = ListTodosQuery.builder().build();
    client.query(listTodosQuery).responseFetcher(AppSyncResponseFetchers.CACHE_ONLY)            .enqueue(new GraphQLCall.Callback<ListTodosQuery.Data>() {                @Override                public void onResponse(@Nonnull Response<ListTodosQuery.Data> response) {                    //Populate a copy of the query in the cache                    List<ListTodosQuery.Item> items = new ArrayList<>();                    if(response.data() != null){                        items.addAll(response.data().listTodos().items());                    }
                    //Add the newly created item to the cache copy                    items.add(new ListTodosQuery.Item(expected.__typename(),                            expected.id(), expected.name(), expected.description()));
                    //Overwrite the cache with the new results                    ListTodosQuery.Data data = new ListTodosQuery.Data(new ListTodosQuery.ListTodos(                            "ModelPetConnection", items, null                    ));
                        client.getStore().write(listTodosQuery, data).enqueue(null);                        Log.i(TAG, "Successfully added item to local store");                }
                @Override                public void onFailure(@Nonnull ApolloException e) {                    Log.e(TAG, "Failed to add item ", e);                }            });}
Usage in your application would be like the following:
CreateTodoInput createTodoInput = CreateTodoInput.builder().    name("Use AppSync").    description("Realtime and Offline").    build();
mAWSAppSyncClient.mutate(CreateTodoMutation.builder().input(createTodoInput).build())    .enqueue(mutationCallback);
optimisticWrite(createTodoInput);
You might add similar code in your app for updating or deleting items using an optimistic response, it would look largely similar except that you might overwrite or remove an element from the response.data().listTodos().items() array. A recommended best practice would be to create similar overloaded methods for optimisticWrite(UpdateTodoInput updateTodoInput) and optimisticWrite(DeleteTodoInput deleteTodoInput).
Offline mutations work by default and are available in memory, as well as through app restarts. The onResponse callback in mutations is received when the network is available and will be executed as long as the app wasn't closed. However if the app was closed or crashed, the persistentMutationsCallback will be called in the AWSAppSyncClient builder which has information about the mutation type and identifier. You should use this in your client initialization routine to protect against any unknown app behaviors such as application errors or user interference:
private AWSAppSyncClient mAWSAppSyncClient = AWSAppSyncClient.builder()    .context(getApplicationContext())    .awsConfiguration(new AWSConfiguration(getApplicationContext()))    .persistentMutationsCallback(new PersistentMutationsCallback() {        @Override        public void onResponse(PersistentMutationsResponse response) {        if (response.getMutationClassName().equals("AddPostMutation")) {            // perform action here add post mutation        }        }
        @Override        public void onFailure(PersistentMutationsError error) {        // handle error feedback here        }    })    .build();
Authorization Modes
For client authorization AppSync supports API Keys, Amazon IAM credentials (we recommend using Amazon Cognito Identity Pools for this option), Amazon Cognito User Pools, and 3rd party OIDC providers. This is inferred from the awsconfiguration.json when you call .awsConfiguration() on the AWSAppSyncClient builder.
API Key
API Key is the easiest way to setup and prototype your application with AppSync. It's also a good option if your application is completely public. If your application needs to interact with other AWS services besides AppSync, such as S3, you will need to use IAM credentials provided by Cognito Identity Pools, which also supports "Guest" access. See the authentication section for more details. For manual configuration, add the following snippet to your awsconfiguration.json file:
{ "AppSync": { "Default": { "ApiUrl": "YOUR-GRAPHQL-ENDPOINT", "Region": "us-east-1", "ApiKey": "YOUR-API-KEY", "AuthMode": "API_KEY" } }}Add the following code to your app:
private AWSAppSyncClient mAWSAppSyncClient = AWSAppSyncClient.builder() .context(getApplicationContext()) .awsConfiguration(new AWSConfiguration(getApplicationContext())) .build();Cognito User Pools
Amazon Cognito User Pools is the most common service to use with AppSync when adding user Sign-Up and Sign-In to your application. If your application needs to interact with other AWS services besides AppSync, such as S3, you will need to use IAM credentials with Cognito Identity Pools. The Amplify CLI can automatically configure this for you when running amplify add auth and can also automatically federate User Pools with Identity Pools. This allows you to have both User Pool credentials for AppSync and AWS credentials for S3. You can then use the AWSMobileClient for automatic credentials refresh as outlined in the authentication section. For manual configuration, add the following snippet to your awsconfiguration.json file:
{ "CognitoUserPool": { "Default": { "PoolId": "POOL-ID", "AppClientId": "APP-CLIENT-ID", "Region": "us-east-1" } }, "AppSync": { "Default": { "ApiUrl": "YOUR-GRAPHQL-ENDPOINT", "Region": "us-east-1", "AuthMode": "AMAZON_COGNITO_USER_POOLS" } }}Add the following code to your app passing tokens from the AWSMobileClient to cognitoUserPoolsAuthProvider() like so:
private AWSAppSyncClient mAWSAppSyncClient = AWSAppSyncClient.builder() .context(getApplicationContext()) .awsConfiguration(new AWSConfiguration(getApplicationContext())) .cognitoUserPoolsAuthProvider(new CognitoUserPoolsAuthProvider() { @Override public String getLatestAuthToken() { try { return AWSMobileClient.getInstance().getTokens().getIdToken().getTokenString(); } catch (Exception e){ Log.e("APPSYNC_ERROR", e.getLocalizedMessage()); return e.getLocalizedMessage(); } } }).build();IAM
When using AWS IAM in a mobile application you should leverage Amazon Cognito Identity Pools. The Amplify CLI can automatically configure this for you when running amplify add auth. You can then use the AWSMobileClient for automatic credentials refresh as outlined in the authentication section For manual configuration, add the following snippet to your awsconfiguration.json file:
{ "CredentialsProvider": { "CognitoIdentity": { "Default": { "PoolId": "YOUR-COGNITO-IDENTITY-POOLID", "Region": "us-east-1" } } }, "AppSync": { "Default": { "ApiUrl": "YOUR-GRAPHQL-ENDPOINT", "Region": "us-east-1", "AuthMode": "AWS_IAM" } }}Then pass the AWSMobileClient to credentialsProvider() like so:
private AWSAppSyncClient mAWSAppSyncClient = AWSAppSyncClient.builder() .context(context) .awsConfiguration(new AWSConfiguration(getApplicationContext())) .credentialsProvider(AWSMobileClient.getInstance()) .build();OIDC
If you are using a 3rd party OIDC provider you will need to configure it and manage the details of token refreshes yourself. Update the awsconfiguration.json file and code snippet as follows:
{ "AppSync": { "Default": { "ApiUrl": "YOUR-GRAPHQL-ENDPOINT", "Region": "us-east-1", "AuthMode": "OPENID_CONNECT" } }}Add the following code to your app (MyOIDCAuthProvider is just for example purposes):
private AWSAppSyncClient mAWSAppSyncClient = AWSAppSyncClient.builder()    .context(context)    .awsConfiguration(new AWSConfiguration(getApplicationContext()))    .oidcAuthProvider(new OidcAuthProvider() {        @Override        public String getLatestAuthToken() {            return MyOIDCAuthProvider();        }    })    .build();
private static String MyOIDCAuthProvider(){    // Fetch the JWT token string from OIDC Identity provider    // after the user is successfully signed-in    return "token";}
Multi-Auth
This section talks about the capability of AWS AppSync to configure multiple authorization modes for a single AWS AppSync endpoint and region. Follow the AWS AppSync Multi-Auth to configure multiple authorization modes for your AWS AppSync endpoint.
You can now configure a single GraphQL API to deliver private and public data. Private data requires authenticated access using authorization mechanisms such as IAM, Cognito User Pools, and OIDC. Public data does not require authenticated access and is delivered through authorization mechanisms such as API Keys. You can also configure a single GraphQL API to deliver private data using more than one authorization type. For example, you can configure your GraphQL API to authorize some schema fields using OIDC, while other schema fields through Cognito User Pools and/or IAM.
As discussed in the above linked documentation, certain fields may be protected by different authorization types. This can lead the same query, mutation, or subscription to have different responses based on the authorization sent with the request; Therefore, it is recommended to use different AWSAppSyncClient objects for each authorization type. Instantiation of multiple AWSAppSyncClient objects is enabled by passing true to the useClientDatabasePrefix flag. The awsconfiguration.json generated by the AWS AppSync console and Amplify CLI will add an entry called ClientDatabasePrefix in the "AppSync" section. This will be used to differentiate the databases used for operations such as queries, mutations, and subscriptions.
The following snippets highlight the new values in the awsconfiguration.json and the client code configurations.
awsconfiguration.json based client instantiation
The friendly_name illustrated here is created from Amplify CLI prompt. There are 4 clients in this configuration that connect to the same API except that they use different AuthMode and ClientDatabasePrefix.
{ "Version": "1.0", "AppSync": { "Default": { "ApiUrl": "https://xyz.us-west-2.amazonaws.com/graphql", "Region": "us-west-2", "AuthMode": "API_KEY", "ApiKey": "da2-xyz", "ClientDatabasePrefix": "friendly_name_API_KEY" }, "friendly_name_AWS_IAM": { "ApiUrl": "https://xyz.us-west-2.amazonaws.com/graphql", "Region": "us-west-2", "AuthMode": "AWS_IAM", "ClientDatabasePrefix": "friendly_name_AWS_IAM" }, "friendly_name_AMAZON_COGNITO_USER_POOLS": { "ApiUrl": "https://xyz.us-west-2.amazonaws.com/graphql", "Region": "us-west-2", "AuthMode": "AMAZON_COGNITO_USER_POOLS", "ClientDatabasePrefix": "friendly_name_AMAZON_COGNITO_USER_POOLS" }, "friendly_name_OPENID_CONNECT": { "ApiUrl": "https://xyz.us-west-2.amazonaws.com/graphql", "Region": "us-west-2", "AuthMode": "OPENID_CONNECT", "ClientDatabasePrefix": "friendly_name_OPENID_CONNECT" } }}The useClientDatabasePrefix is added on the client builder which signals to the builder that the ClientDatabasePrefix should be used from the AWSConfiguration object (awsconfiguration.json).
AWSAppSyncClient client = AWSAppSyncClient.builder() .context(getApplicationContext()) .awsConfiguration(new AWSConfiguration(getApplicationContext())) .useClientDatabasePrefix(true) .build();The following code creates a client factory to retrieve the client based on the authorization mode: public (API Key) or private (AWS IAM).
// AppSyncClientMode.javapublic enum AppSyncClientMode {    PUBLIC,    PRIVATE}
// ClientFactory.javapublic class ClientFactory {
    private static Map<AWSAppSyncClient> CLIENTS;
    public static AWSAppSyncClient getAppSyncClient(AppSyncClientMode choice) {        return CLIENTS[choice];    }
    public static void initClients(final Context context) {        AWSConfiguration awsConfigPublic = new AWSConfiguration(context);        CLIENTS[PUBLIC] = AWSAppSyncClient.builder()                                  .context(context)                                  .awsConfiguration(awsConfigPublic)                                  .useClientDatabasePrefix(true)                                  .build();
        AWSConfiguration awsConfigPrivate = new AWSConfiguration(context);        awsConfigPrivate.setConfiguration("friendly_name_AWS_IAM");        CLIENTS[PRIVATE] = AWSAppSyncClient.builder()                                   .context(context)                                   .awsConfiguration(awsConfigPrivate)                                   .useClientDatabasePrefix(true)                                   .credentialsProvider(AWSMobileClient.getInstance())                                   .build();    }}
This is what the usage would look like.
ClientFactory.getAppSyncClient(AppSyncClientMode.PRIVATE).query(fooQuery).execute();The following example uses API_KEY as the default authorization mode and AWS_IAM as an additional authorization mode.
type Post @aws_api_key @aws_iam { id: ID! author: String! title: String content: String url: String @aws_iam ups: Int @aws_iam downs: Int @aws_iam version: Int!}-
Add a post (Mutation) through
CLIENTS[PRIVATE]usingAWS_IAMauthorization mode. -
Query the post through
CLIENTS[PRIVATE]usingAWS_IAMauthorization mode. -
Query the post through
CLIENTS[PUBLIC]usingAPI_KEYauthorization mode.
apiKeyAppSyncClient.query(GetPostQuery.builder().id(id).build())        .responseFetcher(responseFetcher)        .enqueue(new GraphQLCall.Callback<GetPostQuery.Data>() {            @Override            public void onResponse(@Nonnull Response<GetPostQuery.Data> response) {                GetPost post = response.data().getPost();                post.id();                post.author();                post.title();                post.content();                post.version();
                post.url(); // Null - because it's not authorized                post.ups(); // Null - because it's not authorized                post.downs(); // Null - because it's not authorized
                if (response.hasErrors()) {	                	Log.d(TAG, response.errors().get(0).message()); // "Not Authorized to access url on type Post"	                	Log.d(TAG, response.errors().get(1).message()); // "Not Authorized to access ups on type Post"	                	Log.d(TAG, response.errors().get(2).message()); // "Not Authorized to access downs on type Post"                }            }
            @Override            public void onFailure(@Nonnull ApolloException e) {                e.printStackTrace();            }        });
Code based client instantiation
You can use the AWSAppSyncClientBuilder as an alternative to using awsconfiguration.json.
// AppSyncClientMode.javapublic enum AppSyncClientMode {    PUBLIC,    PRIVATE}
// ClientFactory.javapublic class ClientFactory {
    private static Map<AWSAppSyncClient> CLIENTS;
    public static AWSAppSyncClient getAppSyncClient(AppSyncClientMode choice) {        return CLIENTS[choice];    }
    public static void initClients(final Context context) {        AWSConfiguration awsConfigPublic = new AWSConfiguration(context);        CLIENTS[PUBLIC] = AWSAppSyncClient.builder()                              .context(context)                              .apiKey(new BasicAPIKeyAuthProvider(apiKey))                              .serverUrl(serverUrl)                              .region(region)                              .clientDatabasePrefix("API_KEY")                              .useClientDatabasePrefix(true)                              .build();
        CLIENTS[PRIVATE] = AWSAppSyncClient.builder()                            .context(context)                            .serverUrl(serverUrl)                            .region(region)                            .clientDatabasePrefix("AMAZON_COGNITO_USER_POOLS")                            .useClientDatabasePrefix(true)                            .cognitoUserPoolsAuthProvider(new CognitoUserPoolsAuthProvider() {                                        @Override                                        public String getLatestAuthToken() {                                            try {                                                String idToken = AWSMobileClient.getInstance().getTokens().getIdToken().getTokenString();                                                return idToken;                                            } catch (Exception e) {                                                e.printStackTrace();                                                return null;                                            }                                        }                                    })                            .build();    }}
Clear cache
Clears the data cached by the AWSAppSyncClient object on the local device.
try { awsAppSyncClient.clearCaches(); // clear the queries, mutations and Delta Sync} catch (AWSAppSyncClientException e) { e.printStackTrace();}Selectively clears cache based on ClearCacheOptions.
try { awsAppSyncClient.clearCaches( ClearCacheOptions.builder() .clearQueries() // clear the query cache .clearMutations() // clear the mutations queue .clearSubscriptions() // clear the subscriptions metadata stored for Delta Sync .build());} catch (AWSAppSyncClientException e) { e.printStackTrace();}Delta Sync
DeltaSync allows you to perform automatic synchronization with an AWS AppSync GraphQL server. The client will perform reconnection, exponential backoff, and retries when network errors take place for simplified data replication to devices. It does this by taking the results of a GraphQL query and caching it in the local Apollo cache. The DeltaSync API manages writes to the Apollo cache for you, and all rendering in your app (such as from React components, Angular bindings) should be done through a read-only fetch.
In the most basic form, you can use a single query with the API to replicate the state from the backend to the client. This is referred to as a "Base Query" and could be a list operation for a GraphQL type which might correspond to a DynamoDB table. For large tables where the content changes frequently and devices switch between offline and online frequently as well, pulling all changes for every network reconnect can result in poor performance on the client. In these cases you can provide the client API a second query called the "Delta Query" which can be merged into the cache. When you do this the Base Query is run an initial time to hydrate the cache with data, and on each network reconnect the Delta Query is run to just get the changed data. The Base Query is also run on a regular basis as a "catch-up" mechanism. By default this is every 24 hours however you can make it more or less frequent.
By allowing clients to separate the base hydration of the cache using one query and incremental updates in another query, you can move the computation from your client application to the backend. This is substantially more efficient on the clients when regularly switching between online and offline states. This could be implemented in your AWS AppSync backend in different ways such as using a DynamoDB Query on an index along with a conditional expression. You can also leverage Pipeline Resolvers to partition your records to have the delta responses come from a second table acting as a journal. A full sample with CloudFormation is available in the AppSync documentation. The rest of this documentation will focus on the client usage.
You can also use Delta Sync functionality with GraphQL subscriptions, taking advantage of both only sending changes to the clients when they switch network connectivity but also when they are online. In this case you can pass a third query called the "Subscription Query" which is a standard GraphQL subscription statement. When the device is connected, these are processed as normal and the client API simply helps make setting up realtime data easy. However, when the device transitions from offline to online, to account for high velocity writes the client will execute the resubscription along with synchronization and message processing in the following order:
- Subscribe to any queries defined and store results in an incoming queue
- Run the appropriate query (If
baseRefreshIntervalInSecondshas elapsed, run the Base Query otherwise only run the Delta Query) - Update the cache with results from the appropriate query
- Drain the subscription queue and continue processing as normal
Finally, you might have other queries which you wish to represent in your application other than the base cache hydration. For instance a getItem(id:ID) or other specific query. If your alternative query corresponds to items which are already in the normalized cache, you can point them at these cache entries with the cacheUpdates function which returns an array of queries and their variables. The DeltaSync client will then iterate through the items and populate a query entry for each item on your behalf. If you wish to use additional queries which don't correspond to items in your base query cache, you can always create another instance of the client.sync() process.
Usage
// Provides the ability to sync using a baseQuery, subscription, deltaQuery, and a refresh intervalCancelable handle = client.sync(baseQuery, baseQueryCallback,			  subscription, subscriptionCallback,			  deltaQuery, deltaQueryCallback,			  20 * 60);
//Stop DeltaSynchandle.cancel();
The method parameters
- baseQuery the base query to get the baseline state. (REQUIRED)
- baseQueryCallback callback to handle the baseQuery results. (REQUIRED)
- subscription subscription to get changes on the fly.
- subscriptionCallback callback to handle the subscription messages.
- deltaQuery the catch-up query
- deltaQueryCallback callback to handle the deltaQuery results.
- baseRefreshIntervalInSeconds time duration (specified in seconds) when the base query will be re-run to get an updated baseline state.
- returnValue returns a
Cancelableobject that can be used later to cancel the sync operation by calling thecancel()method.
Note that above only the baseQuery and baseQueryCallback are required parameters. You can call the API in different ways such as:
//Performs sync only with base queryclient.sync(baseQuery, baseQueryCallback, baseRefreshIntervalInSeconds)
//Performs sync with delta but no subscriptionsclient.sync(baseQuery, baseQueryCallback, deltaQuery, deltaQueryCallback,		baseRefreshIntervalInSeconds)
Example
The following section walks through the details of creating an app using Delta Sync. You will use a simple Posts App that has a view that displays a list of posts and keeps it synchronized using the Delta Sync functionality. You will use a Map object called allPosts to collect and manage the posts and a RecyclerView to power the UI.
Base Query and BaseQuery Callback In the Adapter object, create the BaseQuery and the BaseQuery Callback. You will use the listPosts query from the sample schema as your base query.
//Setup the BaseQuery - you will use the ListPostsQuery as your base queryQuery listPostsQuery = ListPostsQuery.builder().build();In the baseQueryCallback you will receive and process the results of listPosts. You will update the allPosts Map object with the query results and trigger the RecyclerView to refresh the contents of the view. The listPosts query cache will be automatically updated by the SDK.
GraphQLCall.Callback listPostsQueryCallback = new GraphQLCall.Callback<ListPostsQuery.Data>() {            @Override            public void onResponse(@Nonnull final Response<ListPostsQuery.Data> response) {                if (response == null  || response.data() == null ||                        response.data().listPosts() == null ||                        response.data().listPosts() == null ) {                    Log.d(TAG, "List Posts returned with no data");                    return;                }
                Log.d(TAG, "listPostsQuery returned data. Iterating over the data");                display.runOnUiThread(new Runnable() {                   @Override                   public void run() {                       for (ListPostsQuery.ListPost p: response.data().listPosts()) {                           //Populate the allPosts map with the posts returned by the query.                           //The allPosts map is used by the recycler view.
                           allPosts.put(p.id(), new ListPostsQuery.ListPost("Post",                                   p.id(), p.author(), p.title(), p.content(),                                   p.url(),p.ups(),p.downs(),                                   p.createdDate(),                                   p.aws_ds()));                       }                       //Trigger the view to refresh by calling notifyDataSetChanged method                       notifyDataSetChanged();                   }               });            }
            @Override            public void onFailure(@Nonnull ApolloException e) {                Log.e(TAG, "ListPostsQuery failed with [" + e.getLocalizedMessage() + "]");            }        };
Subscription and Subscription callback Next, you will create a subscription to get notified whenever a change (Add, Update or Delete) happens to a post.
//Setup Delta Post Subscription to get notified when a change //(add, update, delete) happens on a Post OnDeltaPostSubscription onDeltaPostSubscription = OnDeltaPostSubscription.builder().build();In the subscription callback, you will handle the change by adding, deleting or updating the allPosts Map object and trigger the RecyclerView to refresh the contents of the view. You will also add the logic to update the query cache for the listPosts query.
AppSyncSubscriptionCall.Callback onDeltaPostSubscriptionCallback =    new AppSyncSubscriptionCall.Callback<OnDeltaPostSubscription.Data>() {        @Override        public void onResponse(@Nonnull Response<OnDeltaPostSubscription.Data> response) {            Log.d(TAG, "Delta on a post received via subscription.");            if (response == null  || response.data() == null                    || response.data().onDeltaPost() == null ) {                Log.d(TAG, "Delta was null!");                return;            }
            Log.d(TAG, "Updating post to display");            final OnDeltaPostSubscription.OnDeltaPost p = response.data().onDeltaPost();
            display.runOnUiThread(new Runnable() {                @Override                public void run() {                    // Delete the Post if the aws_ds has the DELETE tag                    if ( DeltaAction.DELETE == p.aws_ds()) {                        allPosts.remove(p.id());                    }                    // Add/Update the post otherwise                    else {                        allPosts.put(p.id(), new ListPostsQuery.ListPost("Post",                                p.id(), p.author(), p.title(), p.content(),                                p.url(),p.ups(), p.downs(),                                p.createdDate(),                                p.aws_ds()));                    }
                    //Update the baseQuery Cache                    updateListPostsQueryCache();
                    //Trigger the view to refresh by calling notifyDataSetChanged method                    notifyDataSetChanged();                }            });        }
        @Override        public void onFailure(@Nonnull ApolloException e) {            Log.e(TAG, "Error " + e.getLocalizedMessage());        }
        @Override        public void onCompleted() {            Log.d(TAG, "Received onCompleted on subscription");        }    };
The updateListPostsQueryCache method will update the query cache of the listPosts query as shown below.
private void updateListPostsQueryCache() {        List<ListPostsQuery.ListPost> items = new ArrayList<>();        items.addAll(allPosts.values());
        ListPostsQuery.Data data = new ListPostsQuery.Data(items);        ClientFactory.getInstance(display.getApplicationContext()).getStore()                .write(listPostsQuery, data).enqueue(null);    }
Delta Query and Delta Query Callback Next you will setup the delta query. You will use the listPostsDelta query for the changes made to Posts. The SDK will keep track of when it was last run and will automatically pass in the appropriate value for lastSync to get the updates in an optimized manner.
//Setup the Delta Query to get changes to posts incrementally Query listPostsDeltaQuery = ListPostsDeltaQuery.builder().build();In the listPostsDeltaQueryCallback, you will add, update, delete the changed Posts in the allPosts Map object and trigger the RecyclerView to refresh the contents of the view. You will also add the logic to update the query cache for the listPosts query.
GraphQLCall.Callback listPostsDeltaQueryCallback = new GraphQLCall.Callback<ListPostsDeltaQuery.Data>() {            @Override            public void onResponse(@Nonnull final Response<ListPostsDeltaQuery.Data> response) {                if (response == null  || response.data() == null || response.data().listPostsDelta() == null ) {                    Log.d(TAG, "listPostsDelta returned with no data");                    return;                }
                //Add to the ListPostsQuery Cache                Log.d(TAG, "listPostsDelta returned data. Iterating...");                display.runOnUiThread(new Runnable() {                    @Override                    public void run() {                        for (ListPostsDeltaQuery.ListPostsDeltum p: response.data().listPostsDelta() ) {                            // Delete the Post if the aws_ds has the DELETE tag                            if ( DeltaAction.DELETE == p.aws_ds()) {                                allPosts.remove(p.id());                                continue;                            }
                            // Add or Update the post otherwise                            allPosts.put(p.id(), new ListPostsQuery.ListPost("Post",                                    p.id(), p.author(), p.title(), p.content(),                                    p.url(),p.ups(), p.downs(),                                    p.createdDate(),                                    p.aws_ds()));                        }
                        //Update the baseQuery Cache                        updateListPostsQueryCache();
                        //Trigger the view to refresh by calling notifyDataSetChanged method                        notifyDataSetChanged();                    }                });            }
            @Override            public void onFailure(@Nonnull ApolloException e) {                Log.e(TAG, "listPostsDelta Query failed with [" + e.getLocalizedMessage() + "]");            }        };
Tying it all together Once you have all of these pieces in place, you will tie it all together by invoking the Delta Sync functionality as follows.
Cancelable handle = client.sync(listPostsQuery, listPostsQueryCallback, onCreatePostSubscription, onCreatePostCallback, listPostsDeltaQuery, listPostsDeltaQueryCallback, 20 * 60 );Delta Sync Lifecycle The delta sync process runs at various times, in response to different conditions:
- Runs immediately, when you make the call to
syncas shown above. This will be the initial run and it will execute the baseQuery, setup the subscription and execute the delta Query. - Runs when the device that is running the app transitions from offline to online. Depending on the duration for which the device was offline ( i.e., >
baseRefreshIntervalInSeconds), either the deltaQuery or the baseQuery will be run. - Runs when the app transitions from background to foreground. Once again, depending on how long the app was in the background, either the deltaQuery or the baseQuery will be run. To enable this, add the
AWSAppSyncAppLifecycleObserverto the ProcessLifeCycle owner in theonCreatemethod of your main view as follows:
import android.arch.lifecycle.ProcessLifecycleOwner;	import com.amazonaws.mobileconnectors.appsync.AWSAppSyncAppLifecycleObserver;
	...	...
ProcessLifecycleOwner.get().getLifecycle(). addObserver(new AWSAppSyncAppLifecycleObserver());- Runs once every
baseRefreshIntervalInSecondsas part of a periodic catch-up.