---
title: "External identity providers"
section: "build-a-backend/auth/concepts"
platforms: ["android", "angular", "flutter", "javascript", "nextjs", "react", "react-native", "swift", "vue"]
gen: 2
last-updated: "2026-03-25T17:40:00.000Z"
url: "https://docs.amplify.aws/react/build-a-backend/auth/concepts/external-identity-providers/"
---
Before you configure external sign-in with Amplify Auth you will need to set up your developer account with each provider you are using.
**Note:** Amazon Cognito provides first class support for Facebook Login, Google Sign-In, Login with Amazon, and Sign in with Apple for seamless setup. However you can configure other Identity Providers that support SAML or OpenID Connect (OIDC).
> **Warning:** **Warning:** When configuring external sign-in it's important to exercise caution when designating attributes as "required." Different external identity providers have varied scopes in terms of the information they respond back to Cognito with. User pool attributes that are initially set up as "required" cannot be changed later, and may require you to migrate the users or create a new user pool.
#### [Facebook Login]
1. Create a [developer account with Facebook](https://developers.facebook.com/docs/facebook-login).
2. [Sign in](https://developers.facebook.com/) with your Facebook credentials.
3. Choose _My Apps_ from the top navigation bar, and on the page that loads choose _Create App_. 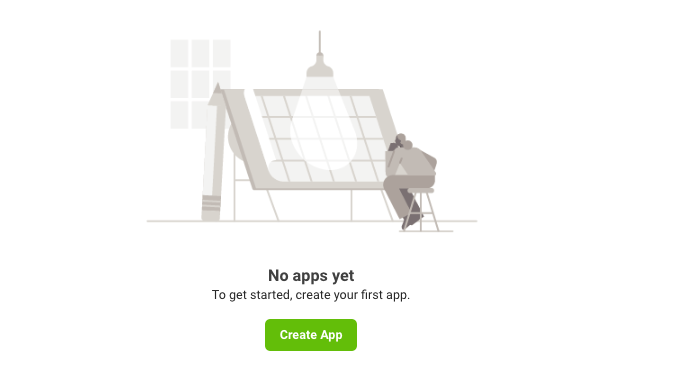
4. For your use case, choose _Set up Facebook Login_. 
5. For platform, choose _Website_ and select _No, I'm not building a game_.
6. Give your Facebook app a name and choose _Create app_. 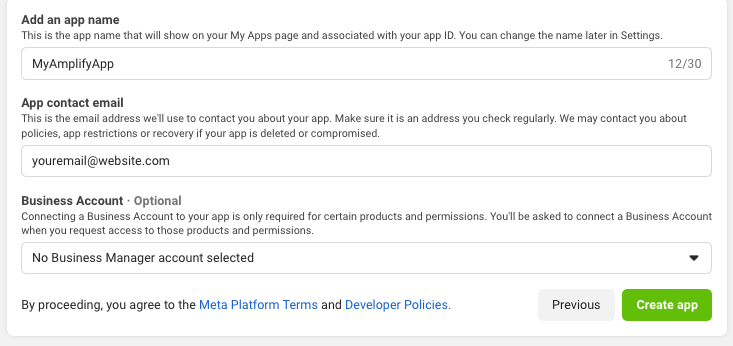
7. On the left navigation bar, choose _Settings_ and then _Basic_. 
8. Note the _App ID_ and the _App Secret_. You will use them in the next section in the CLI flow.
#### [Google Sign-In]
1. Go to [Google developer console](https://console.developers.google.com).
2. Click _Select a project_. 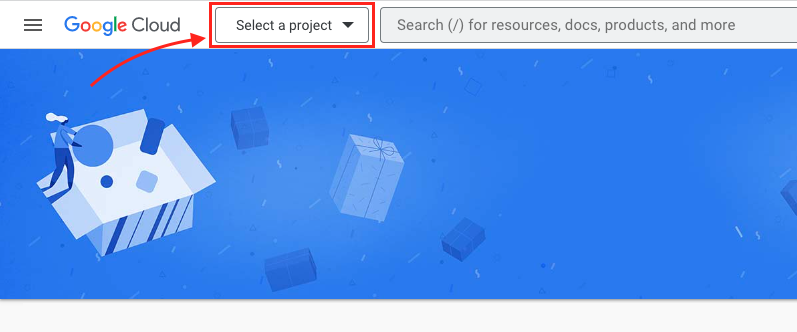
3. Click _NEW PROJECT_. 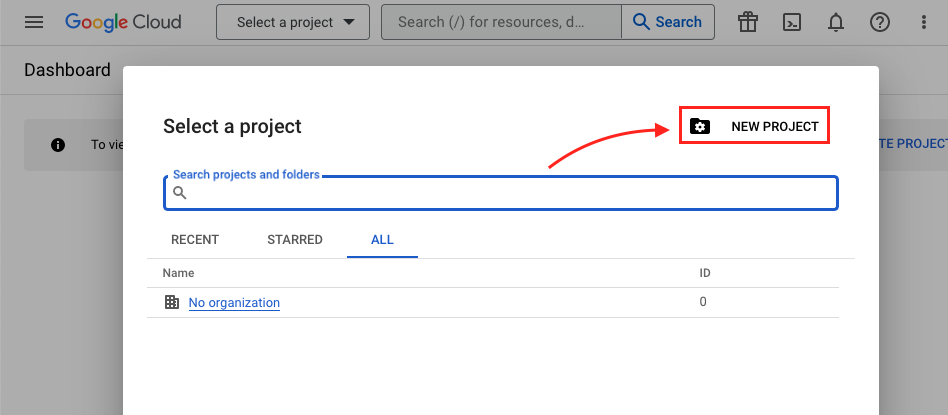
4. Type in project name and click _CREATE_. 
5. Once the project is created, from the left navigation menu, select _APIs & Services_, then select _Credentials_. 
6. Click _CONFIGURE CONSENT SCREEN_. 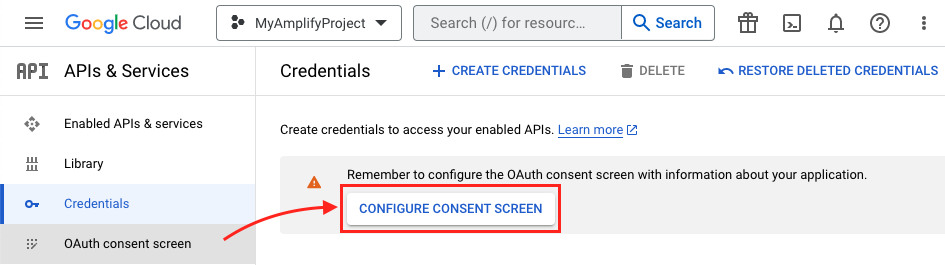
7. Click _CREATE_. 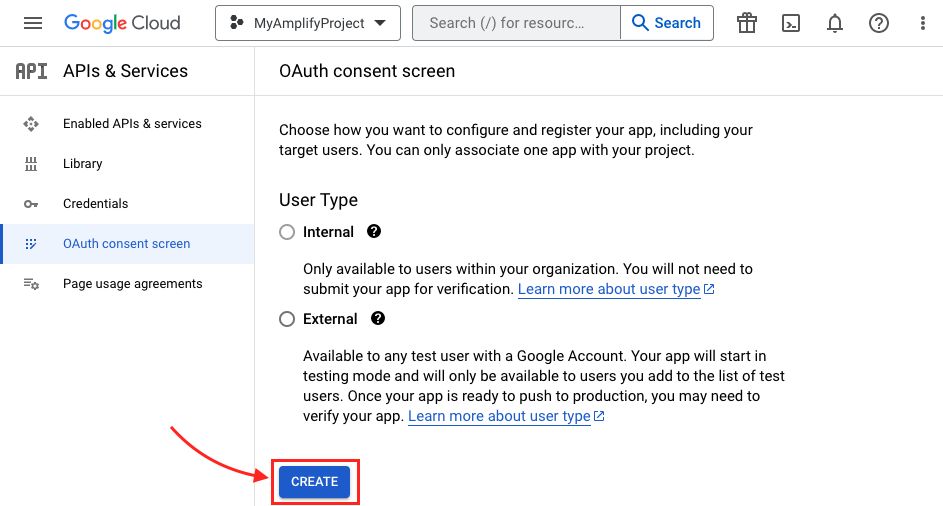
8. Type in _App Information_ and _Developer contact information_ which are required fields and click _SAVE AND CONTINUE_ three times (OAuth consent screen -> Scopes -> Test Users) to finish setting up the consent screen.
9. Back under the _Credentials_ tab, Create your OAuth2.0 credentials by choosing _OAuth client ID_ from the _Create credentials_ drop-down list. .
10. Choose _Web application_ as _Application type_ and name your OAuth Client.
11. Click _Create_.
12. Take note of _Your client ID_ and _Your Client Secret_. You will need them for the next section in the CLI flow.
13. Choose _OK_.
#### [Login with Amazon]
1. Create a [developer account with Amazon](https://developer.amazon.com/login-with-amazon).
2. [Sign in](https://developer.amazon.com/loginwithamazon/console/site/lwa/overview.html) with your Amazon credentials.
3. You need to create an Amazon security profile to receive the Amazon Client ID and Client Secret. Choose _Create a Security Profile_. 
4. Type in a _Security Profile Name_, a _Security Profile Description_, and a _Consent Privacy Notice URL_. 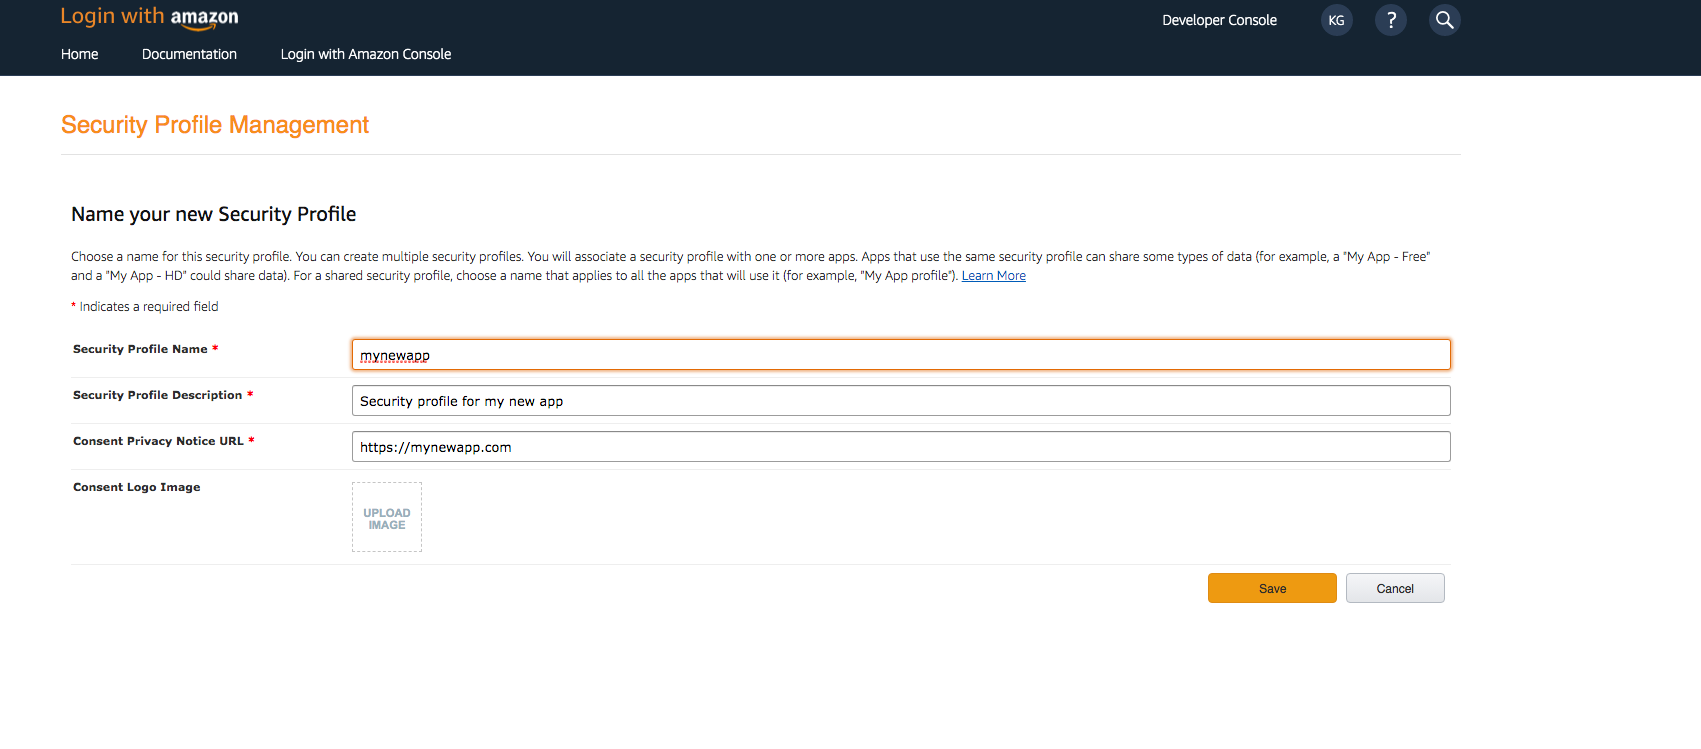
5. Choose _Save_.
6. Choose _Show Client ID_ and _Client Secret_ to show the client ID and secret. You will need them for the next section in the CLI flow. 
#### [Sign in with Apple]
1. [Sign In](https://developer.apple.com/account/) with your Apple developer credentials.
2. On the main developer portal page, select _Certificates, IDs, & Profiles_.
3. On the left navigation bar, select _Identifier_.
4. On the _Identifiers_ page, select the _plus icon (+)_.
5. On the _Register a New Identifier_ page, select _App IDs_.
6. On the _Register an App ID_ page, under _App ID Prefix_, take note of the _Team ID_ value.
7. Provide a description in the _Description_ text box and provide the `bundleID` of the iOS app. 
8. Under _Capabilities_, select _Sign in with Apple_.
9. Select _Continue_, review the configuration, and then select _Register_.
10. On the _Identifiers_ page, on the right, select _App IDs_, and then select _Services ID_.
11. Select the _plus icon (+)_ and, on the _Register a New Identifier_ page, select _Services IDs_.
12. Provide a description in the _Description_ text box and provide an identifier for the Service ID. 
13. Select _Continue_ and register the Service ID.
Your developer accounts with the external providers are now set up and you can return to the Amplify specific configuration.
## Configure external sign-in backend
In `amplify/auth/resource.ts` the external providers need to be added.
The following is an example of how you would set up access to all of the external providers supported by Amplify Auth. Please note you will need to configure your `callbackUrls` and `logoutUrls` URLs for your application, which will inform your backend resources how to behave when initiating sign in and sign out operations in your app.
Secrets must be created manually with [`ampx sandbox secret`](/[platform]/reference/cli-commands#npx-ampx-sandbox-secret) for use with cloud sandbox, or via the Amplify Console for branch environments.
```ts title="amplify/auth/resource.ts"
import { defineAuth, secret } from '@aws-amplify/backend';
export const auth = defineAuth({
loginWith: {
email: true,
externalProviders: {
google: {
clientId: secret('GOOGLE_CLIENT_ID'),
clientSecret: secret('GOOGLE_CLIENT_SECRET')
},
signInWithApple: {
clientId: secret('SIWA_CLIENT_ID'),
keyId: secret('SIWA_KEY_ID'),
privateKey: secret('SIWA_PRIVATE_KEY'),
teamId: secret('SIWA_TEAM_ID')
},
loginWithAmazon: {
clientId: secret('LOGINWITHAMAZON_CLIENT_ID'),
clientSecret: secret('LOGINWITHAMAZON_CLIENT_SECRET')
},
facebook: {
clientId: secret('FACEBOOK_CLIENT_ID'),
clientSecret: secret('FACEBOOK_CLIENT_SECRET')
},
callbackUrls: [
'http://localhost:3000/profile',
'https://mywebsite.com/profile'
],
logoutUrls: ['http://localhost:3000/', 'https://mywebsite.com'],
}
}
});
```
```ts title="amplify/auth/resource.ts"
import { defineAuth, secret } from '@aws-amplify/backend';
export const auth = defineAuth({
loginWith: {
email: true,
externalProviders: {
google: {
clientId: secret('GOOGLE_CLIENT_ID'),
clientSecret: secret('GOOGLE_CLIENT_SECRET')
},
signInWithApple: {
clientId: secret('SIWA_CLIENT_ID'),
keyId: secret('SIWA_KEY_ID'),
privateKey: secret('SIWA_PRIVATE_KEY'),
teamId: secret('SIWA_TEAM_ID')
},
loginWithAmazon: {
clientId: secret('LOGINWITHAMAZON_CLIENT_ID'),
clientSecret: secret('LOGINWITHAMAZON_CLIENT_SECRET')
},
facebook: {
clientId: secret('FACEBOOK_CLIENT_ID'),
clientSecret: secret('FACEBOOK_CLIENT_SECRET')
},
callbackUrls: ["myapp://callback/"],
logoutUrls: ["myapp://signout/"],
}
}
});
```
You need to now inform your external provider of the newly configured authentication resource and its OAuth redirect URI:
#### [Facebook Login]
1. [Sign In](https://developers.facebook.com/) to your Facebook developer account with your Facebook credentials.
2. Choose _My Apps_ from the top navigation bar, and on the _Apps_ page, choose your app you created before.
3. On the left navigation bar, choose _Products_. Add _Facebook Login_ if it isn't already added.
4. If already added, choose _Settings_ under the _Configure_ dropdown. 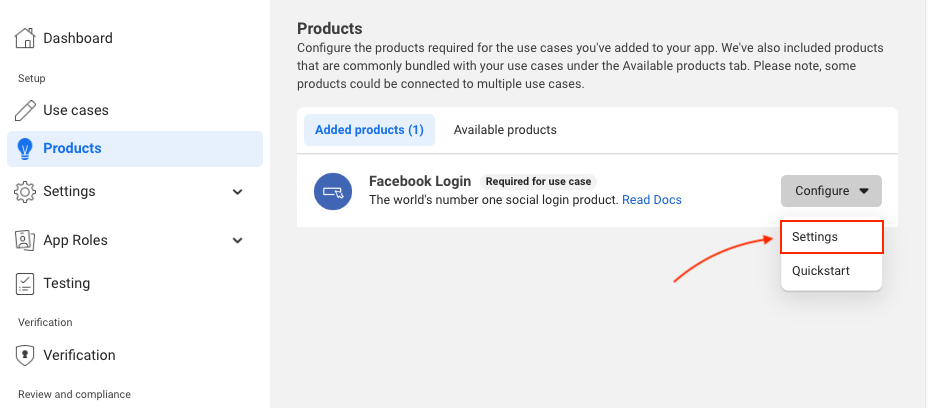
5. Under _Valid OAuth Redirect URIs_ type your user pool domain with the `/oauth2/idpresponse` endpoint.
`https:///oauth2/idpresponse`

6. Save your changes.
#### [Google Sign-In]
1. Go to the [Google developer console](https://console.developers.google.com).
2. On the left navigation bar, look for _APIs and Services_ under _Pinned_ or under _More Products_ if not pinned.
3. Within the _APIs and Services_ sub menu, choose _Credentials_.
4. Select the client you created in the first step and click the _Edit_ button.
5. Type your user pool domain into the _Authorized JavaScript origins_ form.
6. Type your user pool domain with the `/oauth2/idpresponse` endpoint into _Authorized Redirect URIs_.

Note: If you saw an error message `Invalid Redirect: domain must be added to the authorized domains list before submitting.` when adding the endpoint, please go to the _Authorized Domains List_ and add the domain.
7. Click _Save_.
#### [Login with Amazon]
1. [Sign in](https://developer.amazon.com/loginwithamazon/console/site/lwa/overview.html) with your Amazon credentials.
2. Hover over the gear and choose _Web Settings_ associated with the security profile you created in the previous step, and then choose _Edit_. 
3. Type your user pool domain into _Allowed Origins_ and type your user pool domain with the `/oauth2/idpresponse` endpoint into _Allowed Return URLs_. 
4. Choose _Save_.
#### [Sign in with Apple]
1. [Sign In](https://developer.apple.com/account/) with your Apple developer credentials.
2. On the main developer portal page, select _Certificates, IDs, & Profiles_.
3. On the left navigation bar, select _Identifiers_ and then select _Service IDs_ from the drop down list on the right.
4. Select the Service ID created when you set up your auth provider as outlined in the section above.
5. Enable _Sign In with Apple_ and select _Configure_.
6. Under _Primary App ID_ select the App ID that was created before.
7. Type your user pool domain into _Domains and Subdomains_.
8. Type your user pool domain with the `/oauth2/idpresponse` endpoint into _Return URLs_. 
9. Click _Next_, review the information, then select _Done_.
10. On _Edit your Services ID Configuration_ click _Continue_, review the information, then select _Save_.
11. On the main _Certificates, Identifiers & Profiles_, select _Keys_.
12. On the _Keys_ page, select the _plus icon (+)_.
13. Provide a name for the key under _Key Name_.
14. Enable _Sign in with Apple_ and select _Configure_. 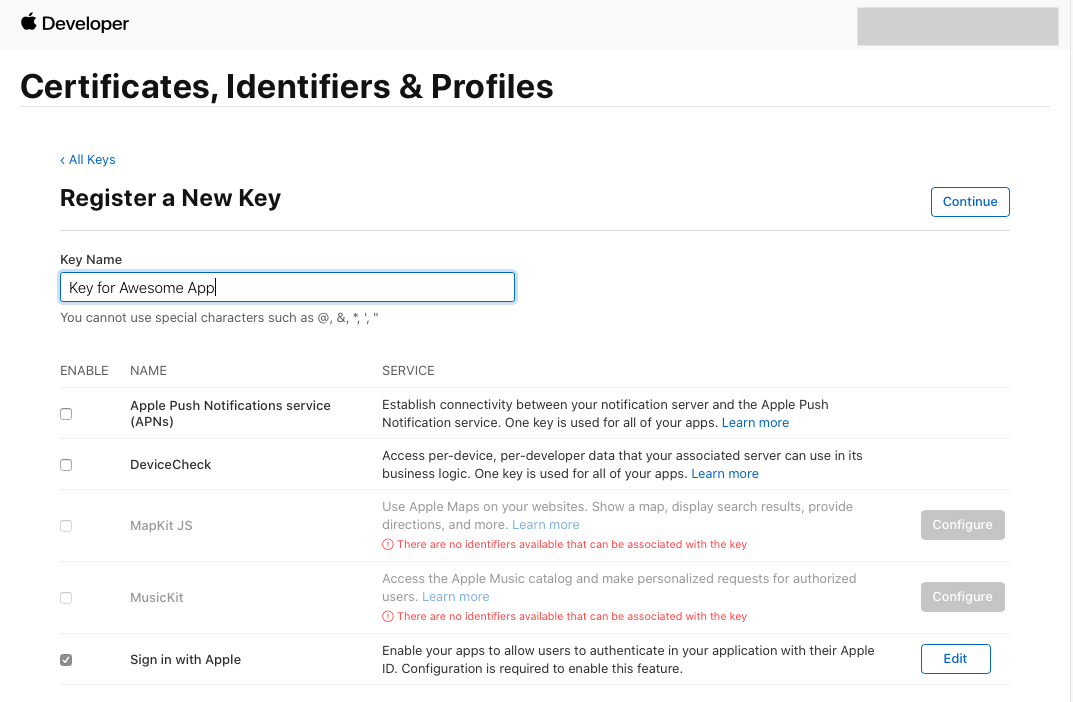
15. Under _Primary App ID_ select the App ID that was created before.
16. Click on _Save_.
17. On _Register a New Key_ click _Continue_, review the information, then select _Register_.
18. You will be redirected to a new page. Take note of the _Key ID_ and download the .p8 file containing the private key. 
[Learn more about using social identity providers with user pool](https://docs.aws.amazon.com/cognito/latest/developerguide/cognito-user-pools-social-idp.html)
### Customizing scopes for retrieving user data from external providers
You can determine the pieces of data you want to retrieve from each external provider when setting them up in the `amplify/auth/resource.ts` file using `scopes`.
```ts title="amplify/auth/resource.ts"
import { defineAuth } from '@aws-amplify/backend';
export const auth = defineAuth({
loginWith: {
email: true,
externalProviders: {
loginWithAmazon: {
clientId: secret('LOGINWITHAMAZON_CLIENT_ID'),
clientSecret: secret('LOGINWITHAMAZON_CLIENT_SECRET'),
// highlight-next-line
scopes: ['profile']
},
callbackUrls: [
'http://localhost:3000/profile',
'https://mywebsite.com/profile'
],
logoutUrls: ['http://localhost:3000/', 'https://mywebsite.com'],
}
}
});
```
```ts title="amplify/auth/resource.ts"
import { defineAuth } from '@aws-amplify/backend';
export const auth = defineAuth({
loginWith: {
email: true,
externalProviders: {
loginWithAmazon: {
clientId: secret('LOGINWITHAMAZON_CLIENT_ID'),
clientSecret: secret('LOGINWITHAMAZON_CLIENT_SECRET'),
// highlight-next-line
scopes: ['email']
},
callbackUrls: ["myapp://callback/"],
logoutUrls: ["myapp://signout/"],
}
}
});
```
### Attribute mapping
Identity provider (IdP) services store user attributes in different formats. When using external IdPs with Amazon Cognito user pools, attribute mapping allows you to standardize these varying formats into a consistent schema.
Learn more about [mapping IdP attributes to user pool profiles and tokens](https://docs.aws.amazon.com/cognito/latest/developerguide/cognito-user-pools-specifying-attribute-mapping.html).
> **Warning:** **Note:** When a federated user signs in to your application, a mapping must be present for each attribute that your user pool requires. Additionally, you must also ensure that the target of each attribute mapping is mutable. Amazon Cognito will attempt to update each mapped attribute when a user signs in regardless of whether the latest value already matches the existing information. If these criteria are not met, Amazon Cognito will return an error and the sign in attempt will fail.
```ts title="amplify/auth/resource.ts"
import { defineAuth } from '@aws-amplify/backend';
export const auth = defineAuth({
loginWith: {
email: true,
externalProviders: {
loginWithAmazon: {
clientId: secret('LOGINWITHAMAZON_CLIENT_ID'),
clientSecret: secret('LOGINWITHAMAZON_CLIENT_SECRET'),
// highlight-start
attributeMapping: {
email: 'email'
}
// highlight-end
},
callbackUrls: [
'http://localhost:3000/profile',
'https://mywebsite.com/profile'
],
logoutUrls: ['http://localhost:3000/', 'https://mywebsite.com'],
}
}
});
```
```ts title="amplify/auth/resource.ts"
import { defineAuth } from '@aws-amplify/backend';
export const auth = defineAuth({
loginWith: {
email: true,
externalProviders: {
loginWithAmazon: {
clientId: secret('LOGINWITHAMAZON_CLIENT_ID'),
clientSecret: secret('LOGINWITHAMAZON_CLIENT_SECRET'),
// highlight-start
attributeMapping: {
email: 'email'
}
// highlight-end
},
callbackUrls: ["myapp://callback/"],
logoutUrls: ["myapp://signout/"],
}
}
});
```
[Learn more about configuring the React Authenticator component for external providers](https://ui.docs.amplify.aws/react/connected-components/authenticator/configuration#external-providers)
## Configure OIDC provider
To setup a OIDC provider, you can configure them in your `amplify/auth/resource.ts` file. For example, if you would like to setup a Microsoft EntraID provider, you can do so as follows:
```ts title="amplify/auth/resource.ts"
import { defineAuth, secret } from '@aws-amplify/backend';
export const auth = defineAuth({
loginWith: {
email: true,
externalProviders: {
oidc: [
{
name: 'MicrosoftEntraID',
clientId: secret('MICROSOFT_ENTRA_ID_CLIENT_ID'),
clientSecret: secret('MICROSOFT_ENTRA_ID_CLIENT_SECRET'),
issuerUrl: '',
},
],
logoutUrls: ['http://localhost:3000/', 'https://mywebsite.com'],
callbackUrls: [
'http://localhost:3000/profile',
'https://mywebsite.com/profile',
],
},
},
});
```
```ts title="amplify/auth/resource.ts"
import { defineAuth, secret } from '@aws-amplify/backend';
export const auth = defineAuth({
loginWith: {
email: true,
externalProviders: {
oidc: [
{
name: 'MicrosoftEntraID',
clientId: secret('MICROSOFT_ENTRA_ID_CLIENT_ID'),
clientSecret: secret('MICROSOFT_ENTRA_ID_CLIENT_SECRET'),
issuerUrl: '',
},
],
callbackUrls: ["myapp://callback/"],
logoutUrls: ["myapp://signout/"],
},
},
});
```
Use the `signInWithRedirect` API to initiate sign-in with an OIDC identity provider.
```ts title="src/my-client-side-js.js"
import { signInWithRedirect } from 'aws-amplify/auth';
await signInWithRedirect({
provider: {
custom: 'MicrosoftEntraID'
}
});
```
## Configure SAML provider
To setup a SAML provider, you can configure them in your `amplify/auth/resource.ts` file. For example, if you would like to setup a Microsoft EntraID provider, you can do so as follows:
```ts title="amplify/auth/resource.ts"
import { defineAuth } from '@aws-amplify/backend';
export const auth = defineAuth({
loginWith: {
email: true,
externalProviders: {
saml: {
name: 'MicrosoftEntraIDSAML',
metadata: {
metadataContent: '', // or content of the metadata file
metadataType: 'URL', // or 'FILE'
},
},
logoutUrls: ['http://localhost:3000/', 'https://mywebsite.com'],
callbackUrls: [
'http://localhost:3000/profile',
'https://mywebsite.com/profile',
],
},
},
});
```
```ts title="amplify/auth/resource.ts"
import { defineAuth } from '@aws-amplify/backend';
export const auth = defineAuth({
loginWith: {
email: true,
externalProviders: {
saml: {
name: 'MicrosoftEntraIDSAML',
metadata: {
metadataContent: '', // or content of the metadata file
metadataType: 'URL', // or 'FILE'
},
},
callbackUrls: ["myapp://callback/"],
logoutUrls: ["myapp://signout/"],
},
},
});
```
Use the `signInWithRedirect` API to initiate sign-in with a SAML identity provider.
```ts title="src/my-client-side-js.js"
import { signInWithRedirect } from 'aws-amplify/auth';
await signInWithRedirect({
provider: {
custom: 'MicrosoftEntraIDSAML'
}
});
```
## Set up your frontend
> **Info:** If you are using the [Authenticator component](https://ui.docs.amplify.aws/react/connected-components/authenticator/configuration#external-providers) with Amplify, this feature works without any additional code. The guide below is for writing your own implementation.
Use the `signInWithRedirect` API to initiate sign-in with an external identity provider.
```ts title="src/my-client-side-js.js"
import { signInWithRedirect } from 'aws-amplify/auth';
await signInWithRedirect({
provider: 'Apple'
});
```
### Redirect URLs
_Sign in_ & _Sign out_ redirect URL(s) are used to redirect end users after the sign in or sign out operation has occurred. You may want to specify multiple URLs for various use-cases such as having different URLs for development/ production or redirect users to an intermediate URL before returning them to the app.
#### Specifying a redirect URL on sign out
If you have multiple sign out redirect URLs configured, you may choose to override the default behavior of selecting a redirect URL and provide the one of your choosing when calling `signOut`. The provided redirect URL should match at least one of the configured redirect URLs. If no redirect URL is provided to `signOut`, one will be selected based on the current app domain.
```ts
import { Amplify } from 'aws-amplify';
import { signOut } from 'aws-amplify/auth';
// Assuming the following URLS were provided manually or via the Amplify configuration file,
// redirectSignOut: 'http://localhost:3000/,https://authProvider/logout?logout_uri=https://mywebsite.com/'
signOut({
global: false,
oauth: {
redirectUrl: 'https://authProvider/logout?logout_uri=https://mywebsite.com/'
}
});
```
### (Required for Multi-Page Applications) Complete external Sign In after Redirect
If you are developing a multi-page application, and the redirected page is not the same page that initiated the sign in, you will need to add the following code to the redirected page to ensure the sign in gets completed:
```ts title="src/my-redirected-page.ts"
import 'aws-amplify/auth/enable-oauth-listener';
import { getCurrentUser, fetchUserAttributes } from 'aws-amplify/auth';
import { Hub } from 'aws-amplify/utils';
Hub.listen("auth", async ({ payload }) => {
switch (payload.event) {
case "signInWithRedirect":
const user = await getCurrentUser();
const userAttributes = await fetchUserAttributes();
console.log({user, userAttributes});
break;
case "signInWithRedirect_failure":
// handle sign in failure
break;
case "customOAuthState":
const state = payload.data; // this will be customState provided on signInWithRedirect function
console.log(state);
break;
}
});
```
**Note:** The listener only works on the client side in the context of a SSR-enabled project, so ensure to import the listener on the client side only. For example, in a Next.js project, you should add the above import statement to a component that renders on the client side only by `'use client'`.
When you import and use the `signInWithRedirect` function, it will add a listener as a side effect that will complete the external sign in when an end user is redirected back to your app. This works well in a single-page application but in a multi-page application, you might get redirected to a page that doesn't include the listener that was originally added as a side-effect. Hence you must include the specific OAuth listener on your login success page.
## Set up your frontend
> **Info:** If you are using the [Authenticator component](https://ui.docs.amplify.aws/react/connected-components/authenticator/configuration#external-providers) with Amplify, this feature works without any additional code. The guide below is for writing your own implementation.
Use the `signInWithRedirect` API to initiate sign-in with an external identity provider.
```ts title="src/my-client-side-js.js"
import { signInWithRedirect } from 'aws-amplify/auth';
signInWithRedirect({
provider: 'Apple'
});
```
### Redirect URLs
_Sign in_ & _Sign out_ redirect URL(s) are used to redirect end users after the sign in or sign out operation has occurred. You may want to specify multiple URLs for various use-cases such as having different URLs for development/ production or redirect users to an intermediate URL before returning them to the app.
#### Specifying a redirect URL on sign out
If you have multiple sign out redirect URLs configured, you may choose to override the default behavior of selecting a redirect URL and provide the one of your choosing when calling `signOut`. The provided redirect URL should match at least one of the configured redirect URLs. If no redirect URL is provided to `signOut`, the first item from the the configured redirect URLs list that does not contain a HTTP nor HTTPS prefix will be picked.
```ts
import { signOut } from 'aws-amplify/auth';
// Assuming the following URLS were provided manually or via the Amplify configuration file,
// redirectSignOut: 'myDevApp://,https://authProvider/logout?logout_uri=myDevApp://'
signOut({
global: false,
oauth: {
redirectUrl: 'https://authProvider/logout?logout_uri=myapp://'
}
});
```
Irrespective of whether a `redirectUrl` is provided to `signOut`, a URL that does not contain http or https is expected to be present in the configured redirect URL list. This is because iOS requires an appScheme when creating the web session.
## Next steps
- [Learn how to sign in with external providers](/[platform]/frontend/auth/sign-in/#sign-in-with-an-external-identity-provider)